Introduction to SyncDNA
Welcome to the official SyncDNA documentation. This guide will help you get started with SyncDNA, understand its features, and learn how to use it effectively for remote collaboration in post-production.
What is SyncDNA?
SyncDNA is a real-time remote collaboration software for film, TV, and music post-production. It enables creative professionals to work together seamlessly across different global locations, providing frame and sample accurate synchronization that overcomes internet latency issues.
Key Features
- Frame & Sample Accurate Sync: Maintains perfect synchronization over variable internet connections
- High-Quality Media Support: Supports up to 4K video and 9.1.6 audio at 24-bit/96kHz
- Industry-Standard Integration: Works seamlessly with your DAW, NLE systems, and SDI hardware
- Real-Time Collaboration: Built-in video conferencing with time-stamped marker dropping
- Secure & Encrypted: All transmissions are encrypted for maximum security
- Instant Guest Access: Collaborators can join sessions instantly without creating accounts
Who Uses SyncDNA?
SyncDNA is designed for post-production professionals including:
- Directors
- Editors
- Sound designers
- Colorists
- Producers
- Post-production teams
Use Cases
- Film & TV Post-Production: Remote review sessions and approvals
- Music Production: Real-time collaboration on mixing and mastering
- Remote Editing: Work with teams across different locations
- Immersive Audio: Develop spatial audio projects with remote teams
How to Use This Documentation
- Start with the Getting Started guide to set up SyncDNA
- Refer to the User Guide for day-to-day usage instructions
- Check the Plugins section to integrate SyncDNA with your DAW or NLE
Let's get started with synchronized remote collaboration!
Getting Started with SyncDNA
This guide will walk you through the initial setup and configuration of SyncDNA to help you get started quickly.
Prerequisites
Before you begin, ensure you have:
- A compatible device running macOS.
- At least 5GB of free storage space, for the application and any media that might be stored during review sessions.
- A stable internet connection.
Installation
See the Installation page for detailed instructions on installing SyncDNA on your specific platform.
Initial Configuration
- Launch SyncDNA: Open the application after installation
- Create an Account: Sign up for a new account or log in with existing credentials
Next Steps
If you subscribed an Organization already, then you can create a Project, Session, and start a Live Meeting.
If you've been invited as a guest to another Organization's session, then you'll be able to join once a Live Meeting has been started by an Organization's Studio member. In the meantime, you can setup your Audio Profile and Video Profile.
Installation
System Requirements
- macOS 11.1+ for Apple Silicon (M1/M2/M3)
- macOS 10.15+ for Intel processors
- At least 5GB of free storage space
- A stable internet connection
Download
Download the installer from the SyncDNA Console:
https://console.syncdna.com/downloads
Installation Steps
- Once downloaded, locate the
.pkgfile in your Downloads folder - Double-click the
.pkgfile to launch the installer
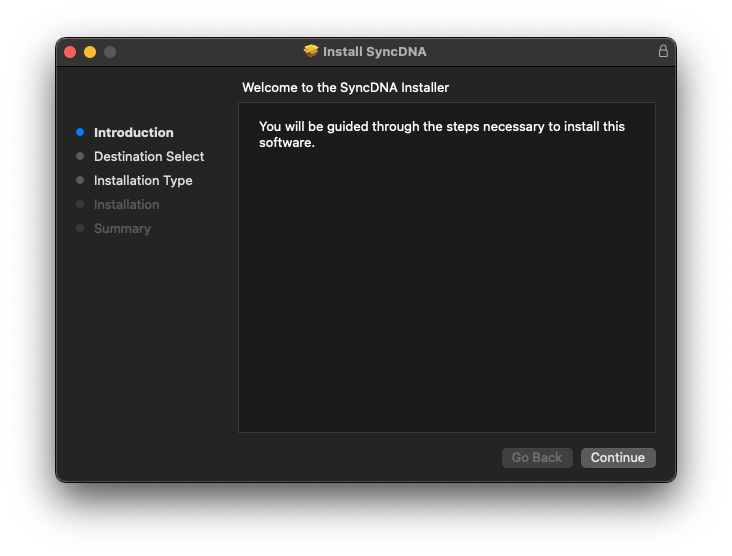
- Follow the on-screen instructions in the installer
- When prompted, enter your system password to authorize the installation
- The installer will complete the setup, installing both the SyncDNA application and DAW plugins
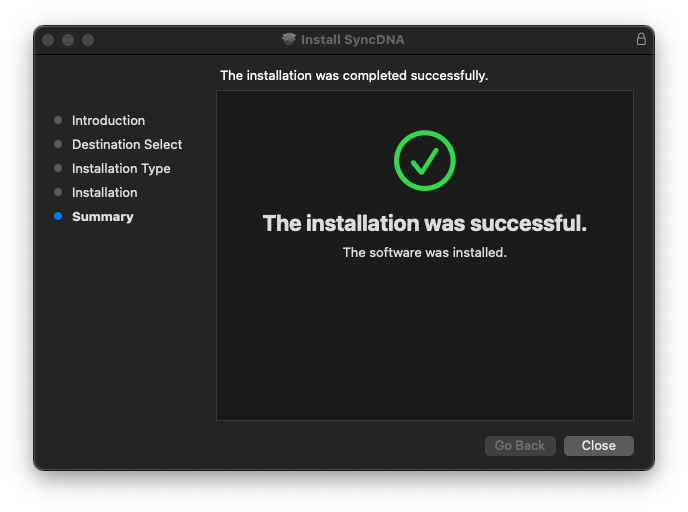
Once installation is complete, you'll have access to:
- The SyncDNA application
- DAW plugins for your music production software
Next Steps
Now that you've installed SyncDNA, head over to the Getting Started guide to launch the application and set up your account.
Basic Usage
This guide covers the fundamental concepts and workflows for using SyncDNA effectively.
Understanding Projects and Sessions
SyncDNA organizes your work using a hierarchical structure:
- Projects are the top-level containers that organize related work
- Sessions exist within projects and represent individual collaboration instances
This structure allows you to:
- Keep related sessions organized together
- Manage permissions at the project level
- Maintain a clear overview of all your collaborative work
Creating Your First Project
To start using SyncDNA, you need to create a project:
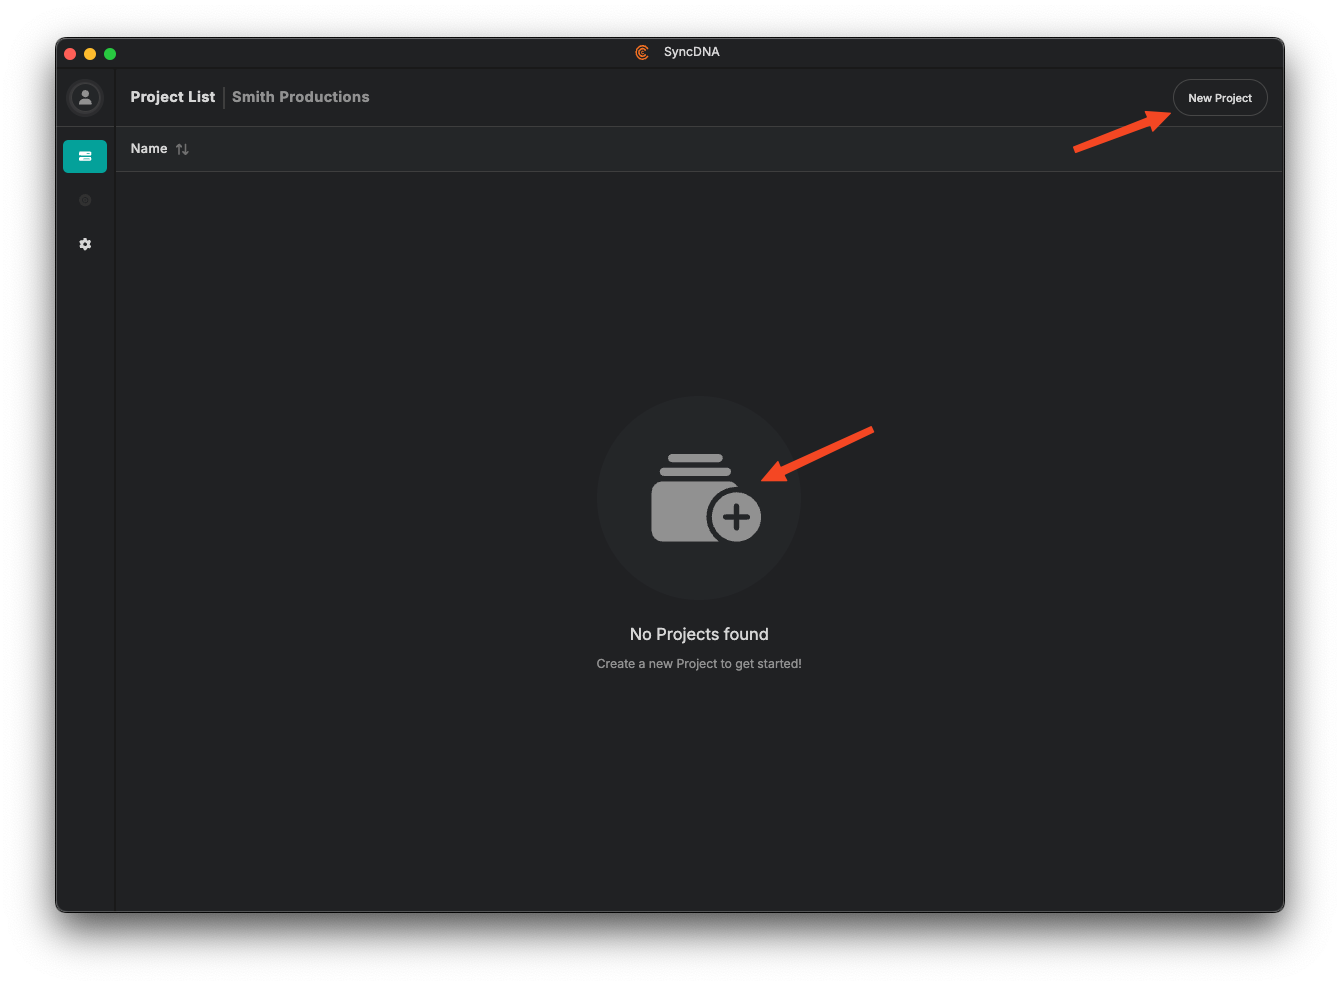
Click the "New Project" button in the main interface
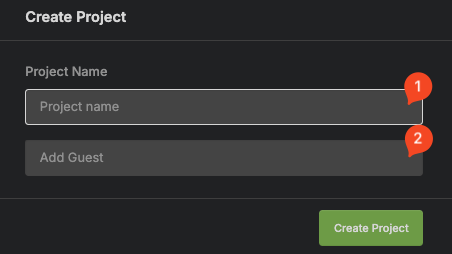
- Enter a descriptive name for your project.
- Add project collaborators (you can do that later on session level as well).
Your new project will appear in the project list, ready to host collaboration sessions.
Creating Sessions
Within a project, you can create multiple sessions for different collaboration needs:
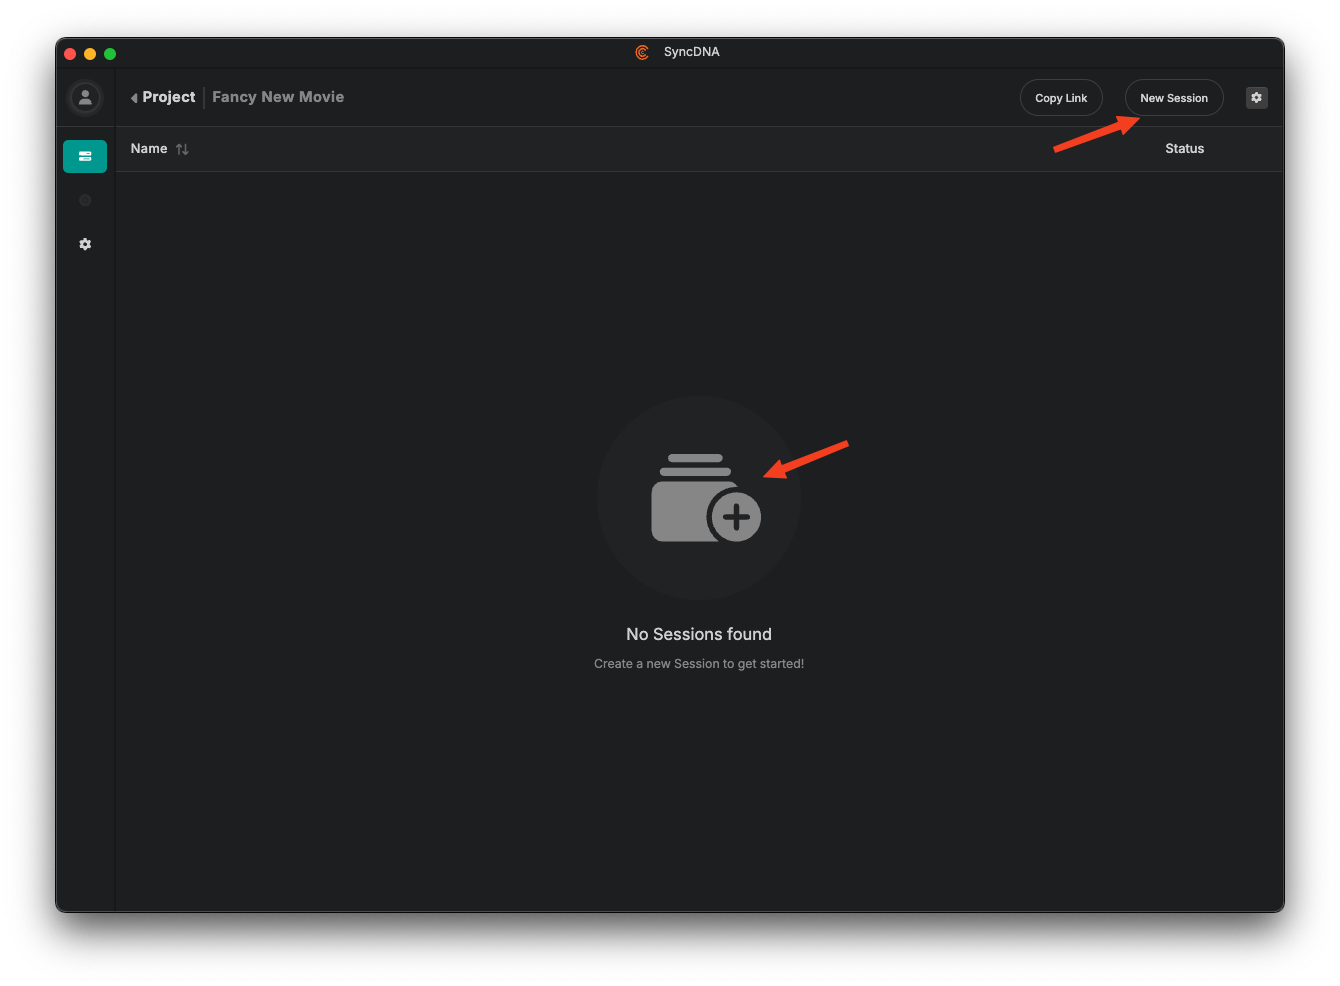
- Open your project by clicking on it
- Click the "New Session" button

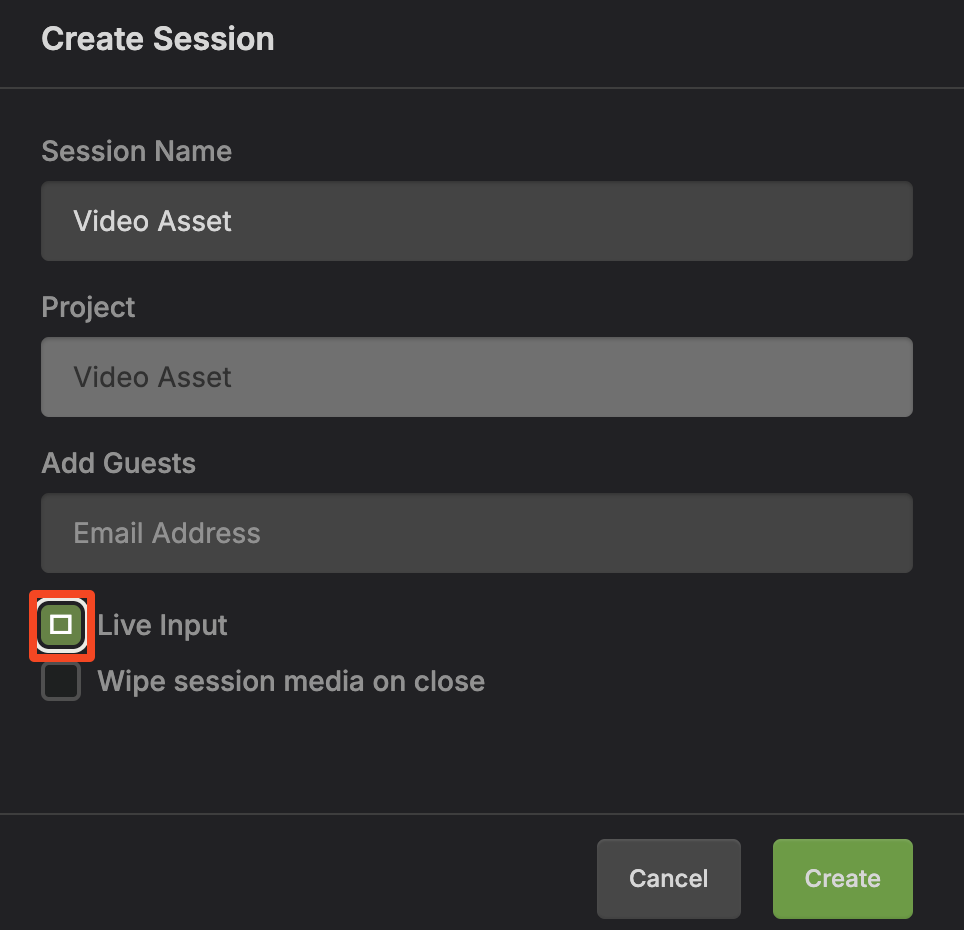
- Enter a descriptive name for your session.
- Add guests that will be able to join live meetings.
- If you want use a video input device, you can enable live input. The requires a configured video input device.
- Enable "Wipe session media on close" to automatically clear all cached media data for guests when they leave a live meeting.
Session Workflow
Once you've created a session, the typical workflow includes:
- Connect your DAW/NLE - Add the SyncDNA plugin to link your production software
- Configure audio routing - Set up Transmit plugins for audio channels
- Invite collaborators - Share the session link with team members
- Begin collaboration - Start playback, communicate via video conference, and drop markers
Managing Multiple Sessions
Within a single project, you can maintain multiple sessions for:
- Different versions of the same content
- Separate review stages (rough cut, fine cut, final)
- Different aspects of production (video, audio, color)
- Various client or stakeholder groups
This flexibility allows you to compartmentalize feedback and maintain organized workflows throughout the post-production process.
Next Steps
Now that you understand the basic structure:
- Learn about session modes for different collaboration scenarios
- Configure session settings for your specific needs
- Set up plugins to connect your DAW or NLE
- Configure audio/video devices
Inviting Users to Your Organization
This guide explains how to invite users to your SyncDNA organization, manage their permissions, and ensure they can effectively participate in your sessions.
Prerequisites
Before inviting users, ensure you have:
- Organization admin or owner privileges
- Active subscription for your organization
- User email addresses for the people you want to invite
How to Invite Users
You can add existing SyncDNA users, or invite new users to your Organization and sessions from both the standalone SyncDNA app, or from our console.
From the app, while on the dashboard, from the New Session or Edit Session modals:
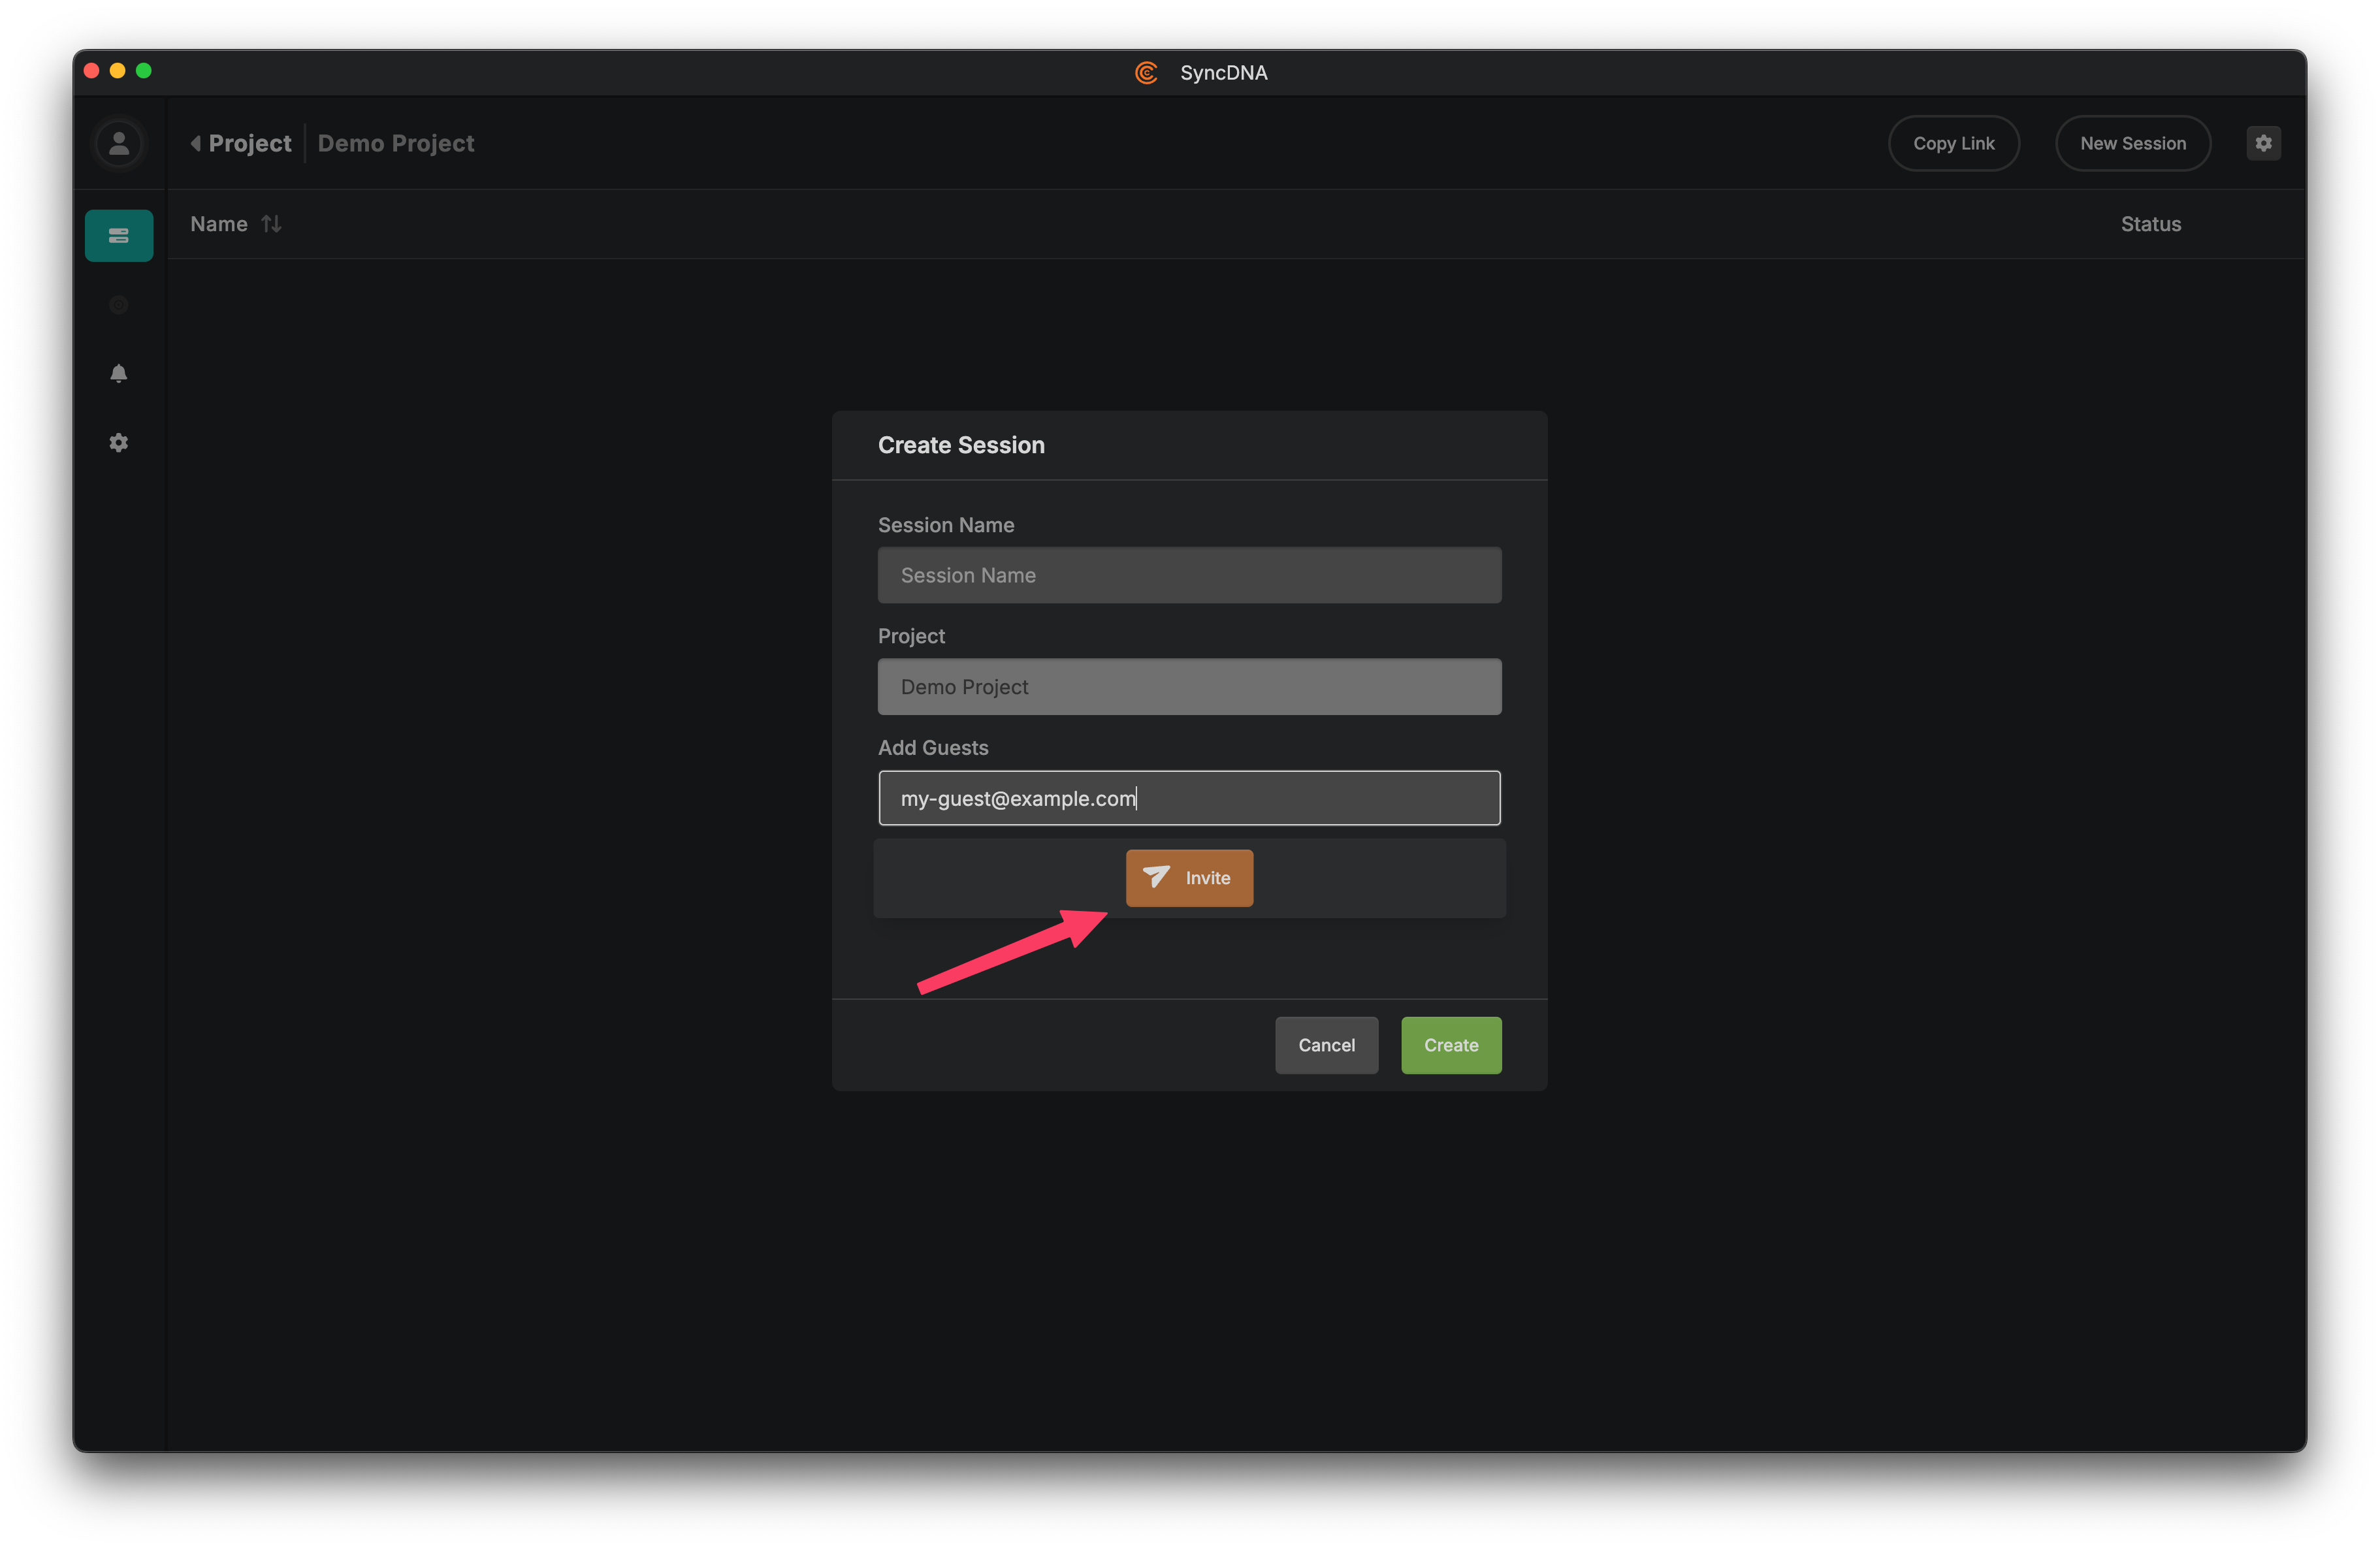
This is the most typical flow, and results in the user being added to your Organization as a Guest, as well as your Project and Session.
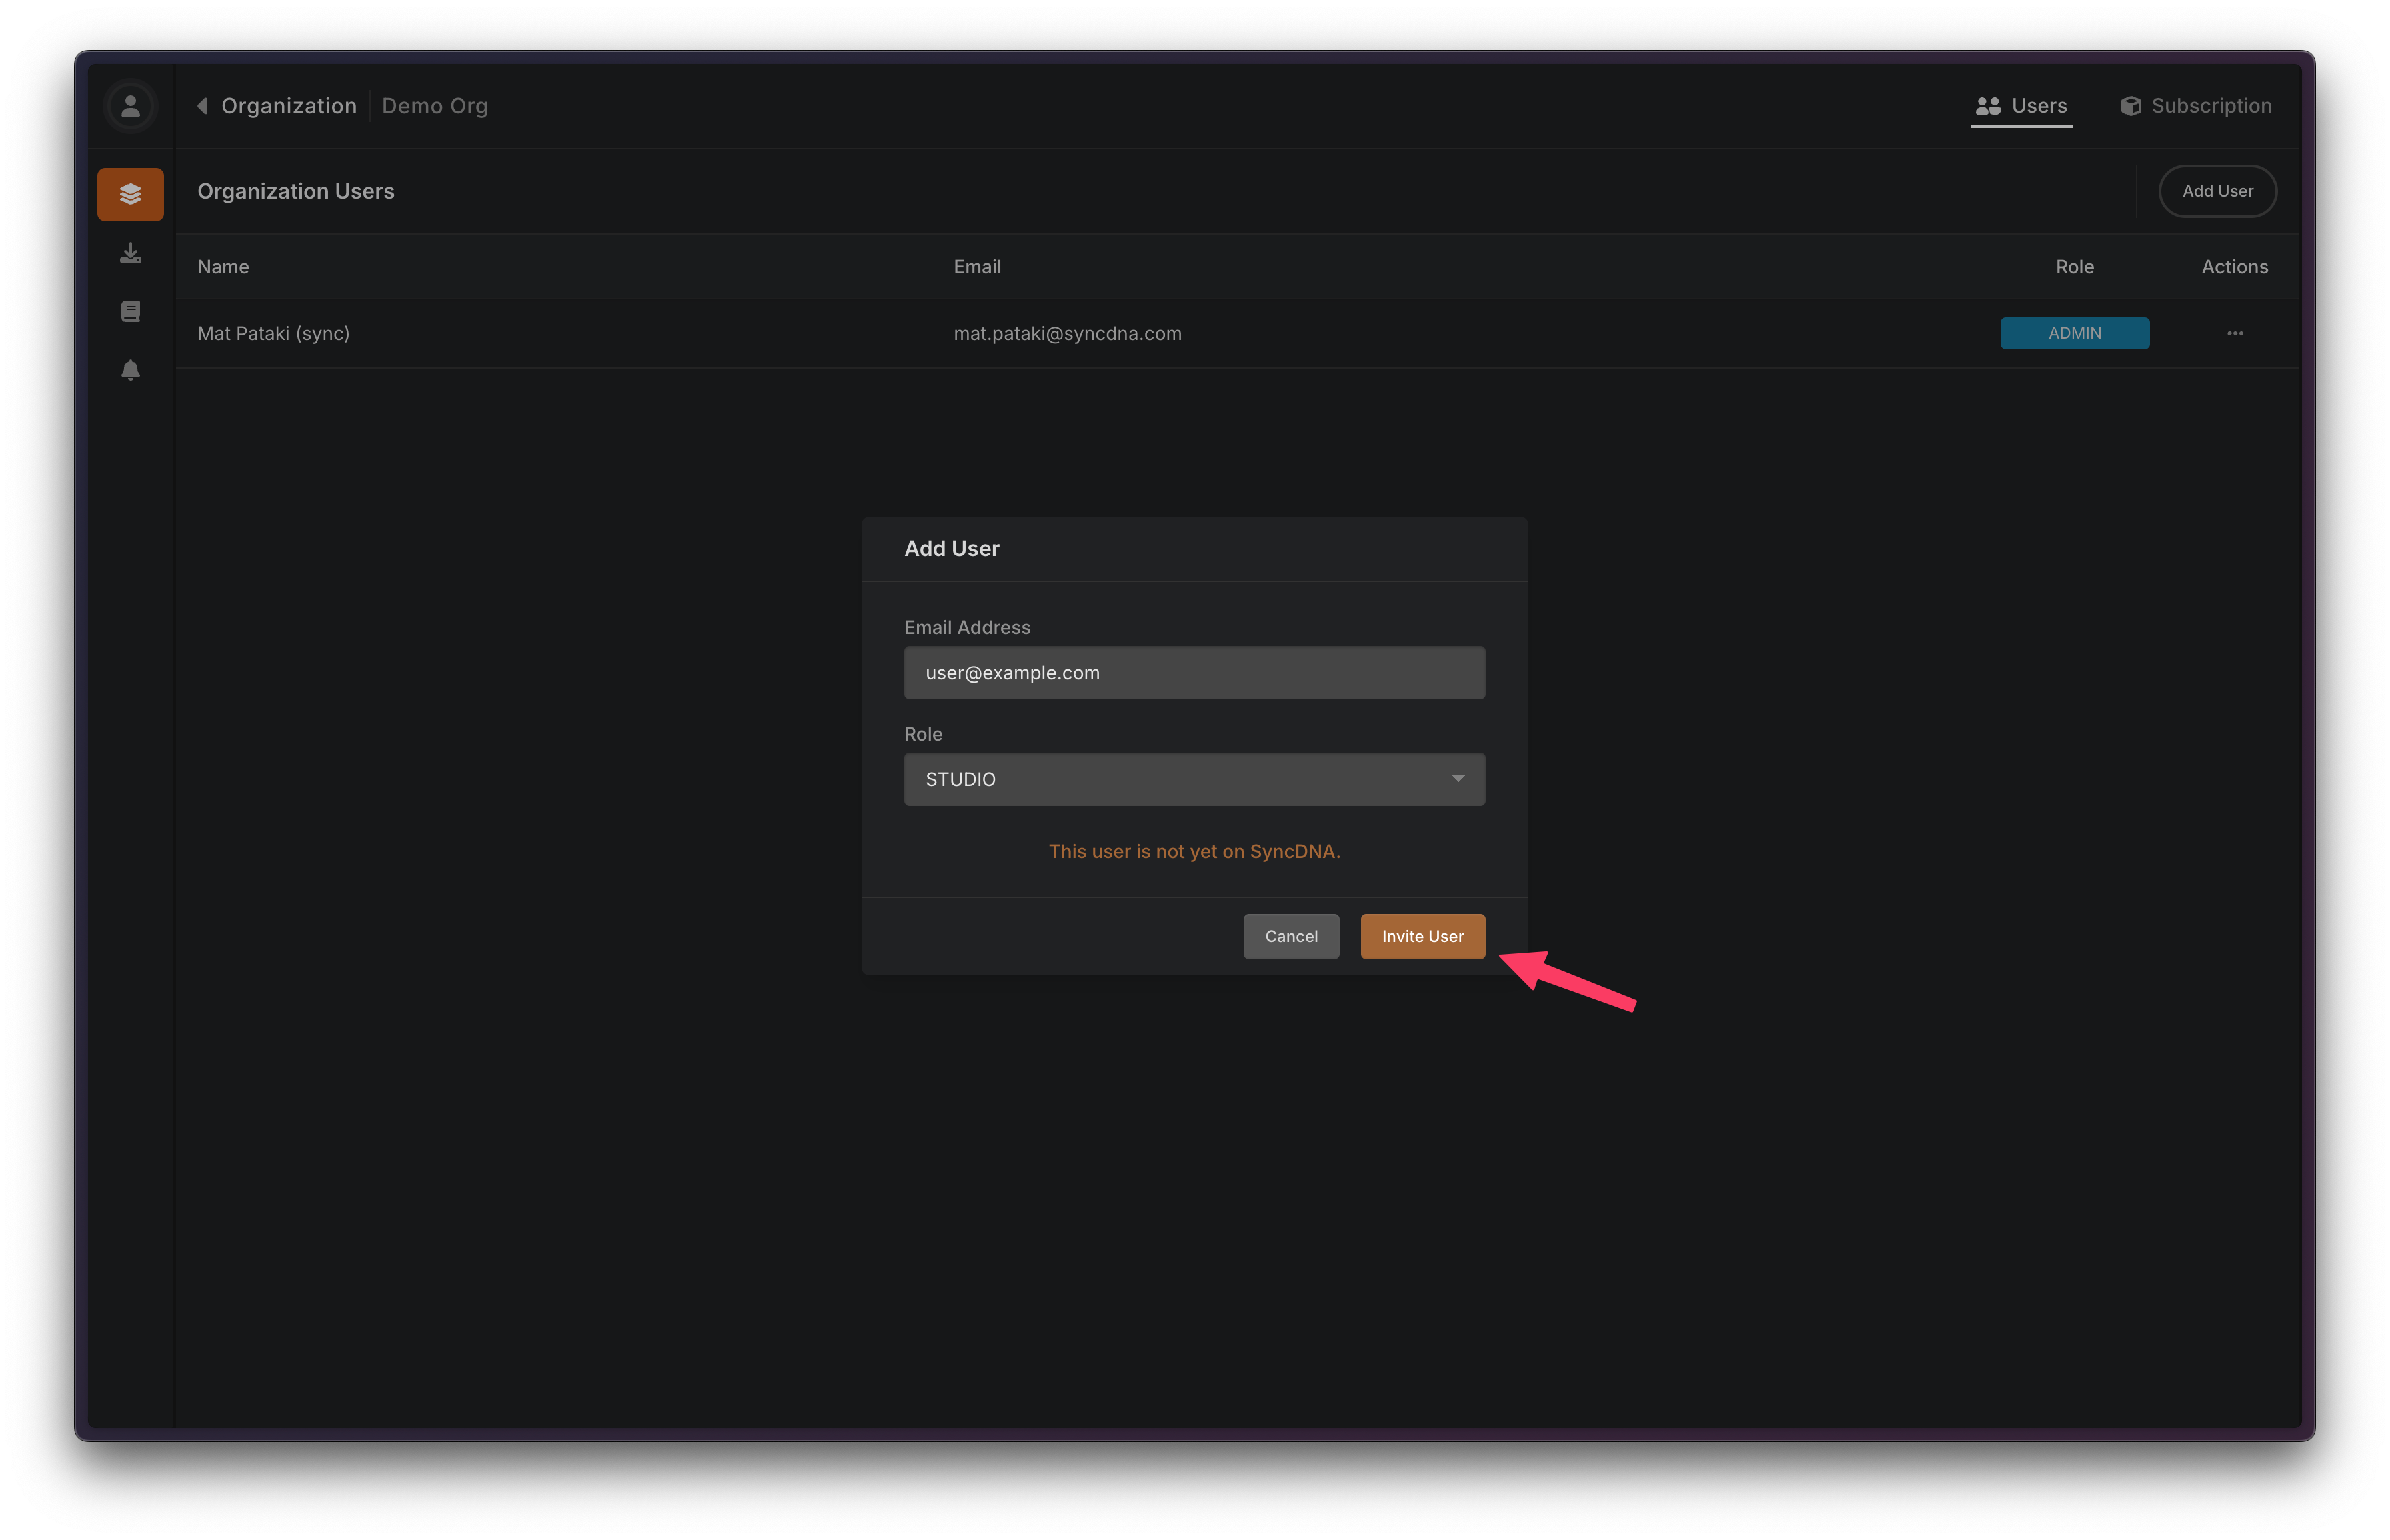
As an Admin of your Organization, you can also add users to your Organization through the SyncDNA Console. Through this flow, you can choose the new user's role in your Organization:
- Guest: Allows them to participate in Sessions
- Studio: Allows them to run Sessions
- Admin: Allows them to manage the Organization itself, including billing, user membership, etc.
Invited User Experience
When you invite a new user to your Organization who is joining SyncDNA for the first time, they will be provisioned a full User on the platform immediately. This means that you can add them to several sessions, designate and change their role in the Organization, etc, just as you can any other user.
The invited user will receive an email with a download link for the app, and a "Launch Project" button.
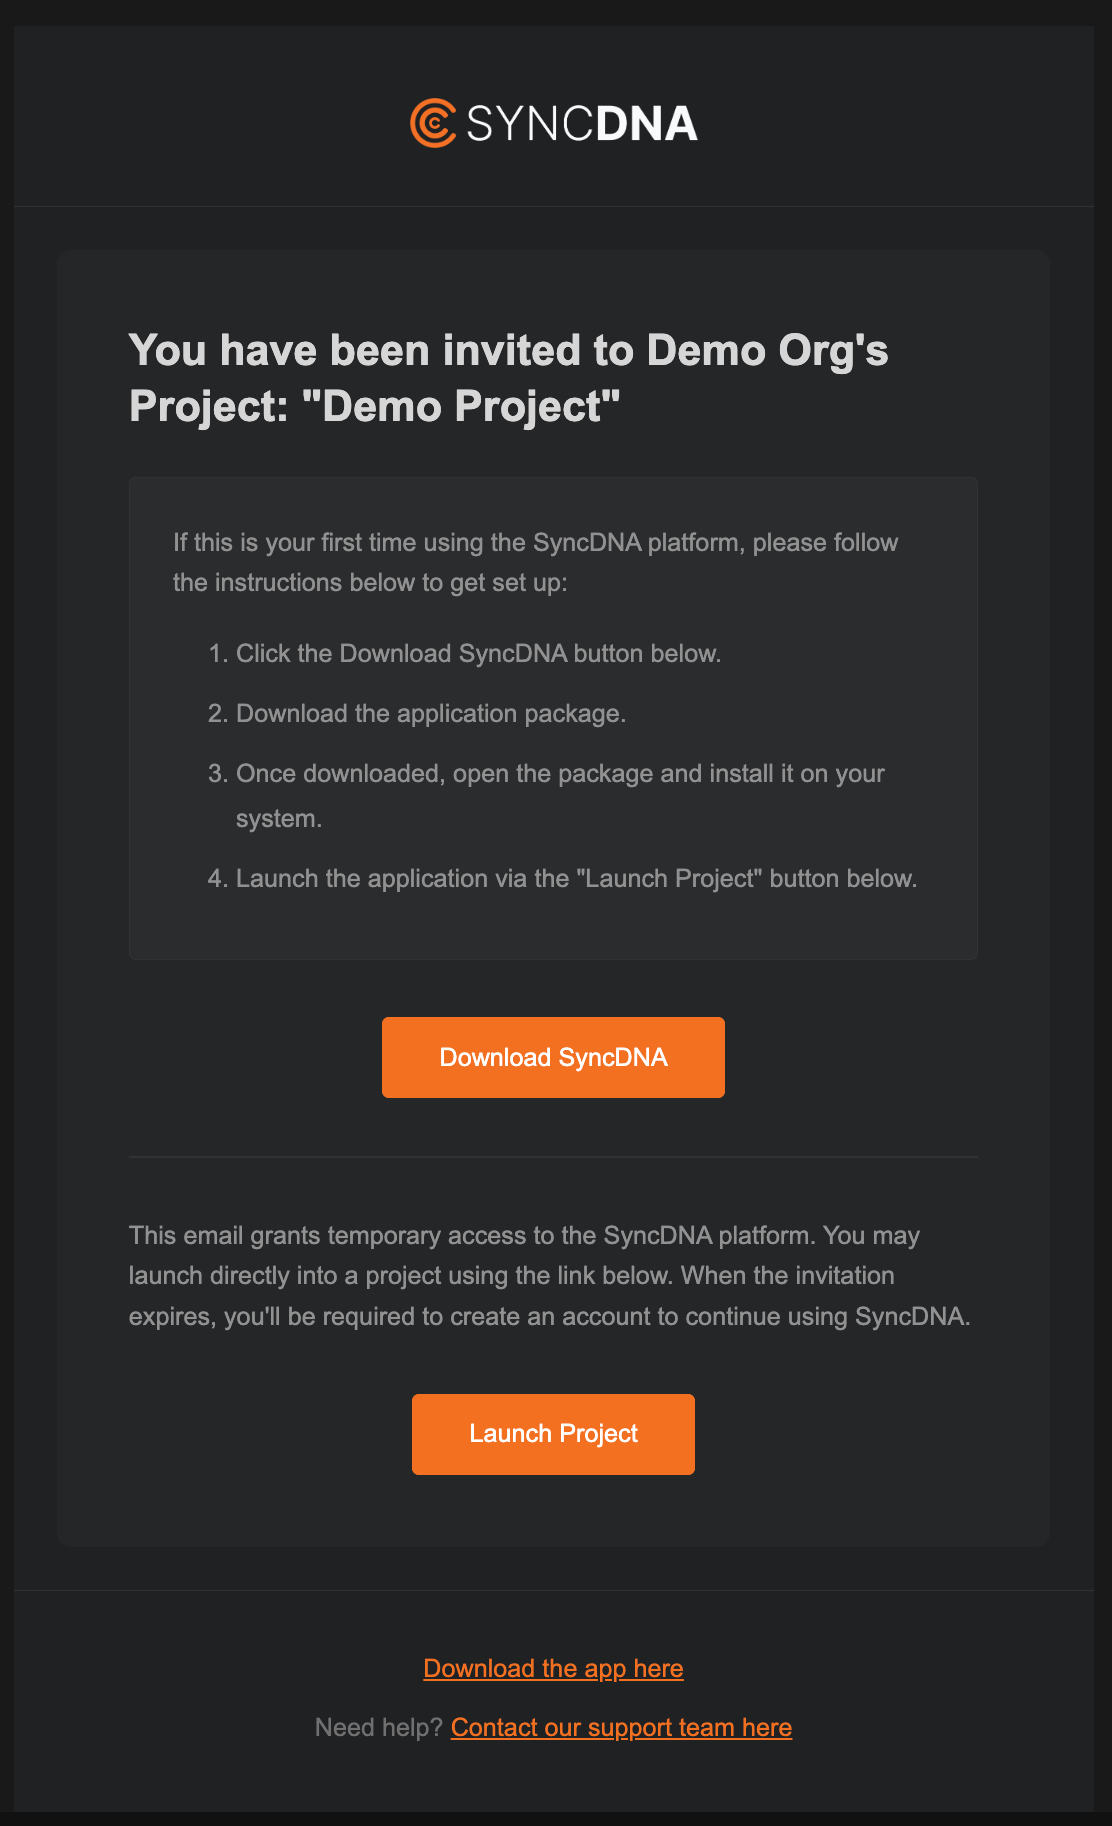
This "Launch Project" button fast-tracks the user straight into your project, allowing them to skip account registration where they would otherwise set up a password and user profile. If your project has an ongoing Live Meeting, it will also immediately allow them to join.
This is the best way to get new users onto the platform with minimal friction.
Once the user launches the app using your invite, they will be sent an email to set a password and fill out their profile with a name, etc. They should do this eventually to secure their account, however the invite will continue to work as a login method.
Troubleshooting
Common Issues
User didn't receive invitation email
- Check spam/junk folders
- Verify email address is correct
- Resend the invitation
User can't join sessions
- Ensure they've launched the app from the invite email, as this effectively accepts the invitation
- Verify a Studio member has started the Live Meeting
- Check their audio/video profile configuration
Next Steps
After inviting users:
- Help them complete their Audio Profile setup if they have a more involved studio setup that they plan on listening through.
- Review Session Settings for optimal collaboration
- Explore Workflows for your specific use case
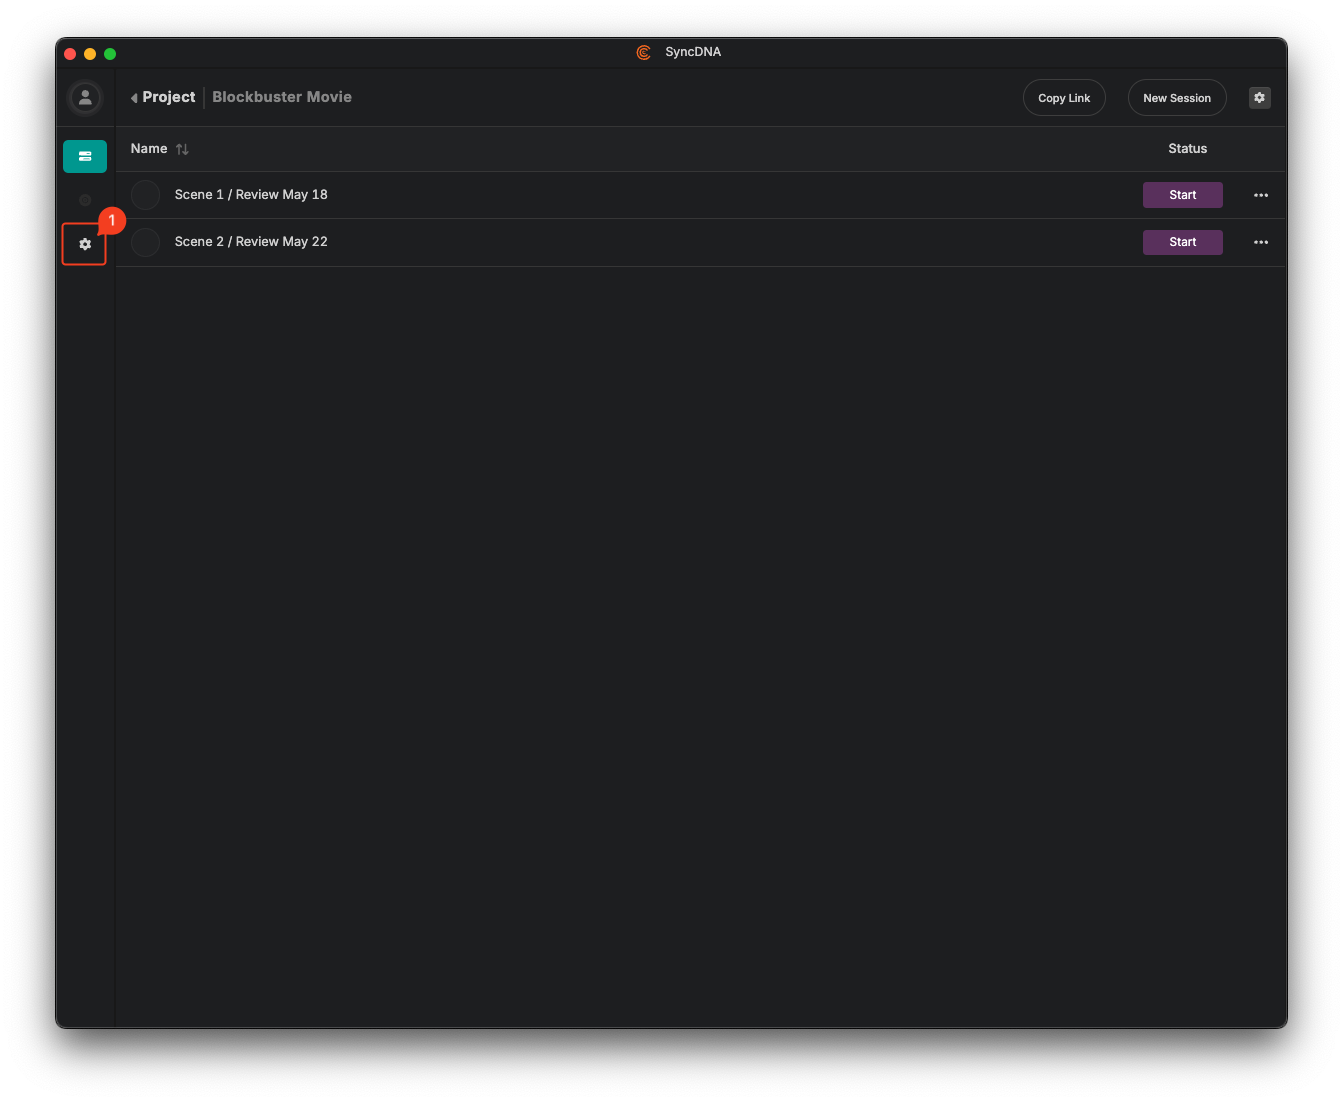
App Settings
To open the application settings you have to click on the settings cog (1) on the navbar.
Meeting Settings
The meeting settings let you configure the audio and video devices you want to use in video conferences.
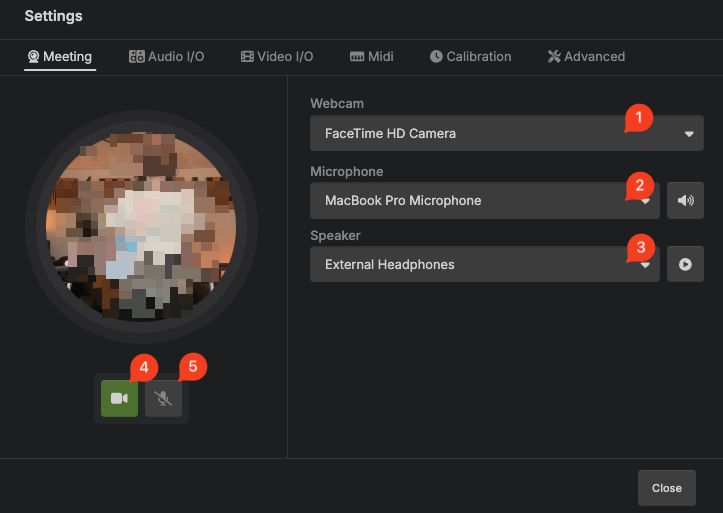
- Select your webcam
- Select the input device
- Select your output device
- Camera mute
- Microphone mute
Audio Settings
In the audio settings you can configure the audio hardware to use for a review session. Your system audio device will be used if you do not create a profile.
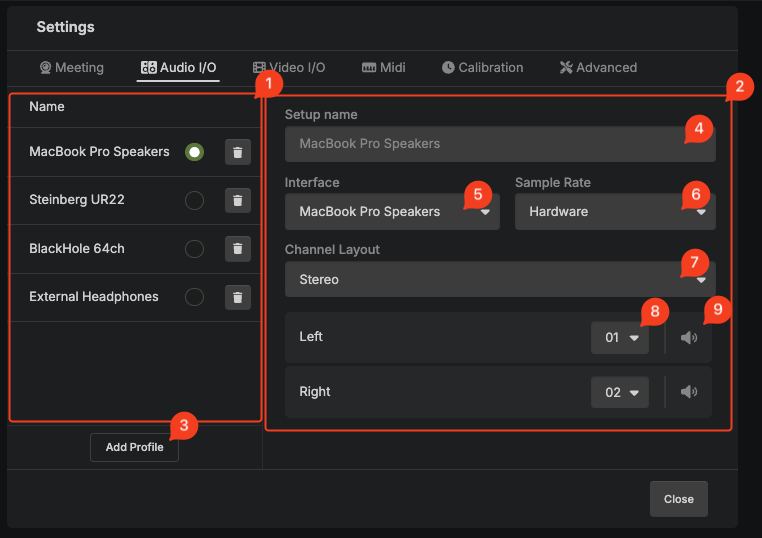
- Profile selector.
- Profile settings pane.
- Add a new profile.
- Profile name (follows the selected device name).
- Audio device to use.
- The sample rate to use:
- Hardware: Follow the configured device sample rate and do not attempt to change it.
- Session: Use the specified session sample rate.
- Channel layout to use. This depends on the available channels of the audio hardware.
- Channel mapping of the layout channels to the actual hardware channels.
- Play a pink noise test sound on the selected channel.
Video Settings
In the video settings you can configure video devices you want to use.
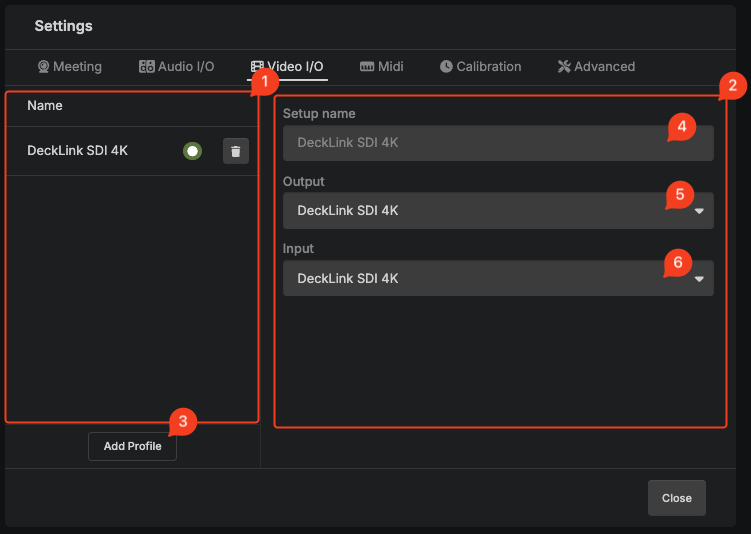
- Profile selector.
- Profile settings pane.
- Add a new profile.
- Profile name (follows the selected device name).
- Video output device to use. Video will be played back on the video output instead of the application window.
- Video input device to use. If you want to use the live input feature, you have choose an input device.
Midi Settings
In the MIDI settings you can configure MIDI devices you want to use. This would only be required to setup an air-gapped system.
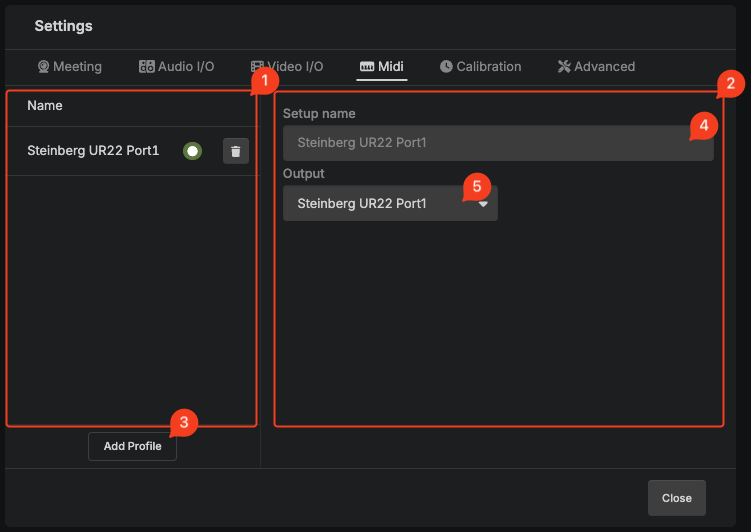
- Profile selector.
- Profile settings pane.
- Add a new profile.
- Profile name (follows the selected device name).
- Midi output device to use.
Calibration Settings
In the calibration settings you can calibrate audio/video delays.
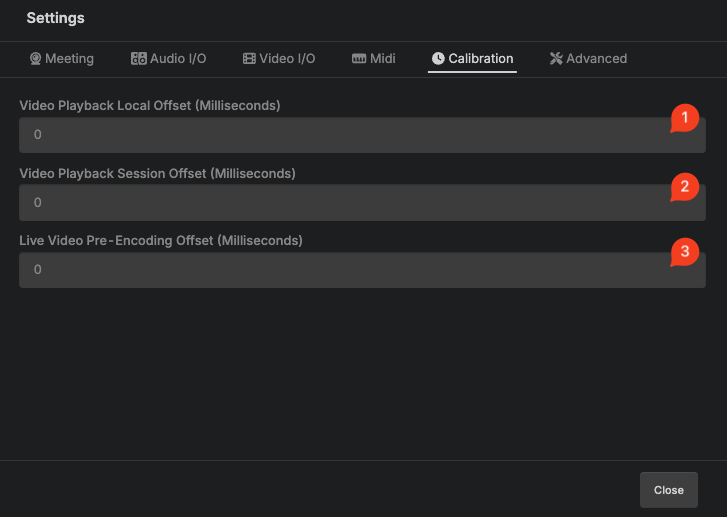
- The local video/audio delay. You can use a software like Catchin’ Sync. This is the most important setting.
- Producer setting to adjust the video offset for the entire review session.
- Producer setting to adjust the video offset for guests.
Advanced Settings
The advanced settings contain options for troubleshooting and diagnostics.
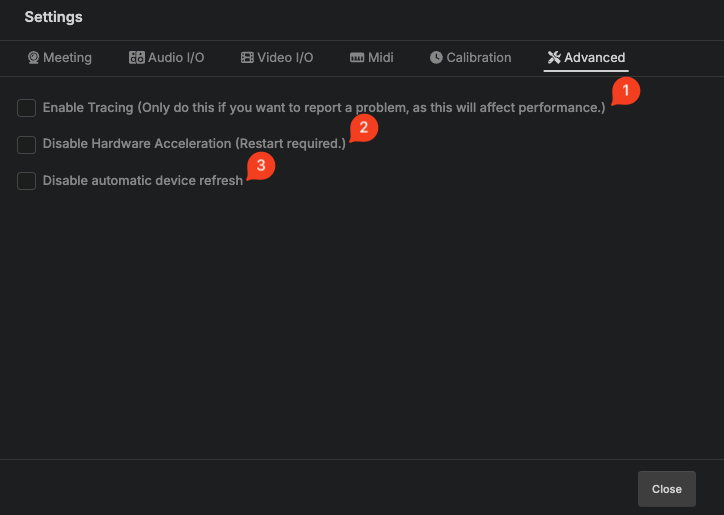
- Tracing enables additional diagnostics for our developers. Turn this on only if you intend to submit a bug report.
- Disable hardware acceleration. Don't do that if you have no problems.
- Disable automatically refreshing audio/video and midi devices.
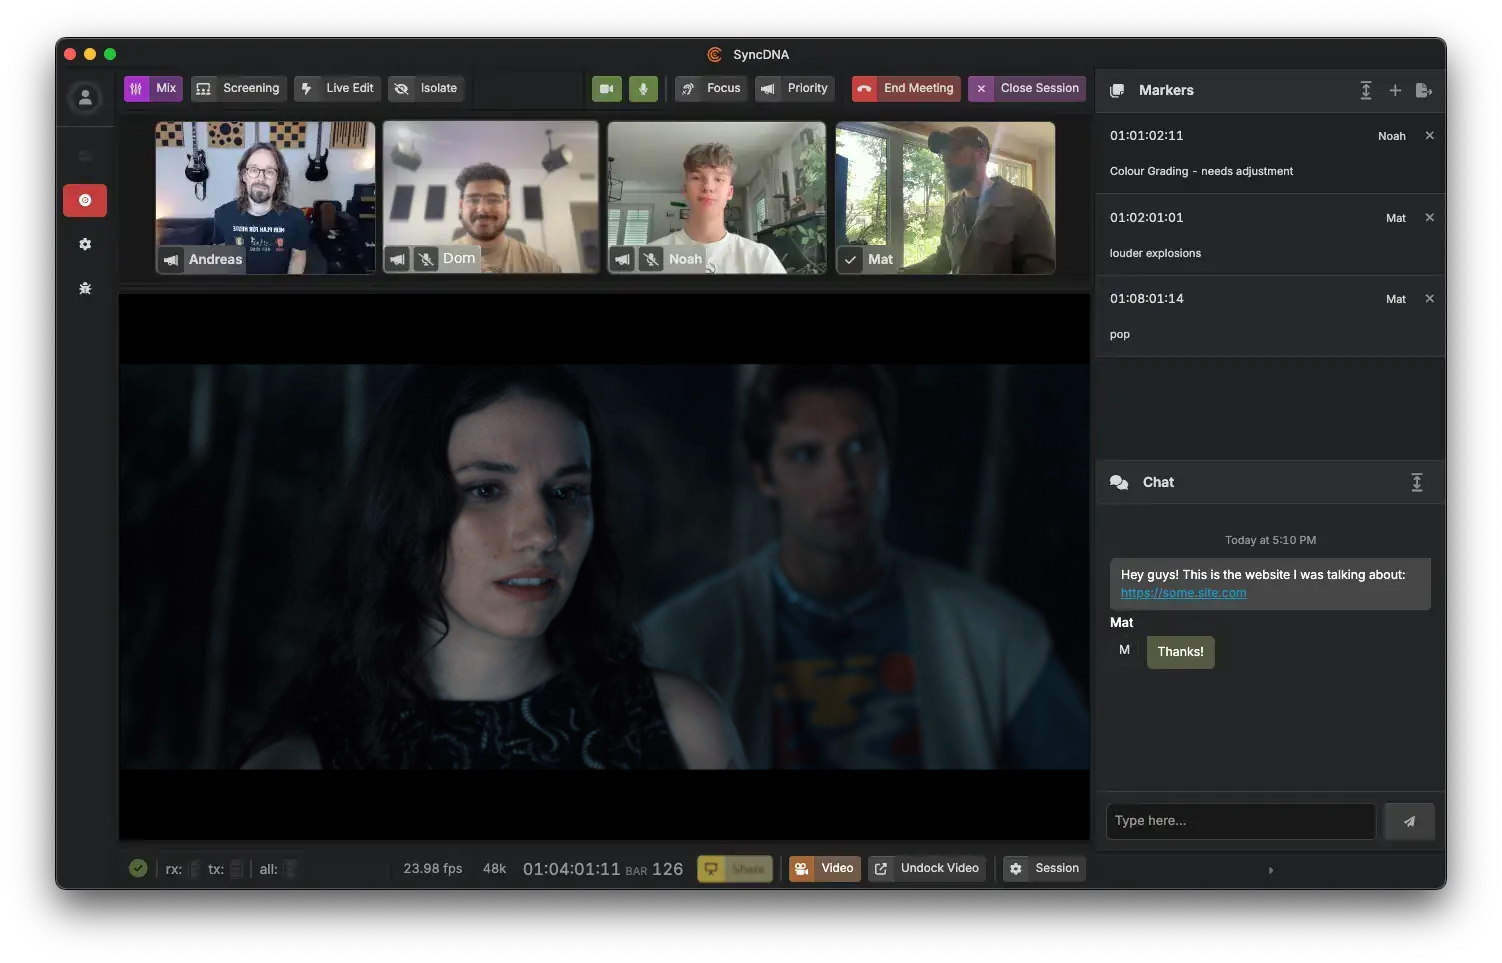
Review Stage
The Review Stage is where review and approval sessions are performed.
The stage is composed of several sections including video conference controls, participant views, a video feed, transport information, chat, markers, and more. This section endeavours to explain each.
The Studio View
The Studio is the member that is running the session. Typically this would be the mixing engineer or DAW operator. This comprehensive view allows them to manage the session, control Session Modes, and coordinate with all participants.
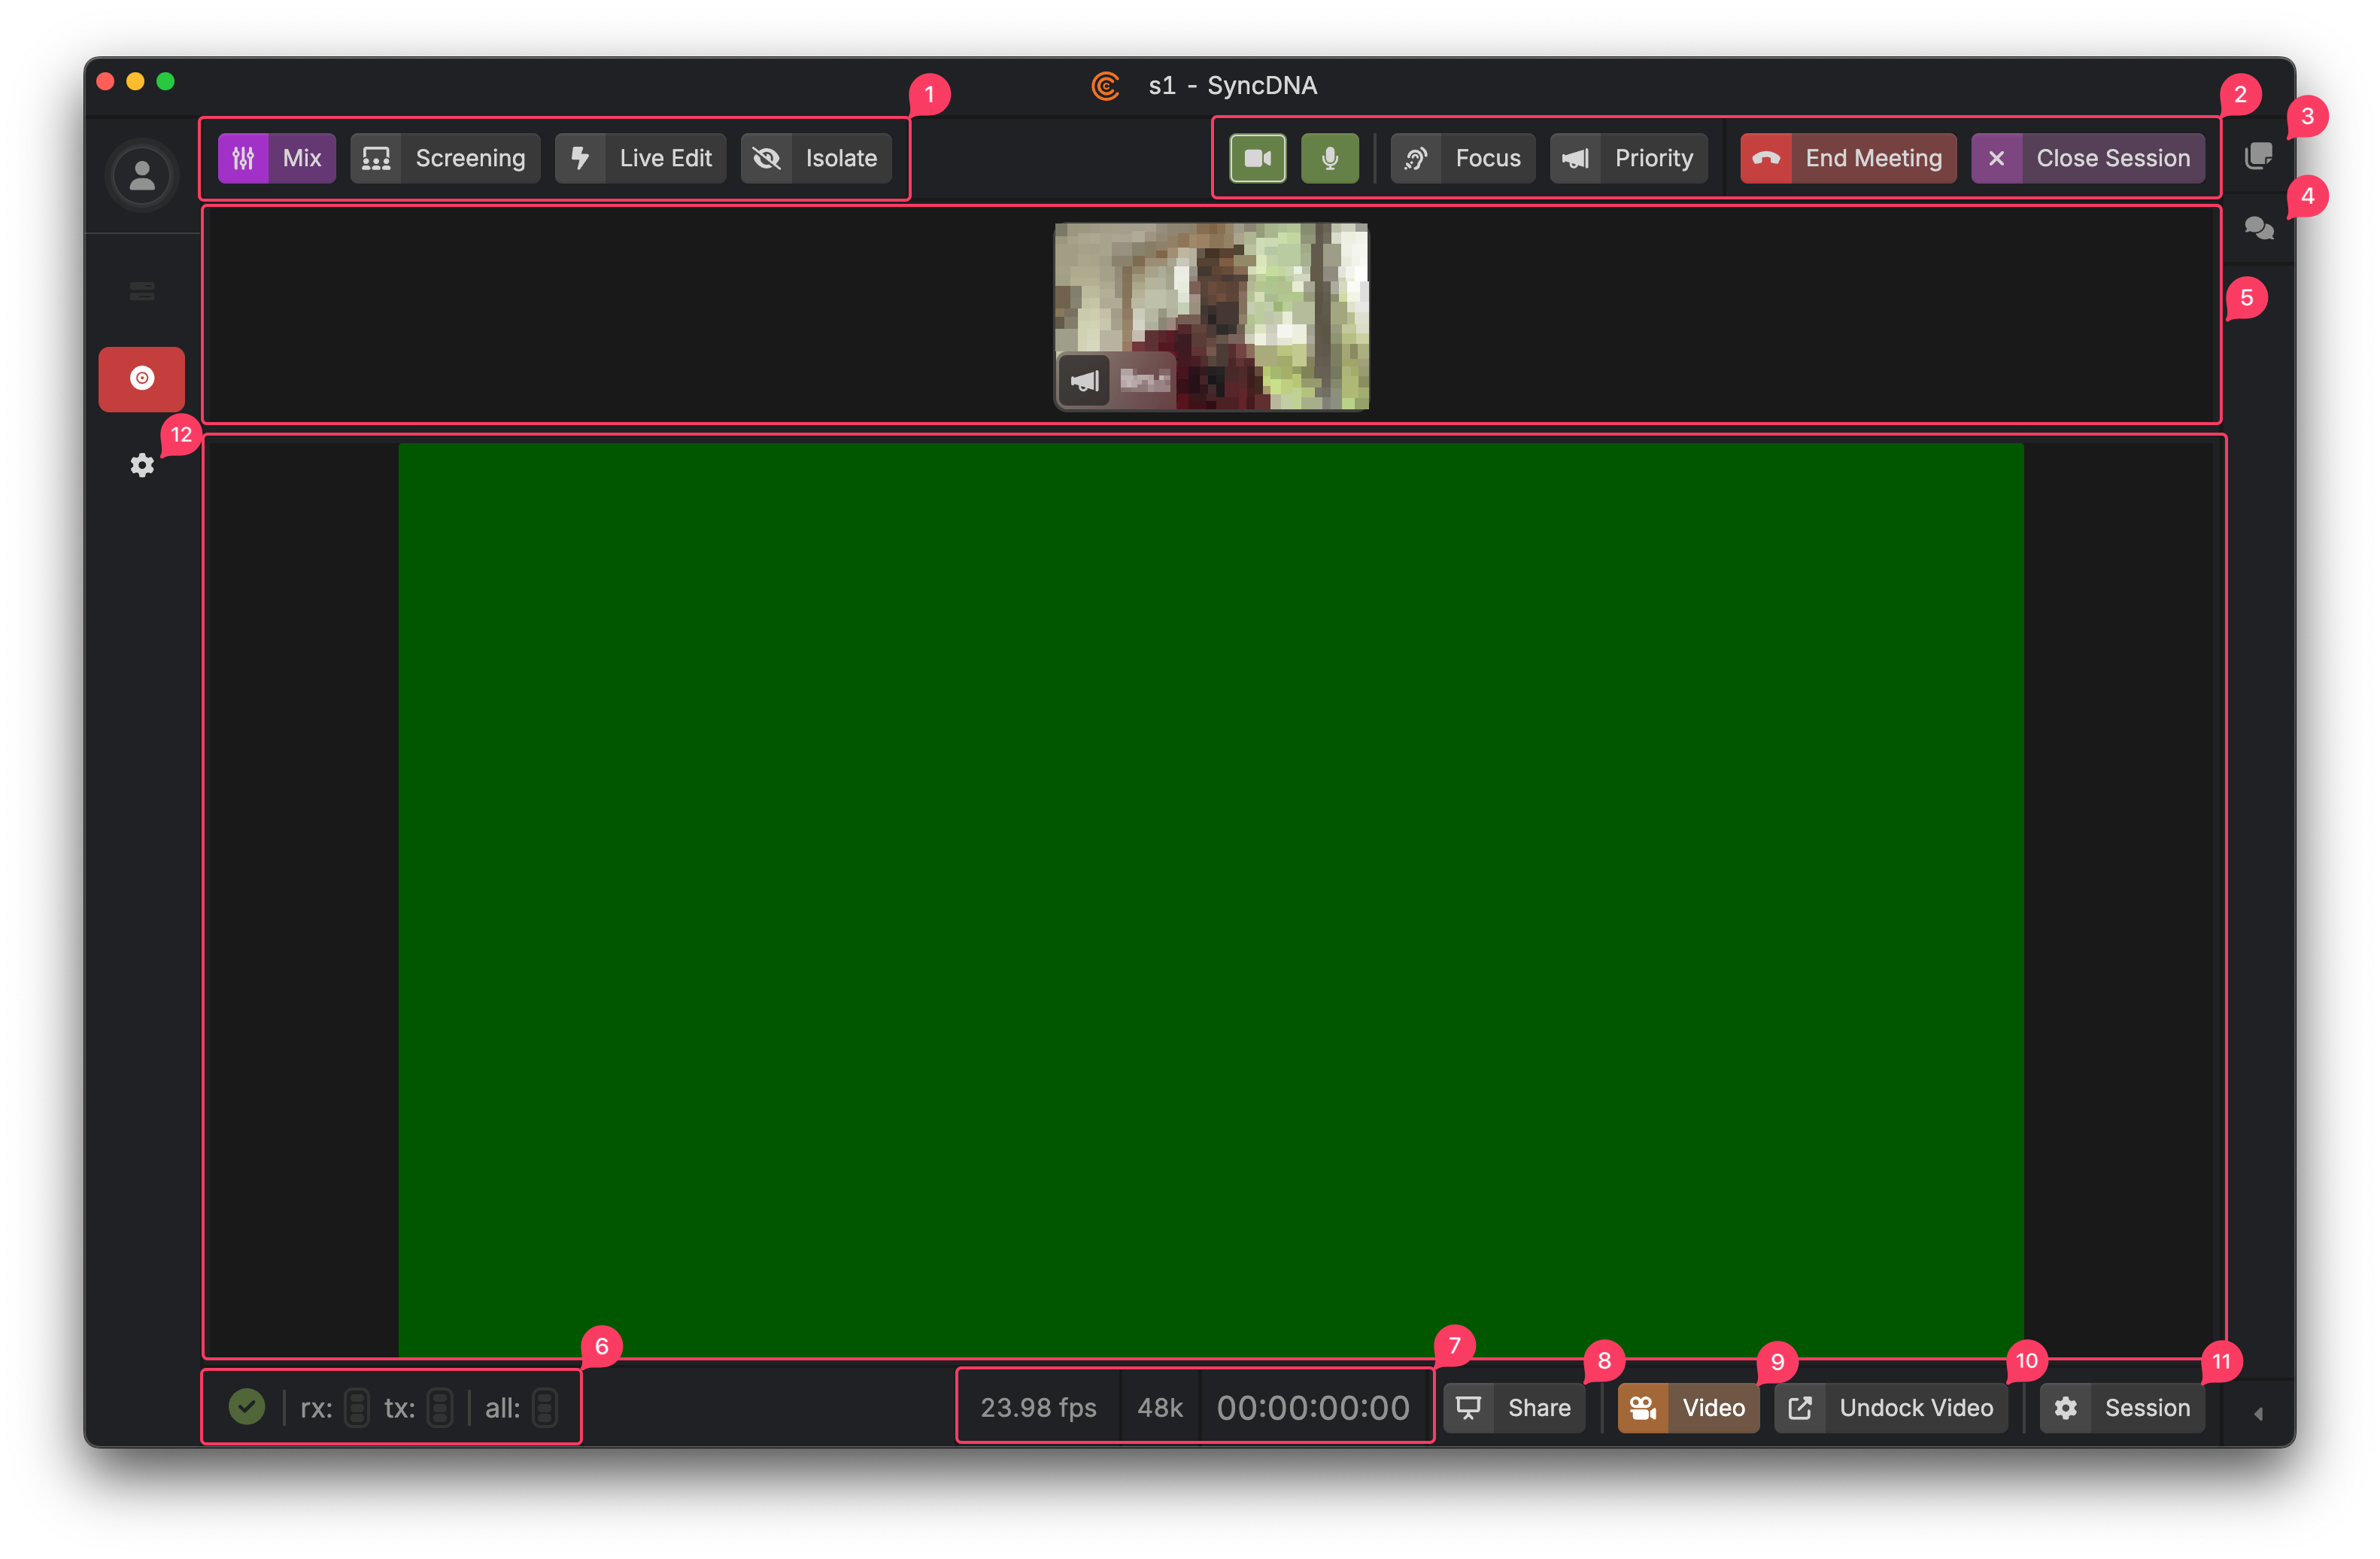
- Session Mode Controls
- Mix Mode
- Screening Mode
- Live Edit
- Isolate
- Video Conference Controls
- Camera on/off
- Microphone mute
- Focus
- Priority Speaker
- End Meeting
- Ends the Live Meeting for all participants, closing the session for all guests and shutting down the video conference.
- Close Session
- Closes the session, sending all participants back to the Project's Session List, while keeping the video conference open. This allows the Studio to bring the participants into a new session.
- Markers Panel
- Chat Panel
- Participant Video Tiles
- Show the video feeds of all the participants as well as several status indicators. These tiles also have controls which allow participants to be pinned, or even muted by Studios, etc.
- Status Indicators
- On the left is the Sync Status Indicator, which communicates whether the system is in the process of upload or downloading asset media content. It will be a green check mark when complete.
- rx: Receive status, which indicates whether incoming realtime media is arriving in time to be played without issue.
- tx: Transmit status, which indicates whether outgoing media is being produced and received by the SyncDNA backend in a healthy amount of time in order to be played back without issue by other participants.
- all: This status is an aggregation, indicating the health of everyone on the session as a whole. If green, everyone is receiving media normally. If yellow, playback is fine but one or more participant is slowing down. If red, one or more participants aren't keeping up and will likely hear or see dropouts in content.
- Note that each participant video tile will have an indicator as well, allowing Studios to diagnose whether an issue is session-wide or specific to a particular user, for example, if they have an unhealthy internet connection.
- Session Information
- Video frame rate
- Audio Sample rate
- Current transport position
- Screen Share button
- Allows users to share their screen over the video conferencing engine.
- Video Module Toggle
- Allows the user to hide and show the video feed.
- Tip: If a participant can't see the video, check whether the module has been toggled off.
- Undock Video Toggle
- Allows the video to be broken out of the UI into a separate window. This is helpful if a user wants to place the video full screen on another monitor, separate from the video conference.
- Session Settings
- App Settings
Session Modes
Session Modes control how audio and video playback is synchronized between the Studio and Guests during a review session. Each mode optimizes for different workflow needs - from sample-accurate playback to real-time collaboration.
Mix Mode
Mix Mode is our default mode -- where sessions start automatically. The Studio hears and sees content without any delay, just as they would when not using SyncDNA. Guests on the session see and hear media at full sample and frame accuracy after a short delay, and at the same time as one another.
Screening Mode
Screening Mode is much like Mix Mode, except the Studio now hears and sees media content at the same time as the Guests on the session. This is helpful in particular for longer review playbacks as it allows the Studio to observe client reactions to media in real time, just as they would in a physical studio together.
Live Edit
Live Edit prioritizes low latency over sample accuracy when playing back media. It removes virtually all playback delay in the same way that video conferencing technology connects people at near real time speeds. This mode is particularly useful when editing small sections of content collaboratively, where fast iteration is preferred over sample accuracy. Typically users will flip out of Live Edit when the edit is complete, to Screening Mode for a final playback at full resolution before finalizing a change.
Isolate
This mode fully disconnects the DAW transport and SyncDNA playback engine from the guests on the session, allowing the Studio to work independently without the Guests watching/hearing what they are doing. This is useful, for example, if the studio needs to troubleshoot some issue without being disturbed, and without disturbing Guests.
Session Settings
In the session settings, you can manage the session video and guests.
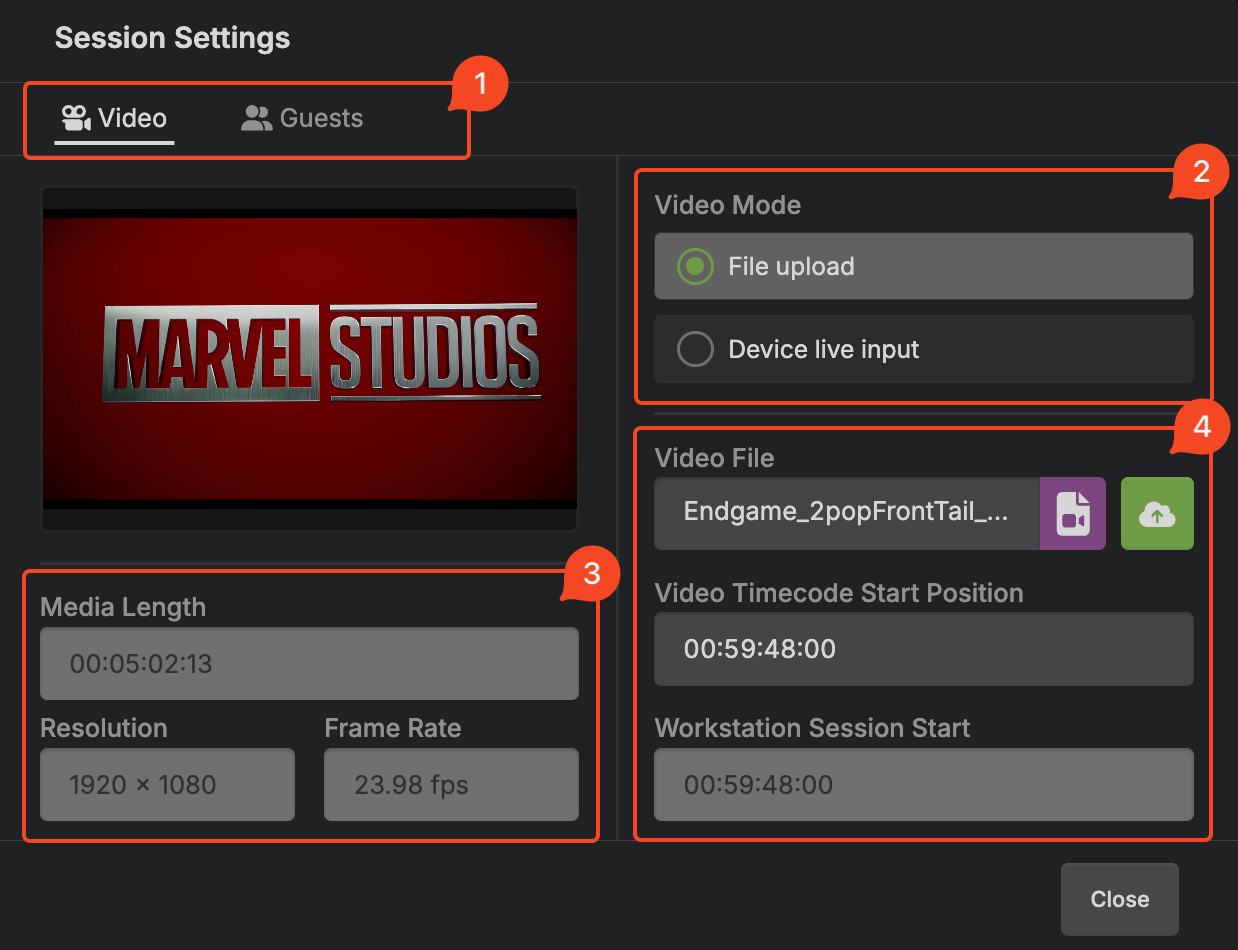
- Settings tabs:
- Video: Manage the video input.
- Guests: Manage guests.
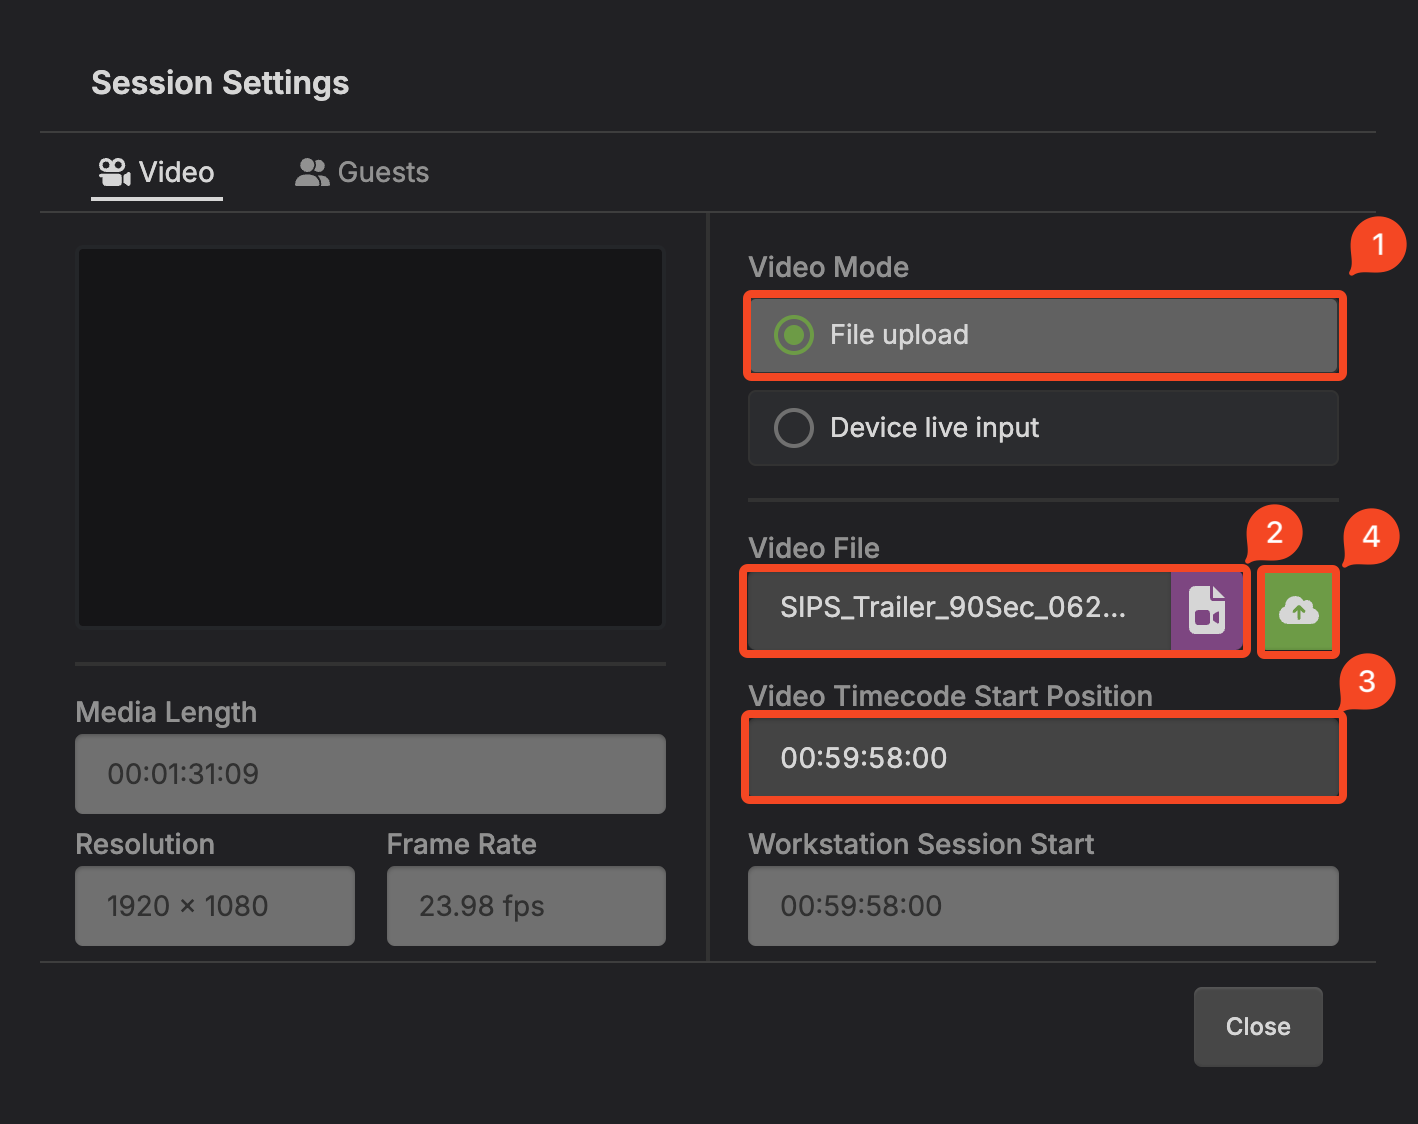
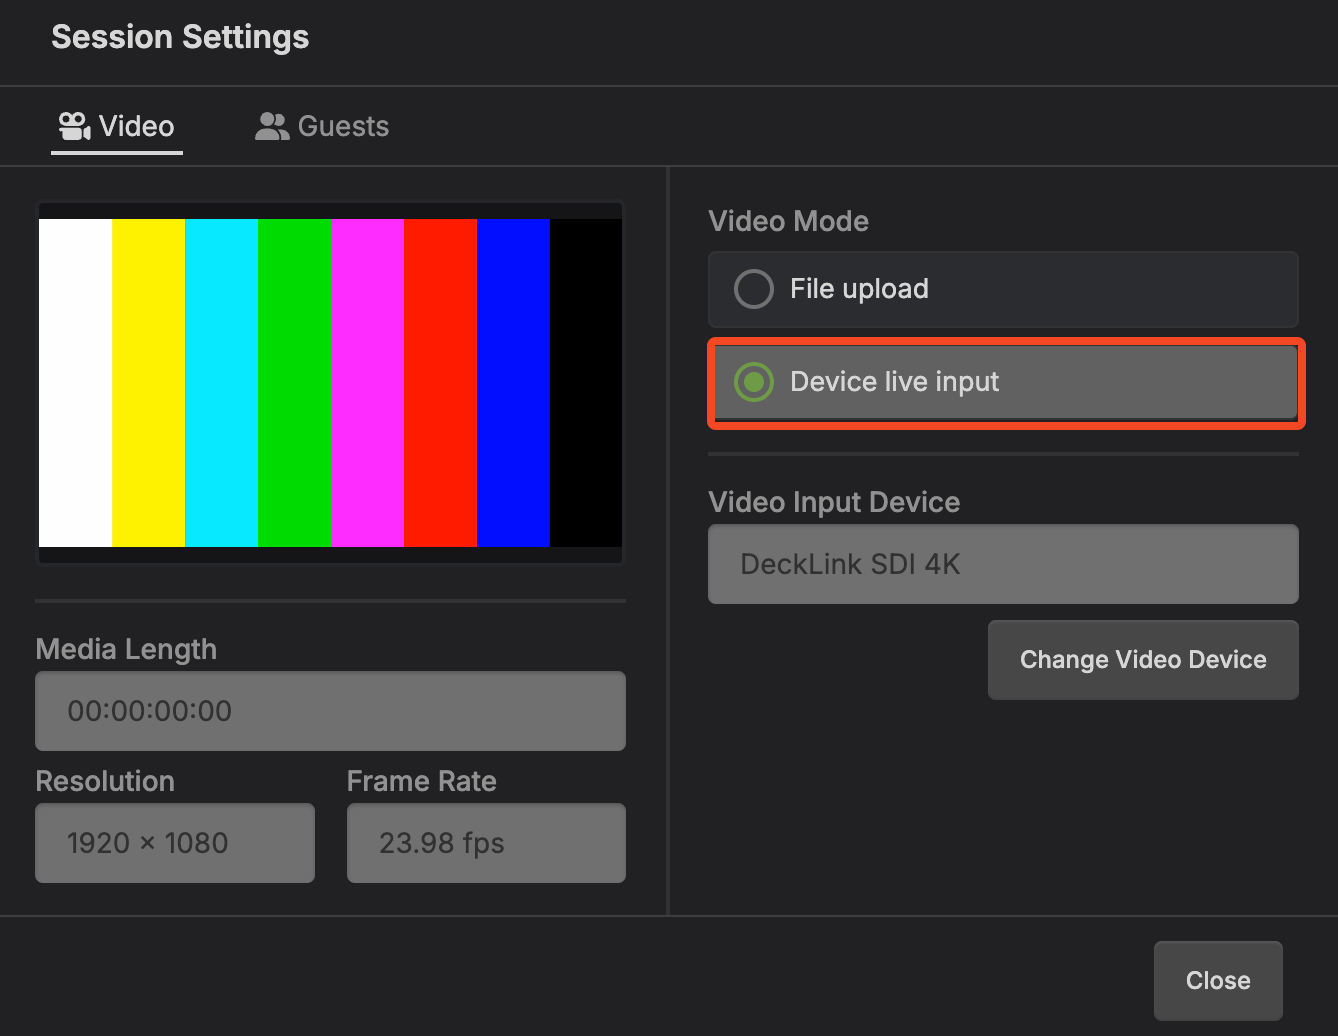
- Video mode:
- File upload: Use a static video for review.
- Device live input: Read video from a video device input. A video input must be configured in the app video settings.
- Video attributes
- Video file settings: This is only available when using "File upload" mode.
- Video file: Choose a video file. Click the upload button to import and upload the video into the SyncDNA session.
- Video timecode start position: You can adjust the start position of the video if it should not be imported to the start of the session.
- Workstation session start: The start of the session in the connected DAW/NLE. The SyncDNA session inherits the workstation session start.
Focus
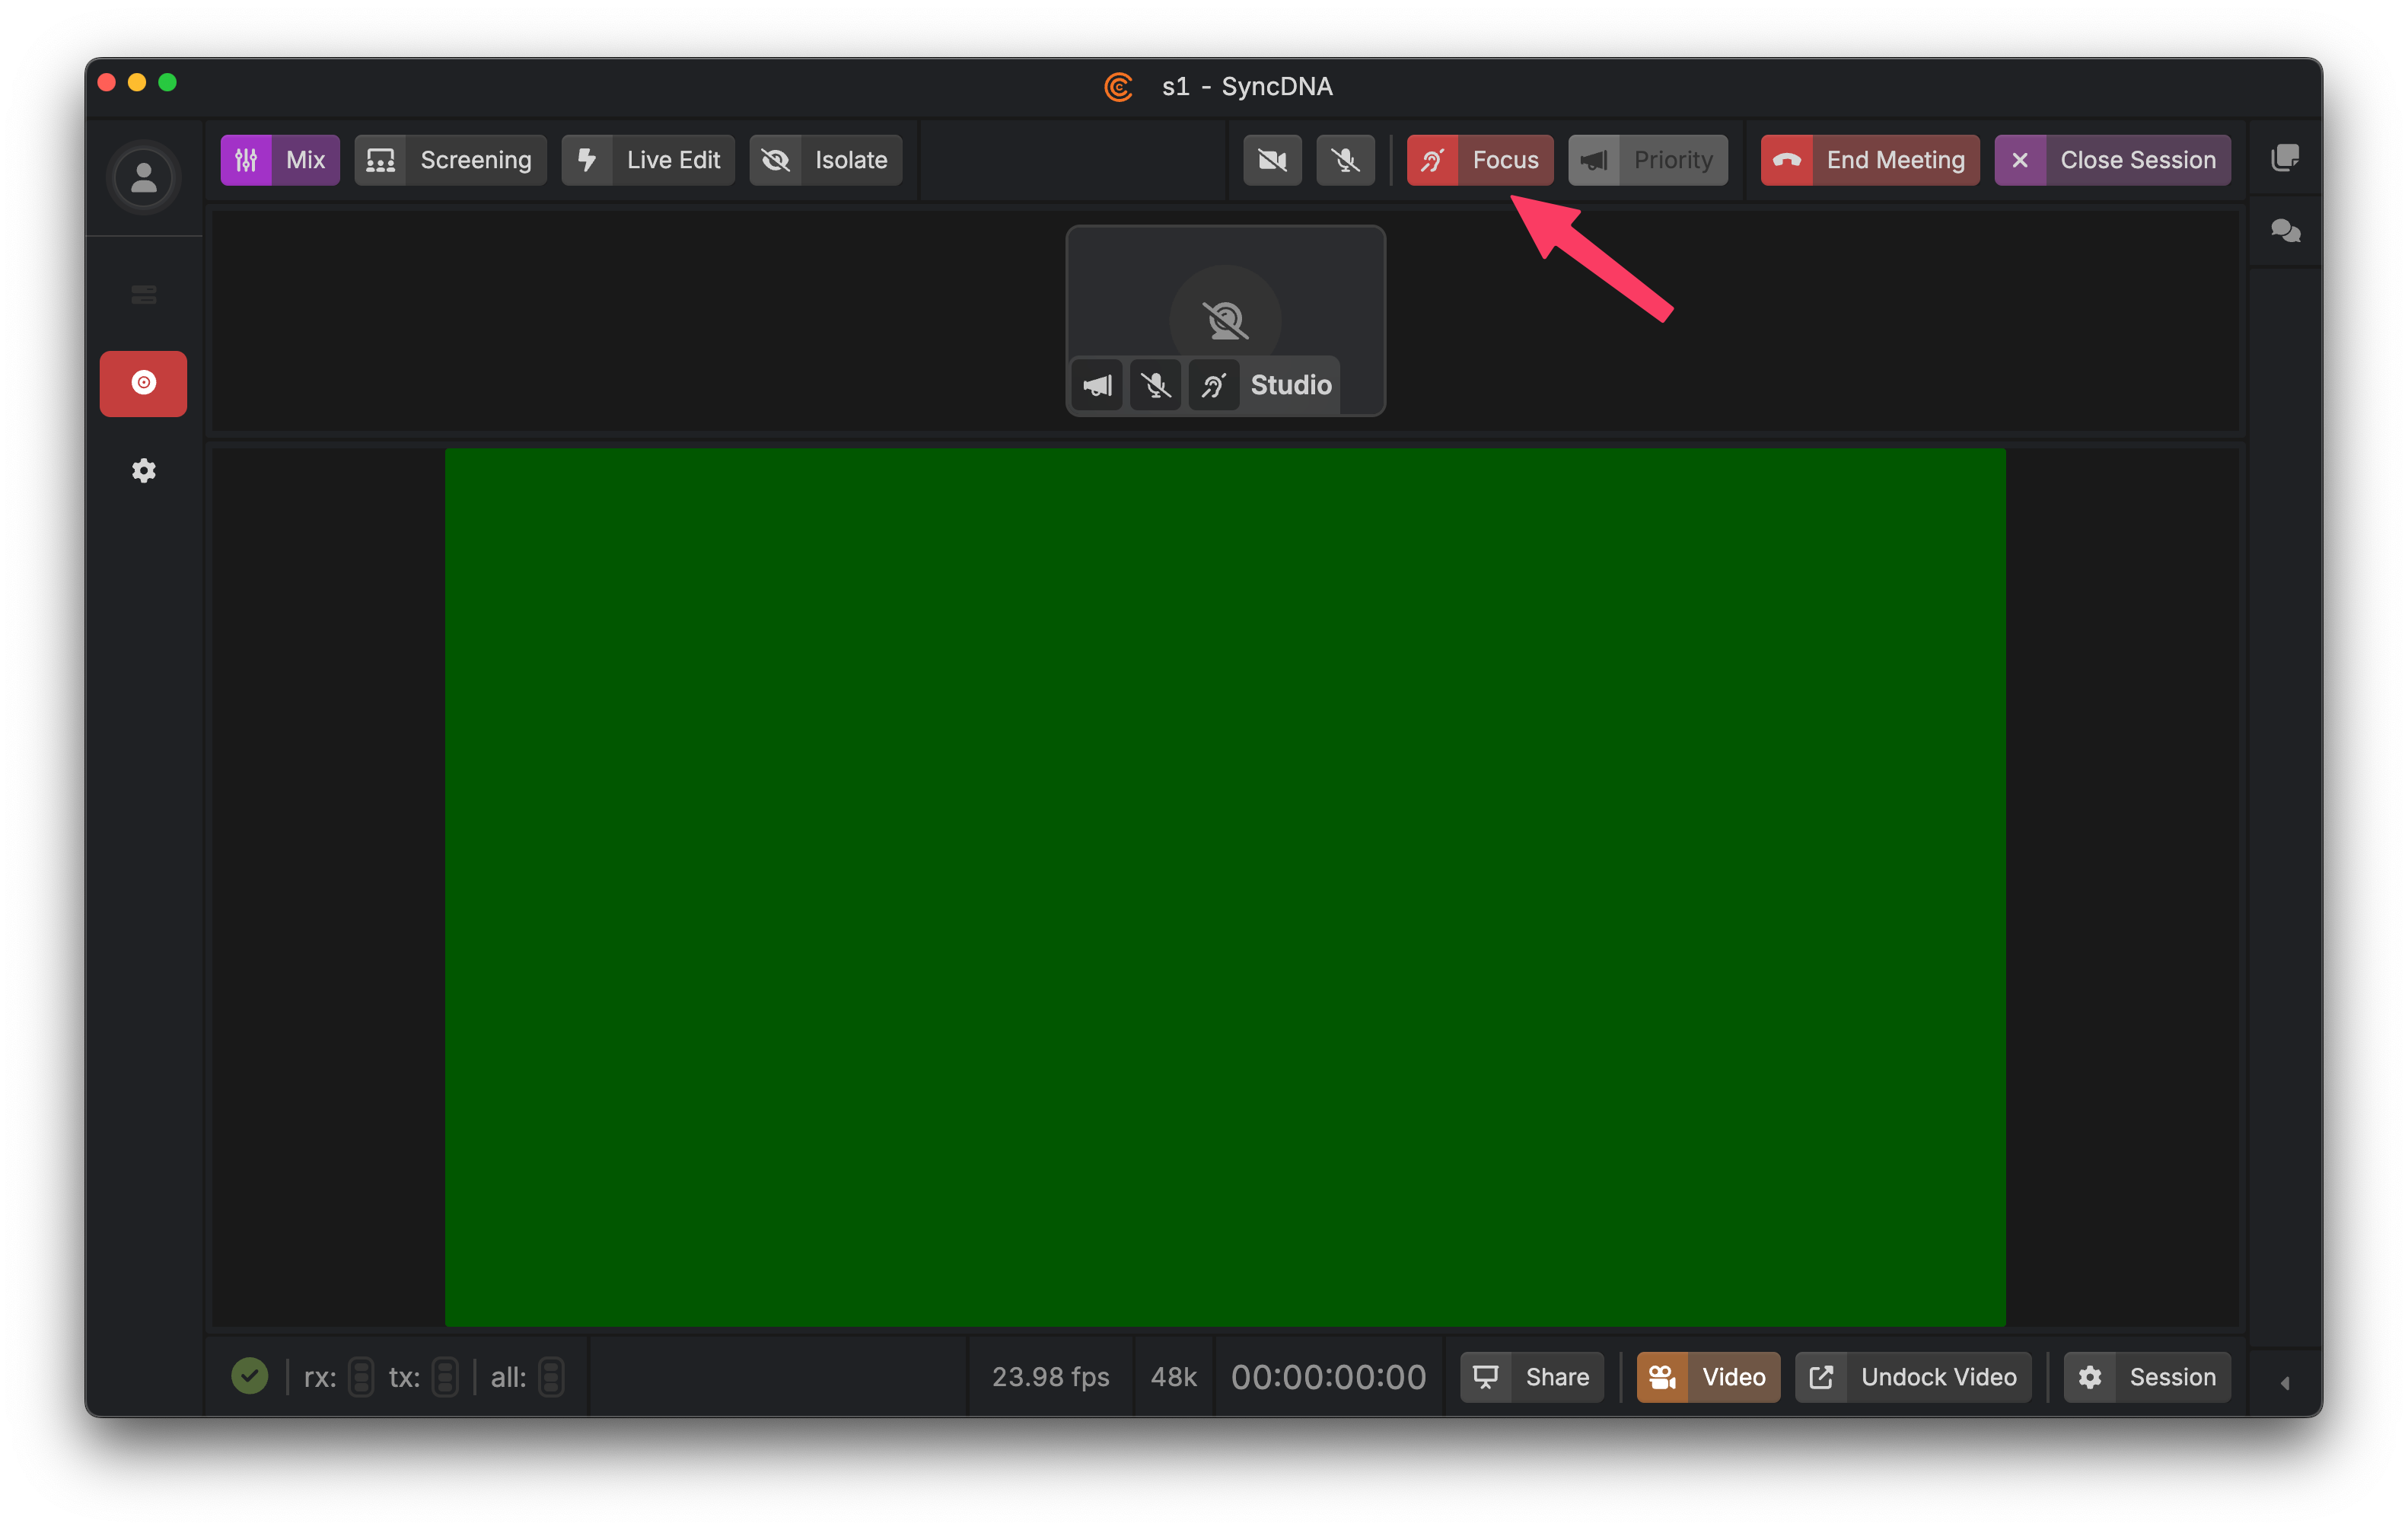
The Focus button is available to any participant in the session. It mutes the participant's microphone and mutes the video conference audio, allowing the participant to focus on the media content without engaging in conversation. The other participants in the session will be made aware of the participant's Focus state by way of a status icon on their video tile.
Priority Speaker
Video conferences in general, beyond some small number of participants, can suffer from too many people talking at once, making it difficult for individuals to be heard and for people to communicate. SyncDNA endeavours to mitigate this issue by allowing Studios to assign one or more participants the "Priority Speaker" status. Priority Speakers are given an additional control, shown below:
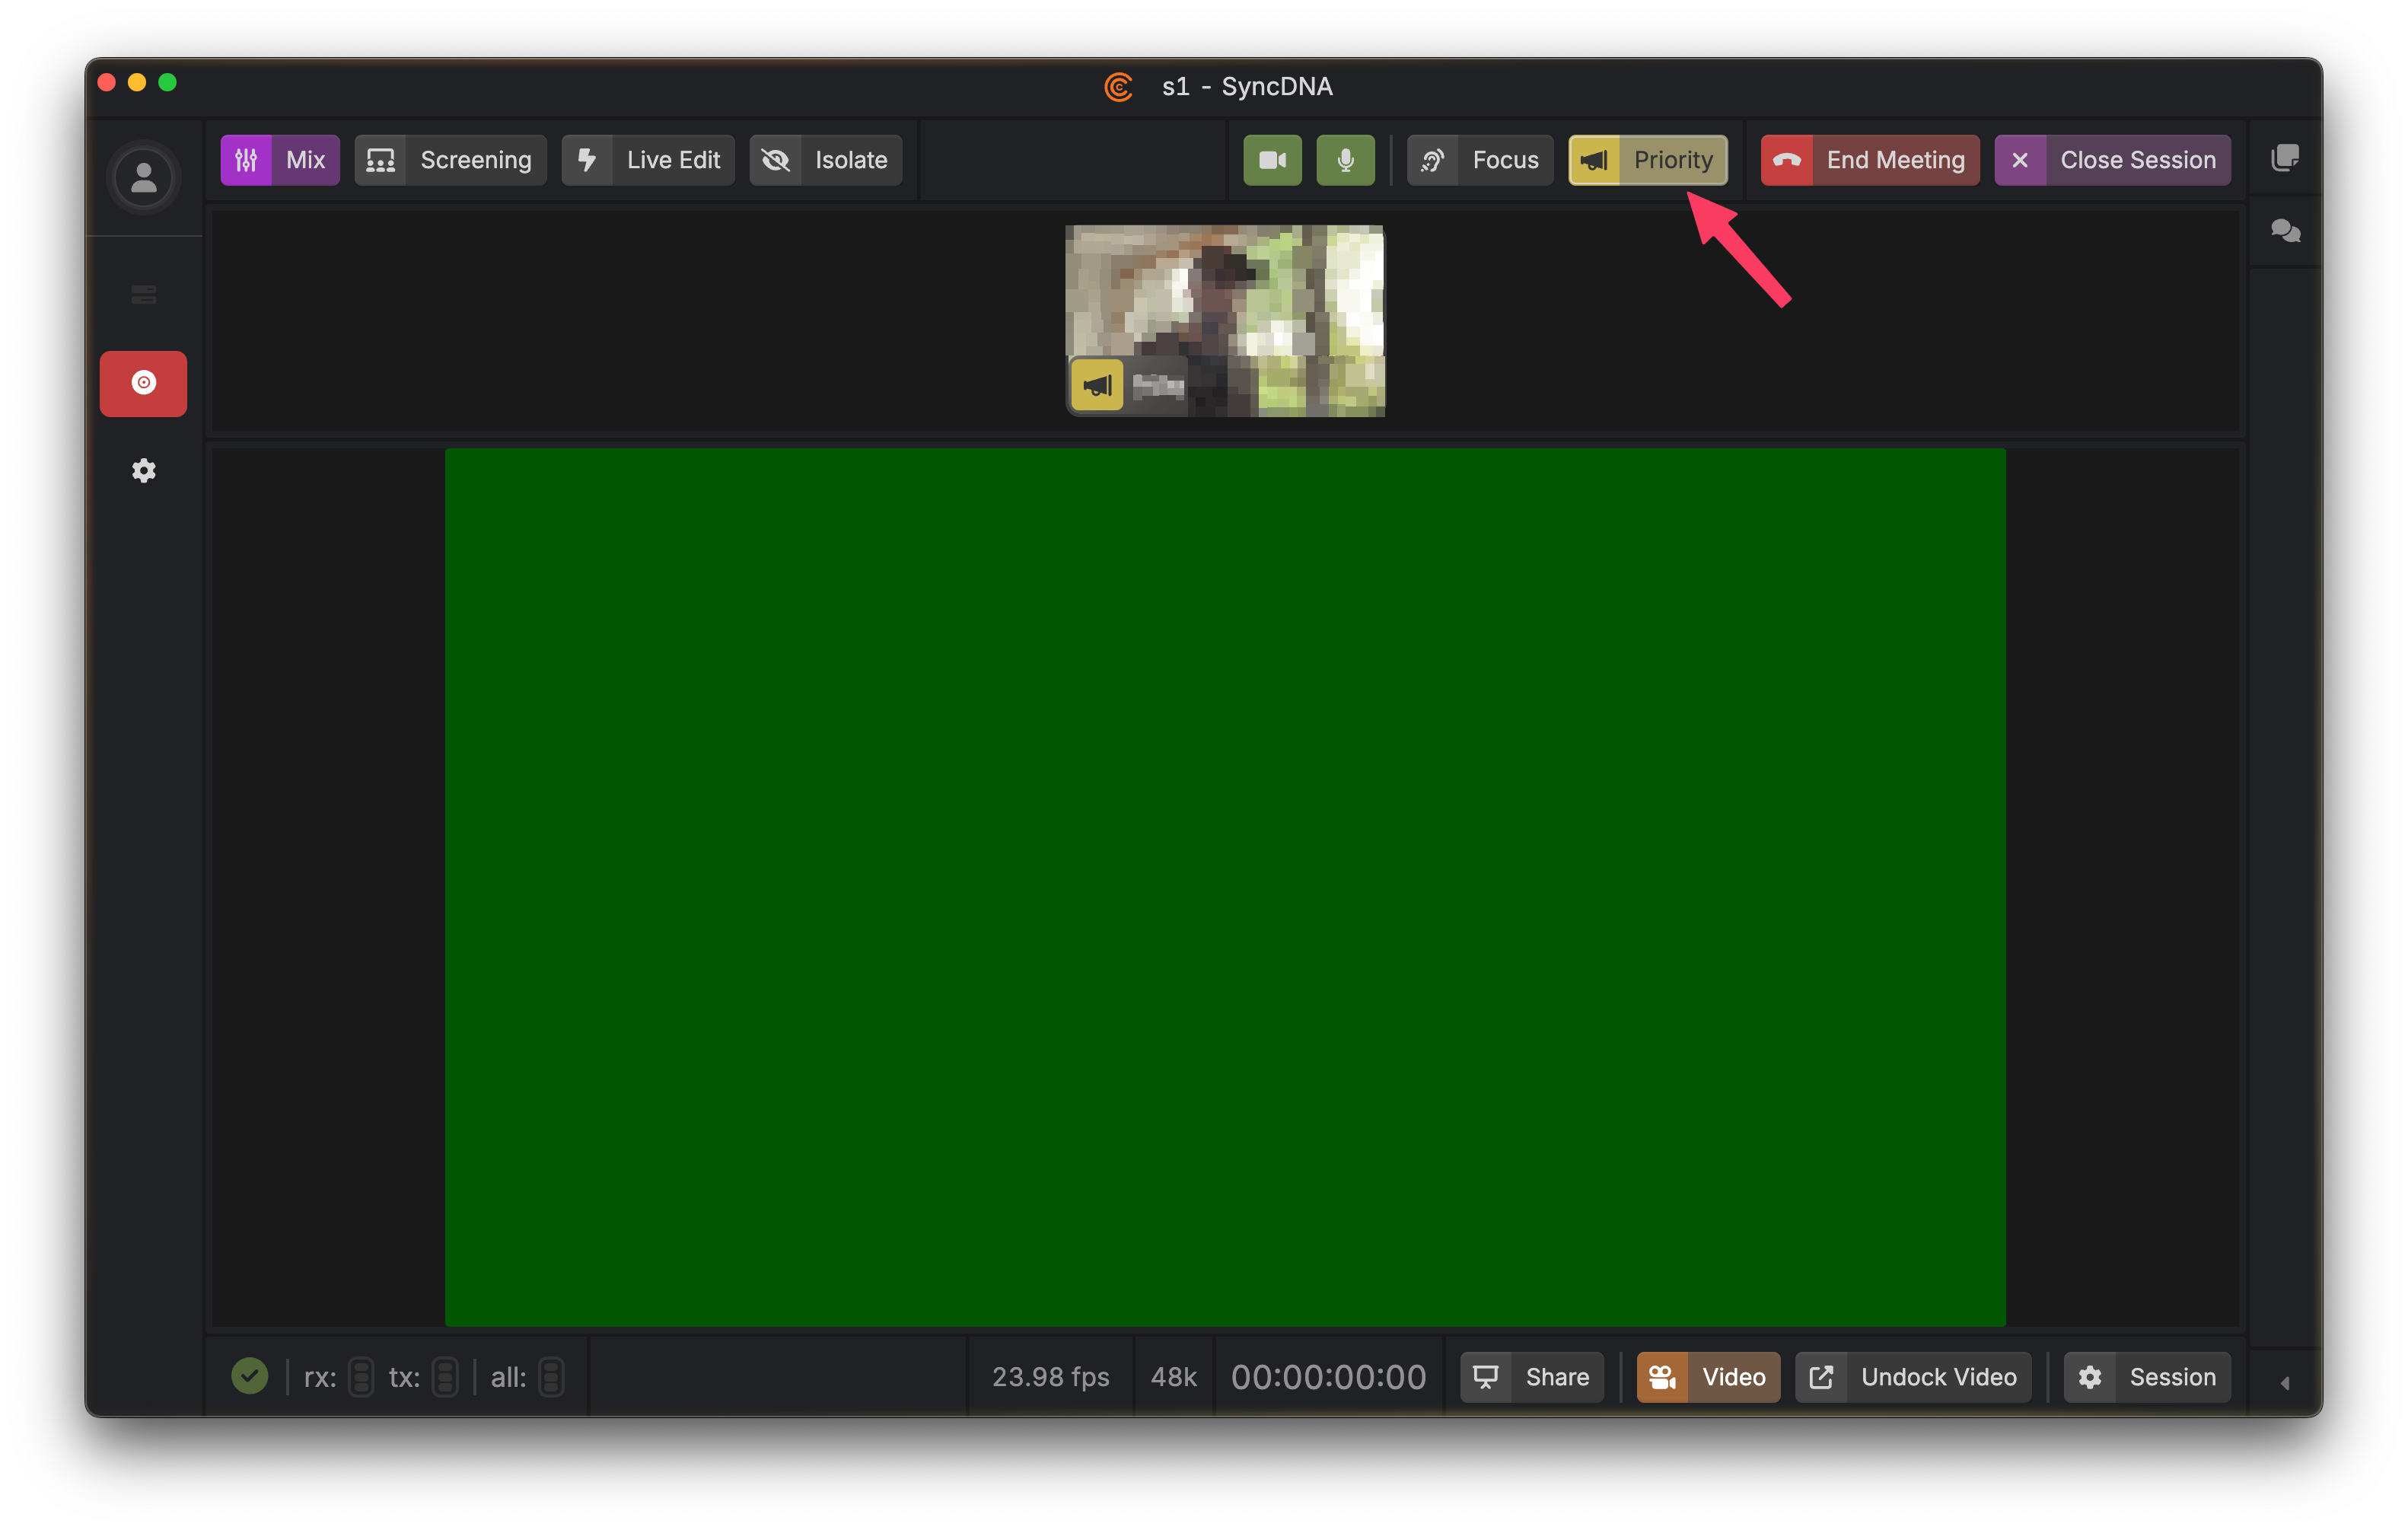
When pressed, this button mutes all non-priority speaker participants, allowing Priority Speakers to be heard.
This button acts as a momentary switch, and can also be engaged with F9.
Markers
Markers are the way guests can give timeline-based feedback. Just press the 'm' key to add a new marker at the current playhead position.
Markers List
The markers are listed in the left sidebar.
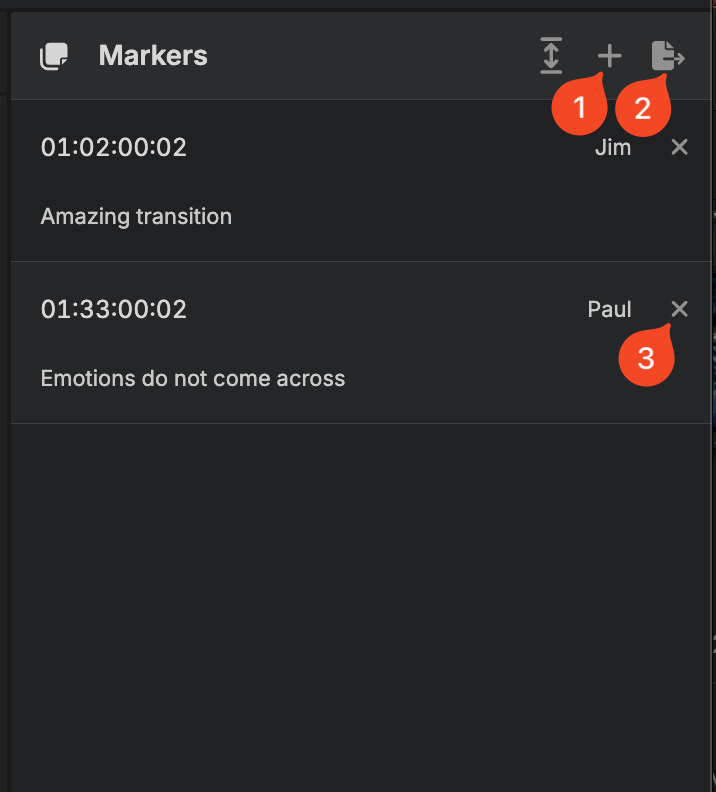
- Create a new marker. Tip: You can also press the 'm' key.
- Export markers into a PDF.
- Delete a marker. The session producer can delete all markers. Guests can only delete the markers they created.
Create a marker
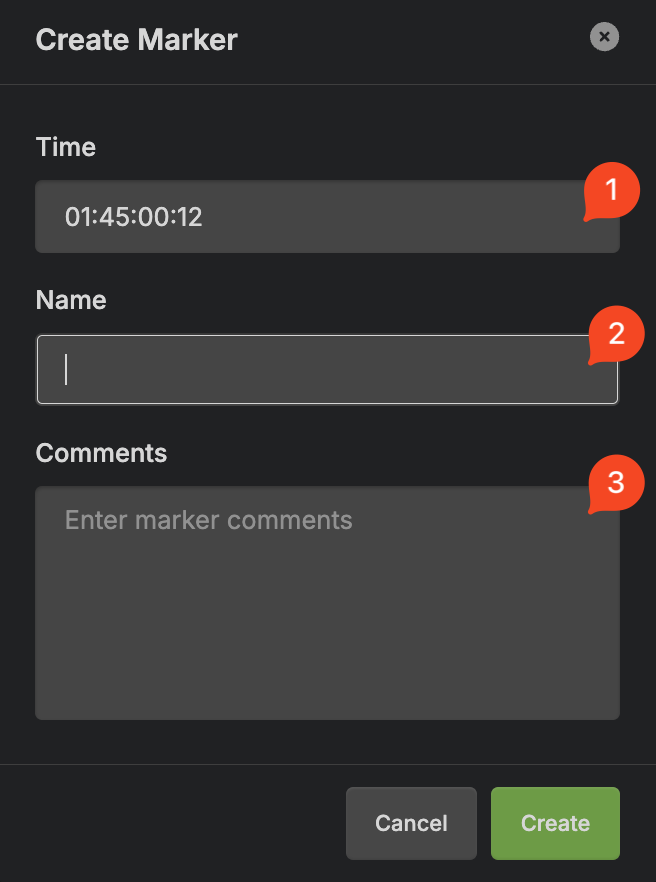
- Time: Initialized with the current playhead position and can be changed.
- Name: The name of the marker.
- Comments: Additional comments.
Edit a marker
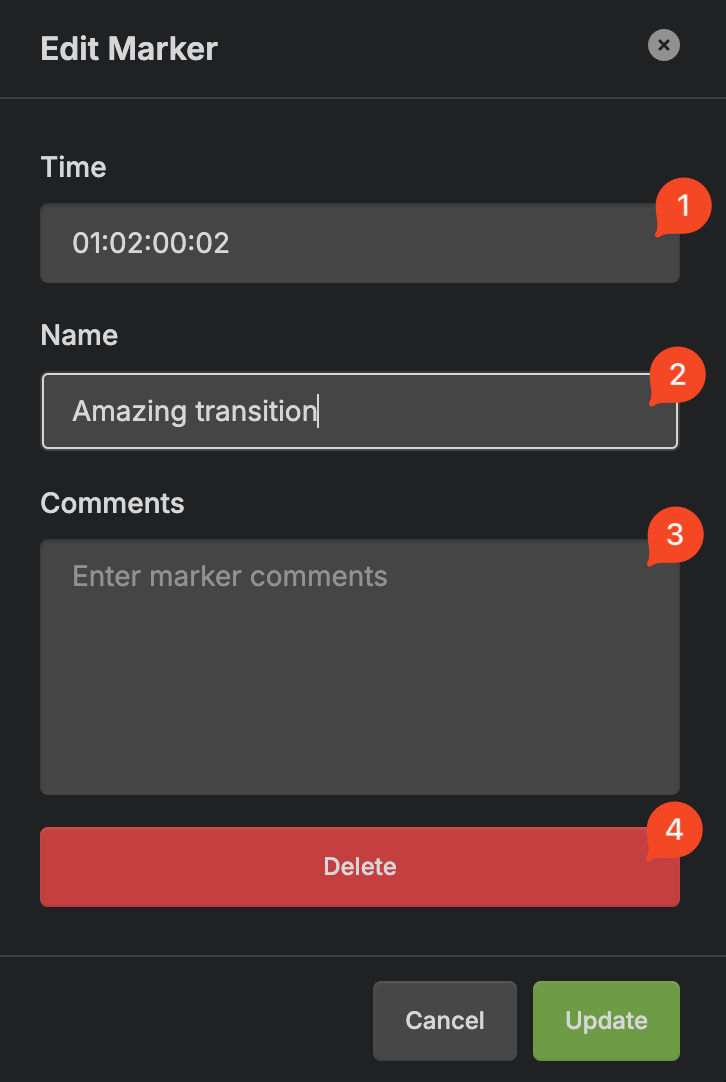
- Time: Initialized with the current playhead position and can be changed.
- Name: The name of the marker.
- Comments: Additional comments.
- Delete the marker.
Key Bindings
SyncDNA supports the following key bindings:
| Key | Function |
|---|---|
| F1 | Screening mode |
| F2 | Mix mode |
| F3 | Isolate mode |
| F4 | Live edit mode |
| F6 | Camera mute/unmute |
| F7 | Microphone mute/unmute for producers and guests |
| F8 | Focus mode |
| F9 | Priority speaker |
| Space | Microphone mute/unmute for guests only |
| m | Create a marker |
Plugins
- To connect your DAW or NLE session to SyncDNA you have to add a SyncDNA Plugin.
- After that you can setup audio routing via Transmit plugins.
- To delay local audio for Screening Mode, you can use the Delay Plugin or Delay MIDI Plugin for air-gapped setups.
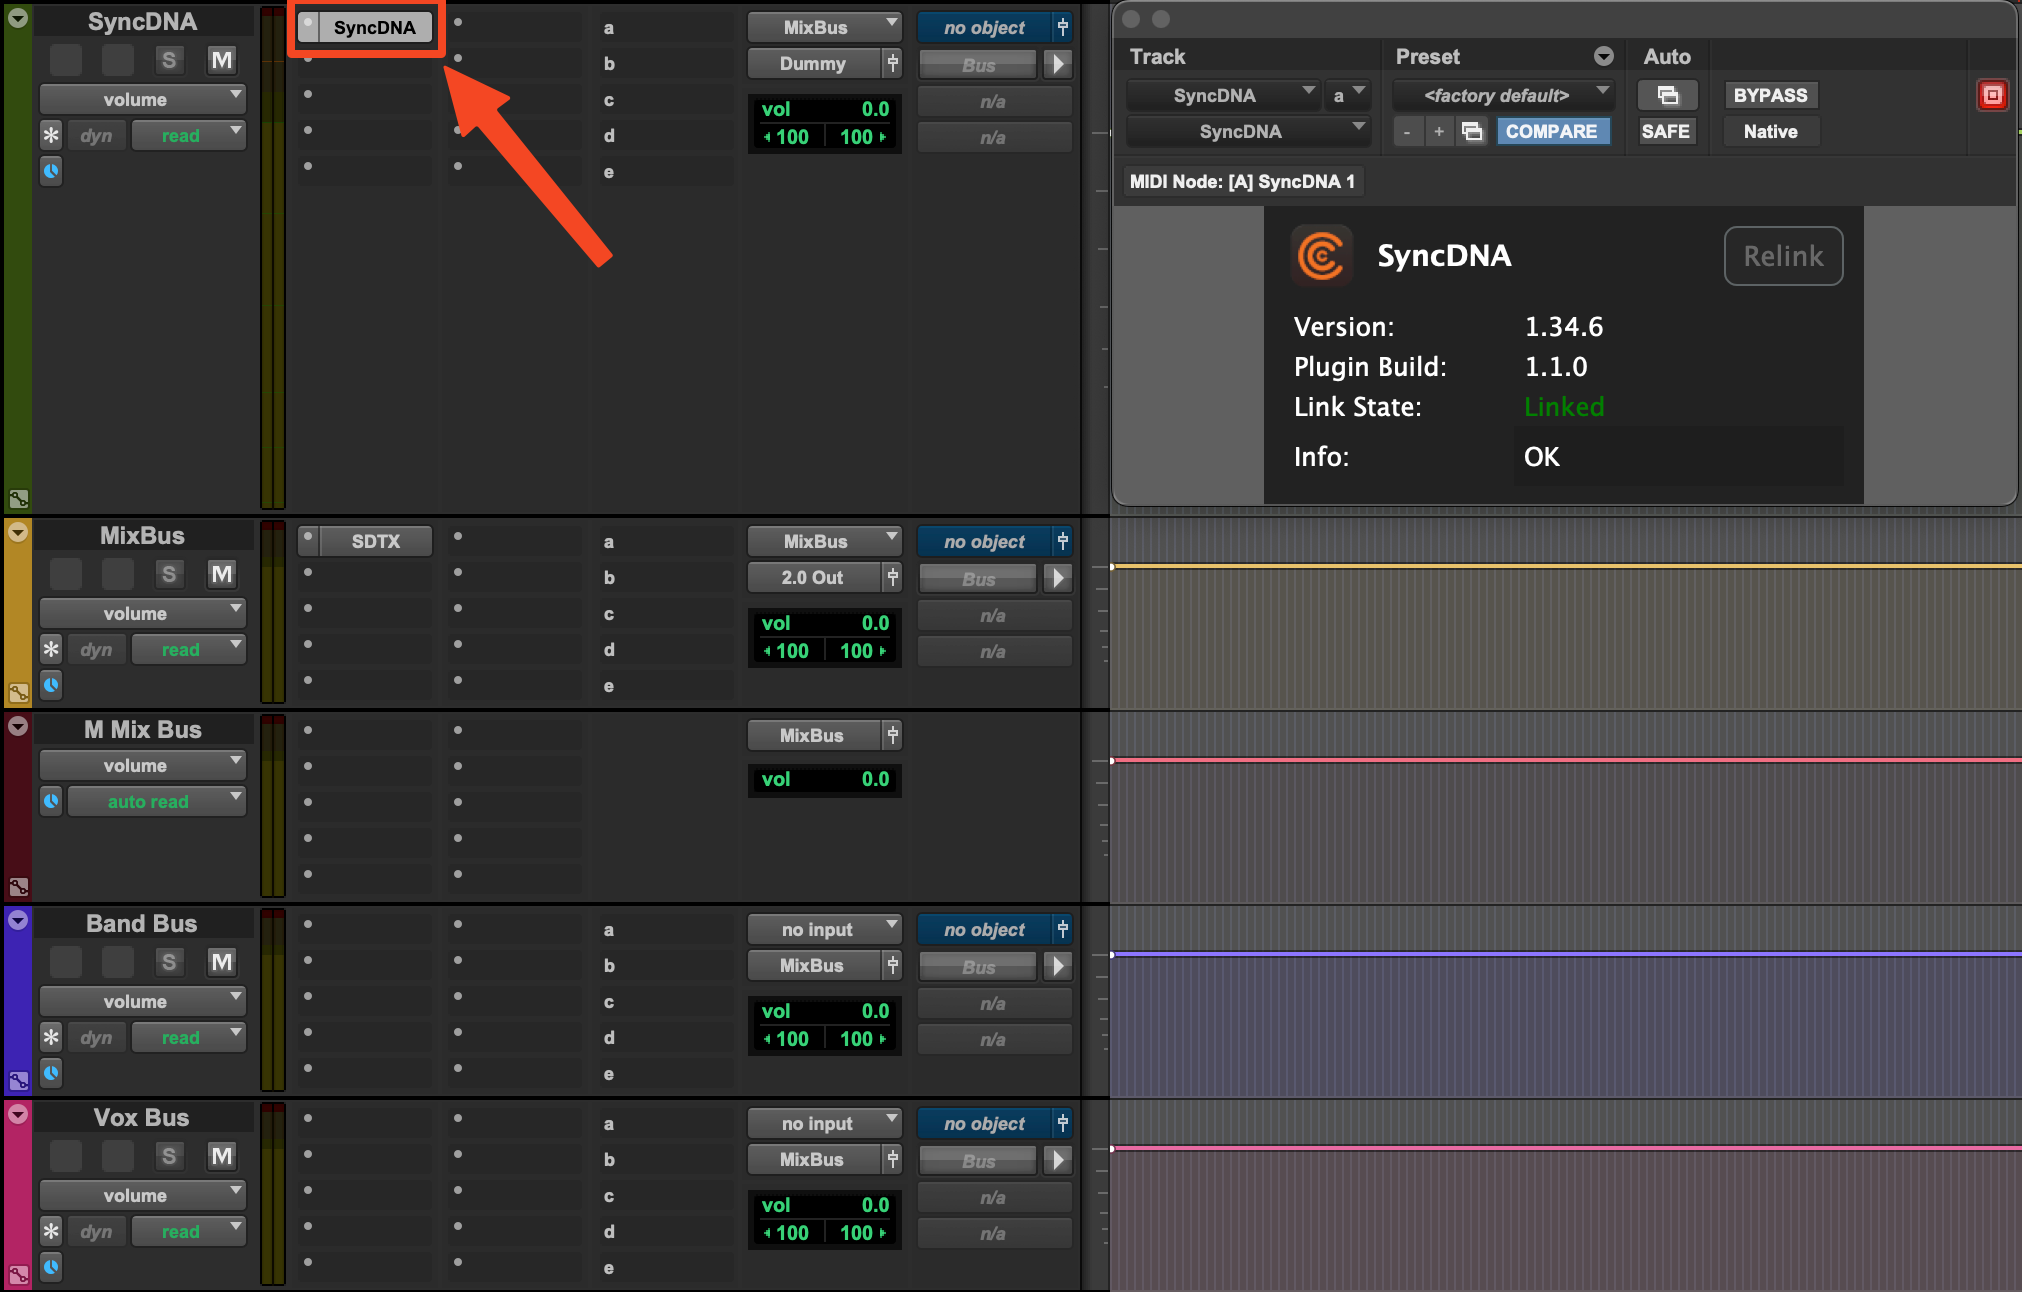
SyncDNA Plugin
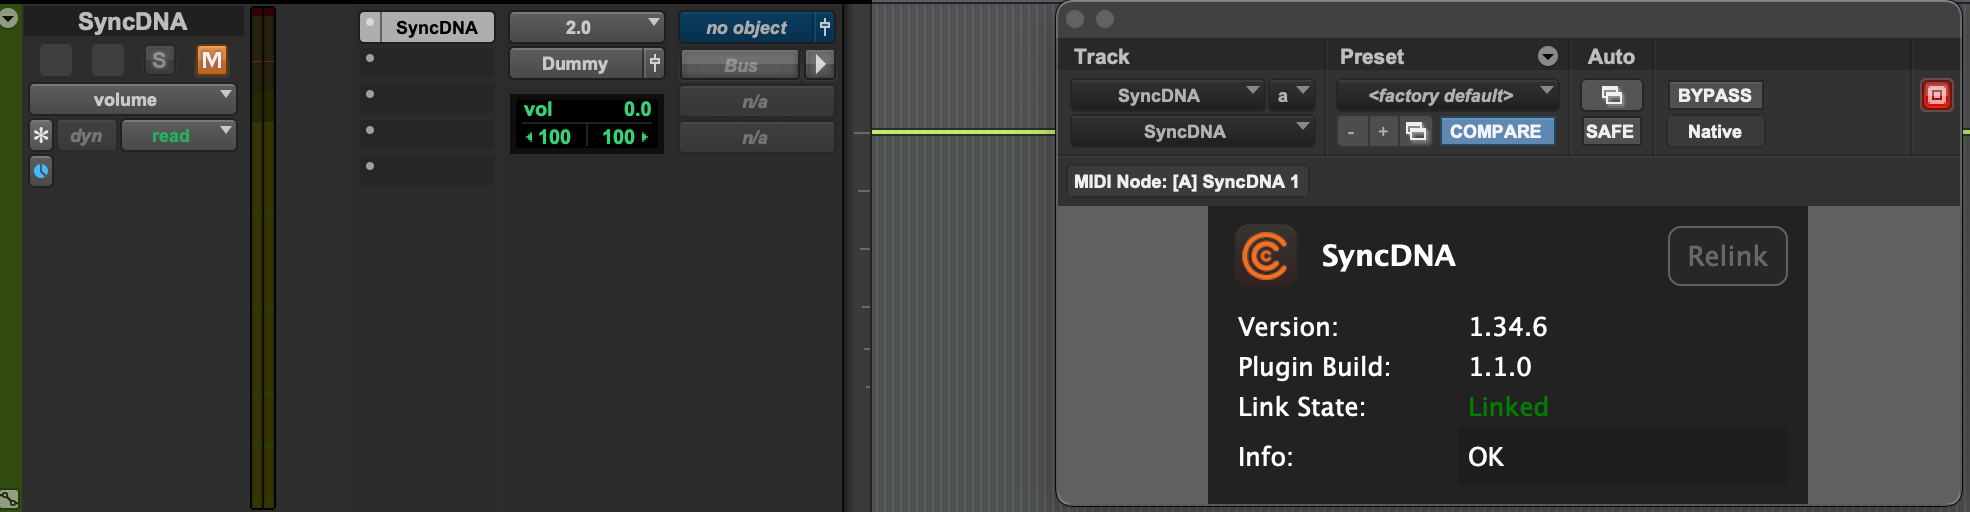
The SyncDNA plugin links your DAW/NLE session to a SyncDNA session. It synchronizes the timeline and playhead of your production software with SyncDNA. You can only instantiate exactly one SyncDNA plugin per session and no other plugin will work without a SyncDNA plugin.
The plugin can be added as an instrument or inserted as effect. It does not pass audio through, so you should not place it on audio tracks in your mix.
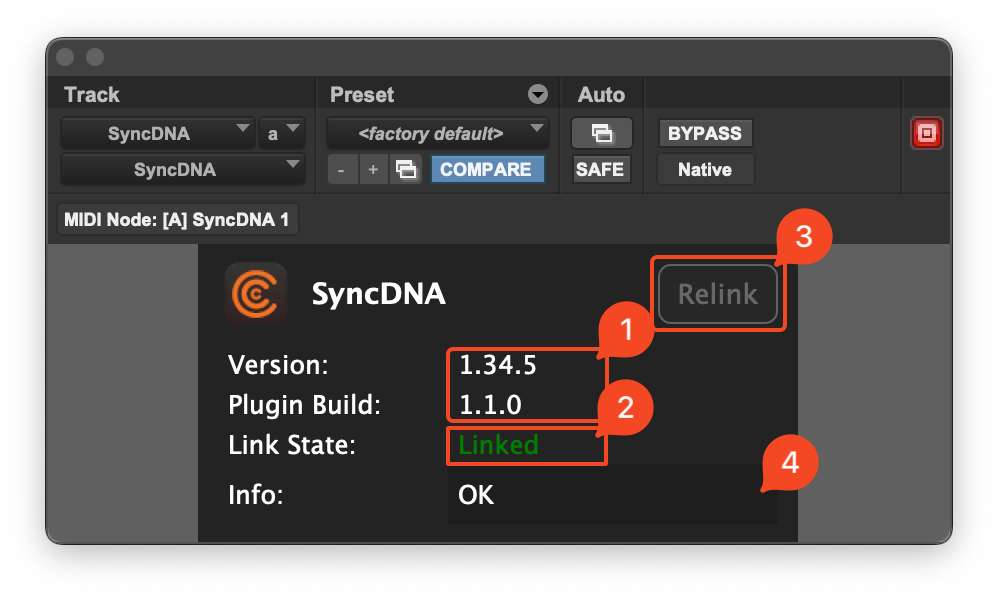
- Version: SyncDNA app and plugin version info.
- Session link state: "Linked" when the plugin is successfully connected to a SyncDNA session. "Unlinked" otherwise.
- The "Relink" button becomes active when you load a session in the SyncDNA app that has been linked to a different DAW/NLE session before. Clicking it will override the previous link and link the current DAW/NLE session to the SyncDNA session.
- Status info or error messages.
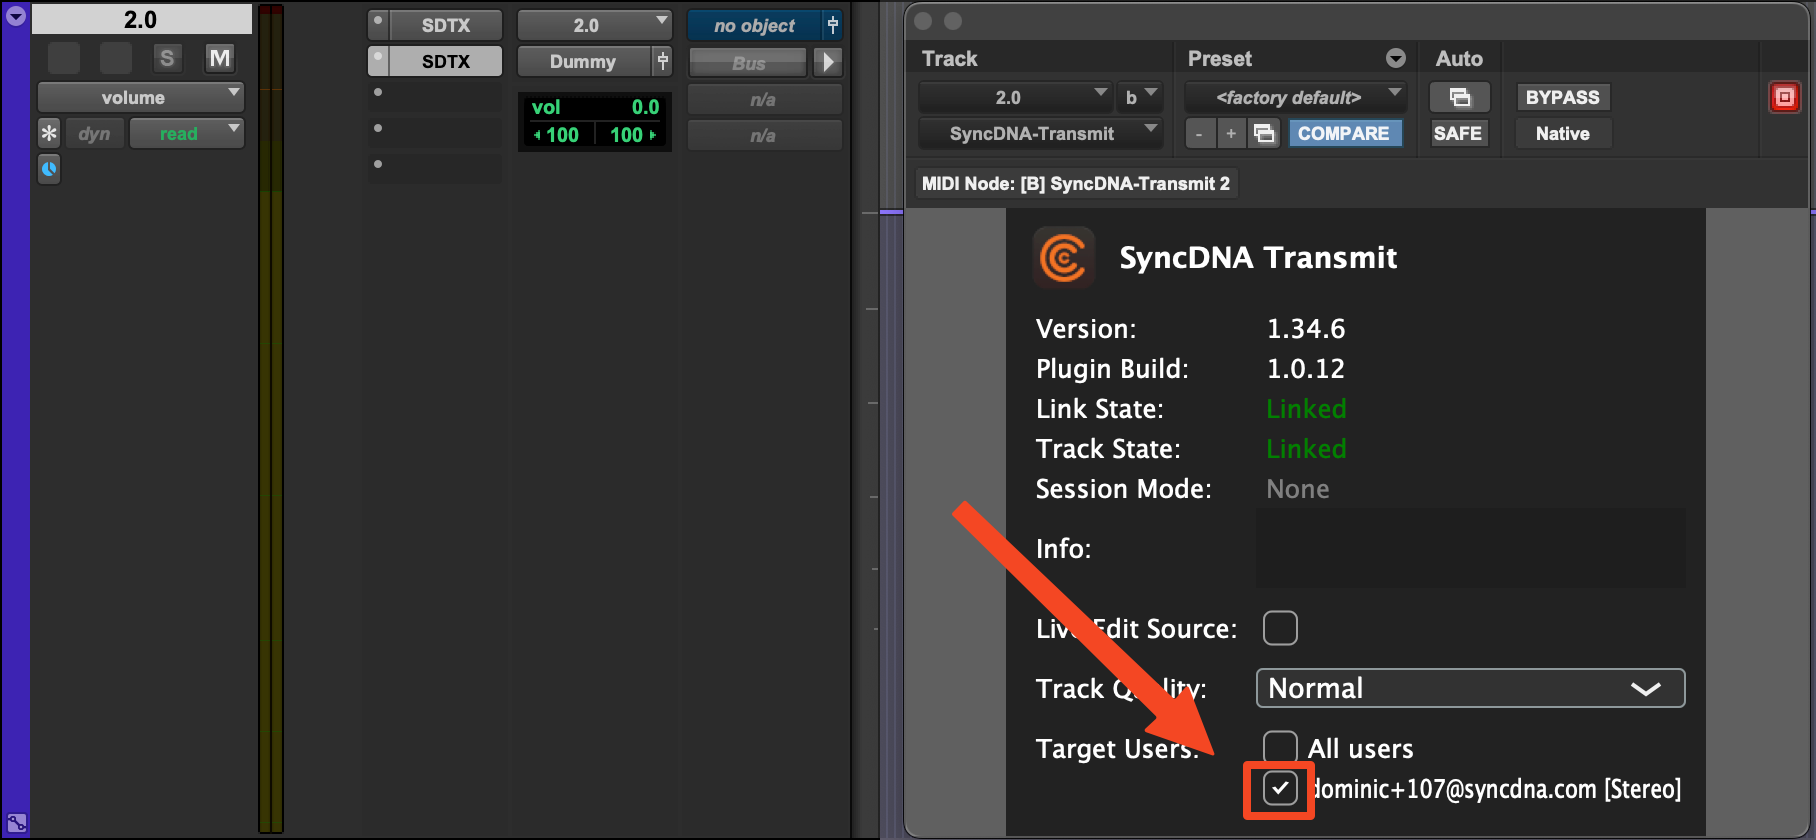
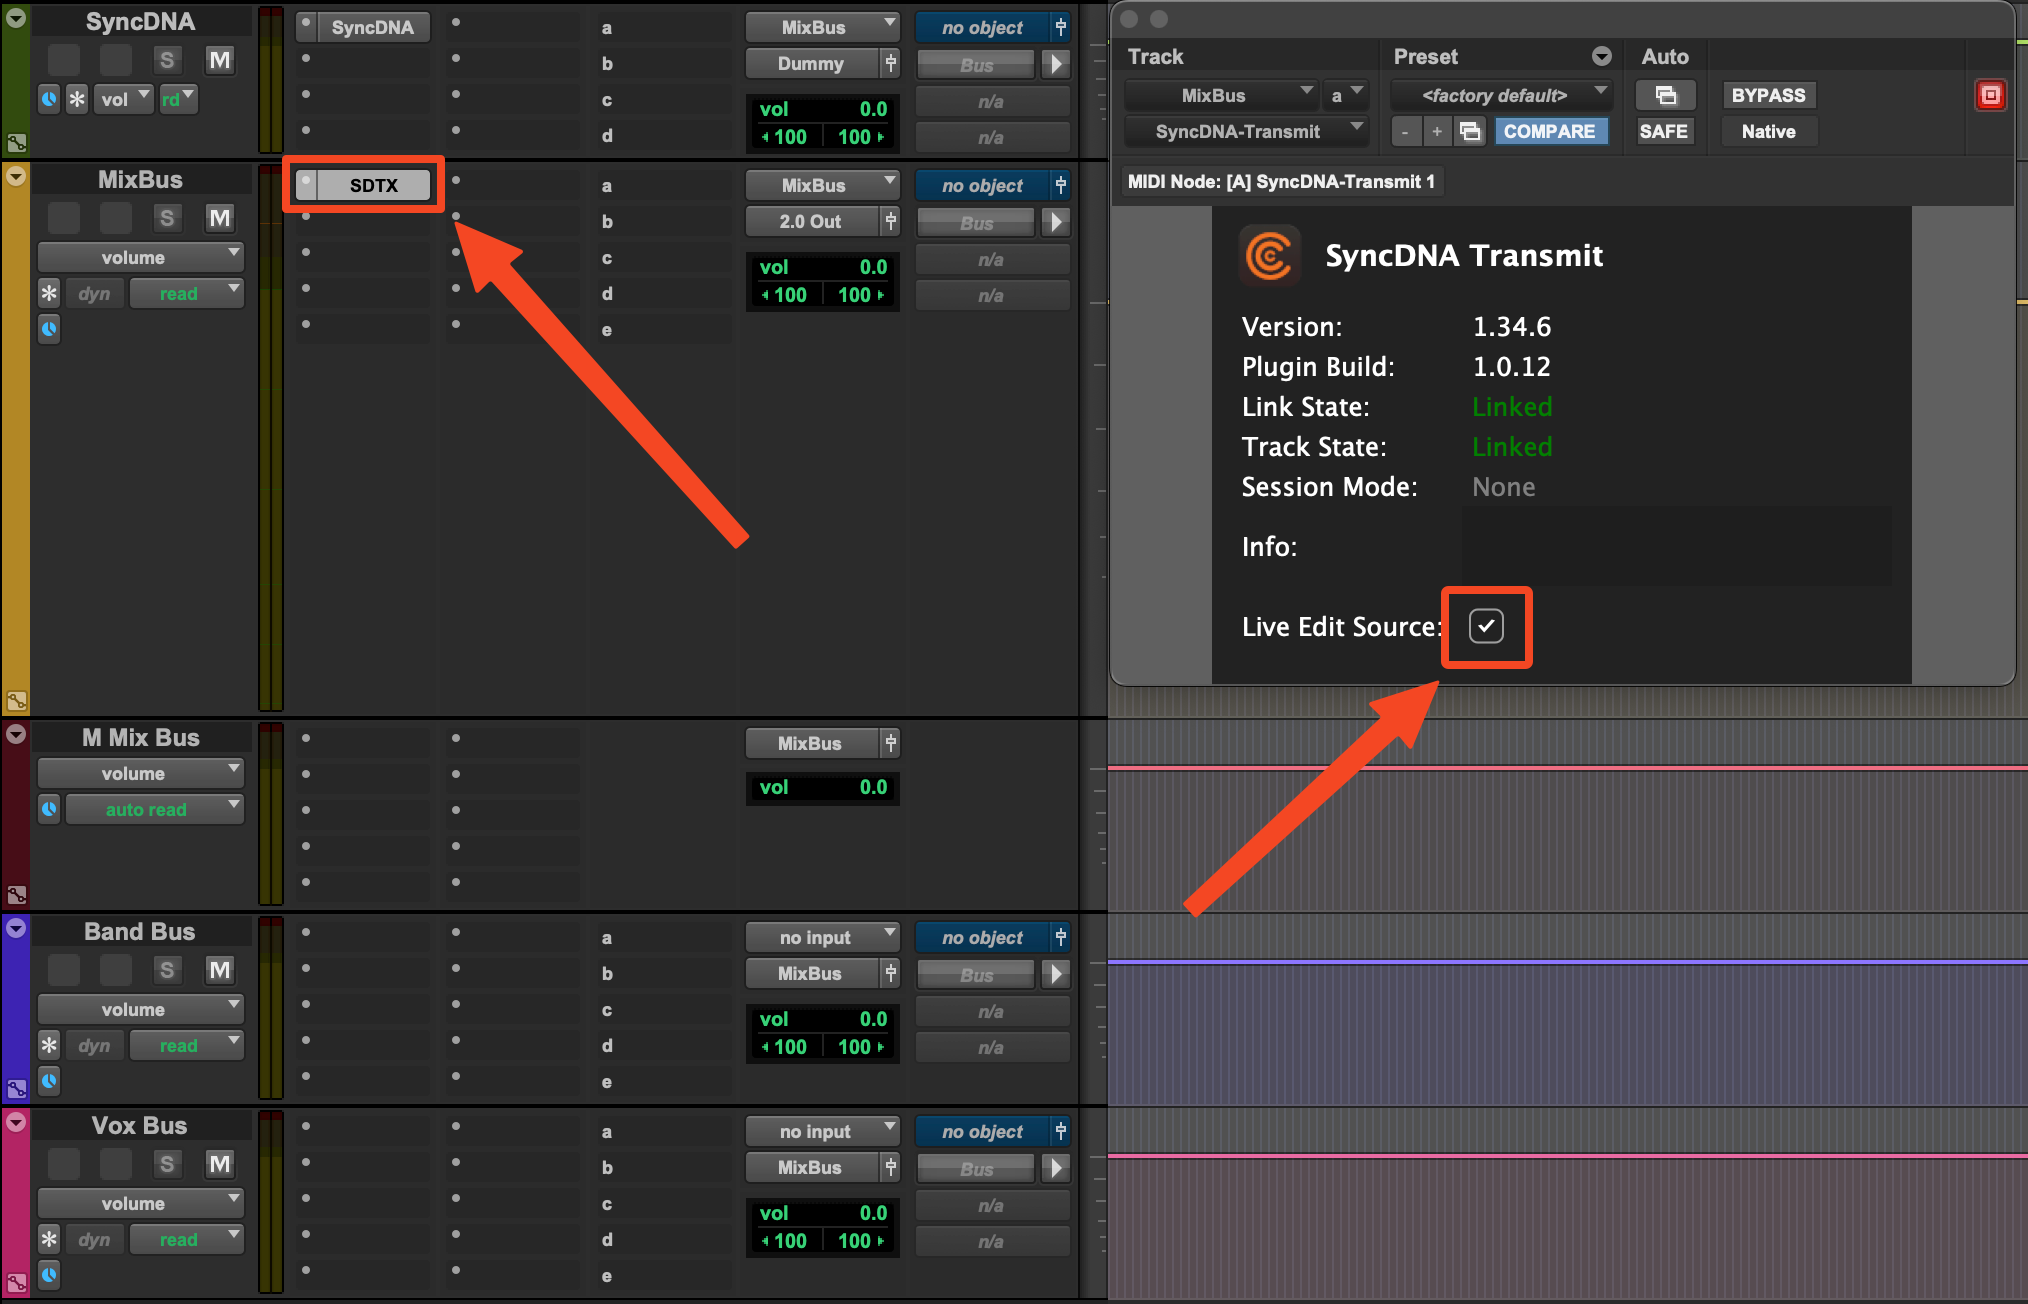
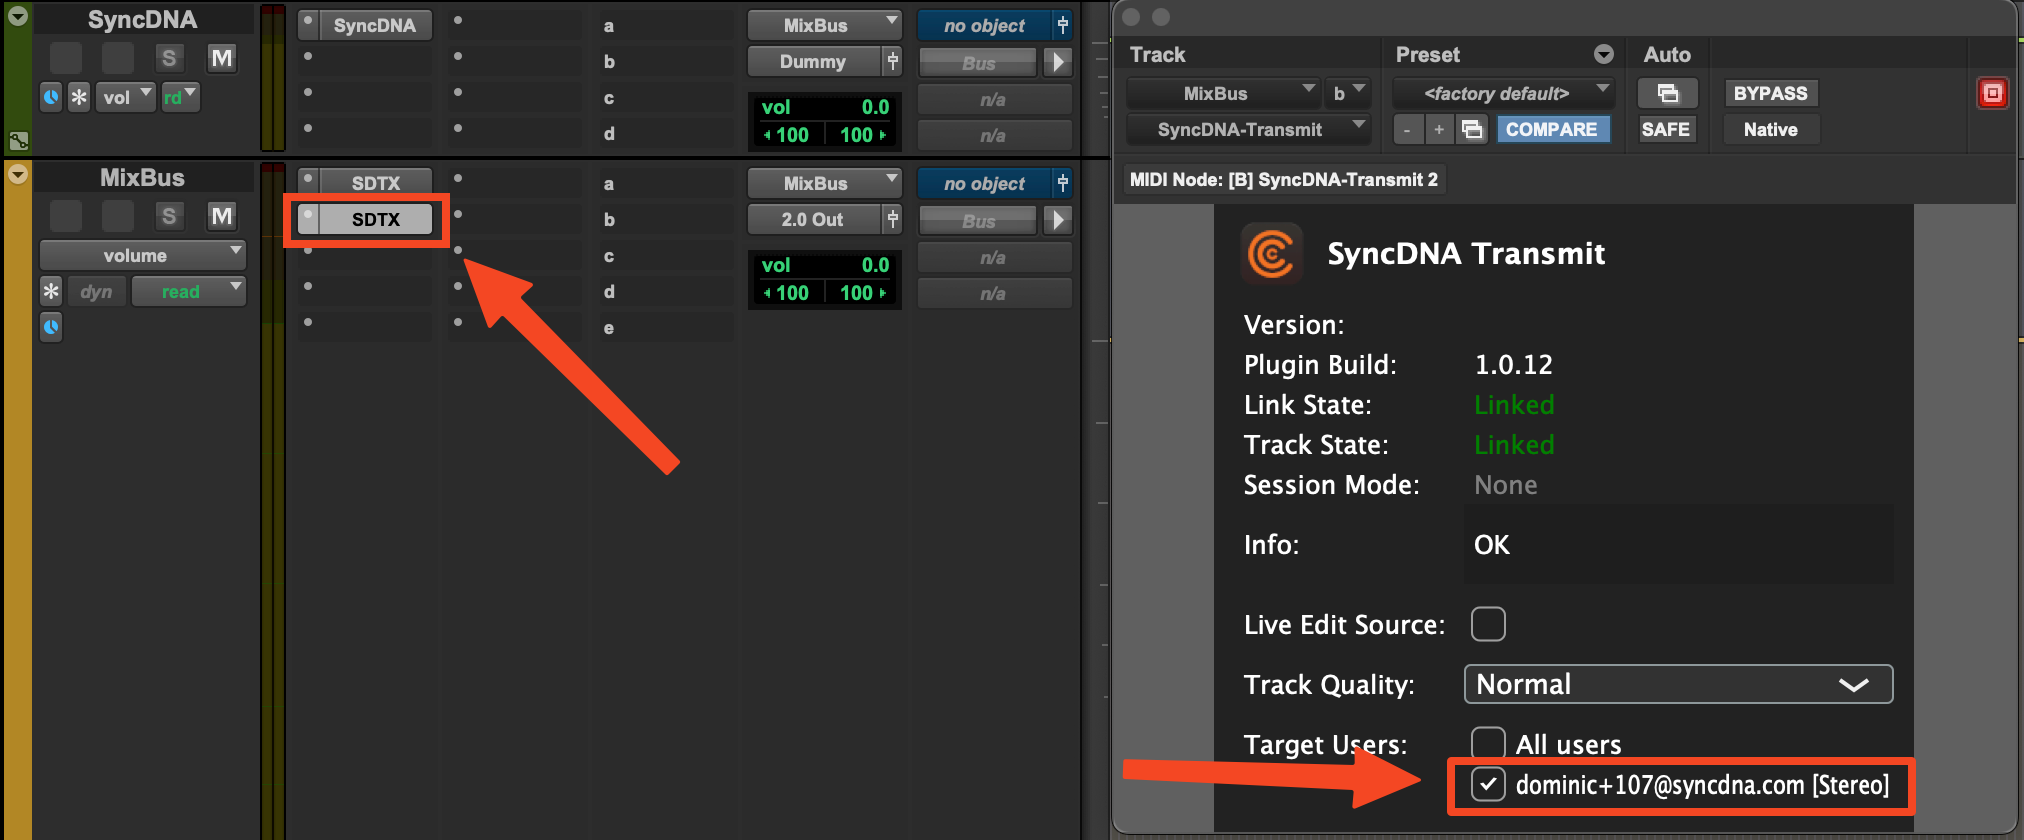
Transmit Plugin
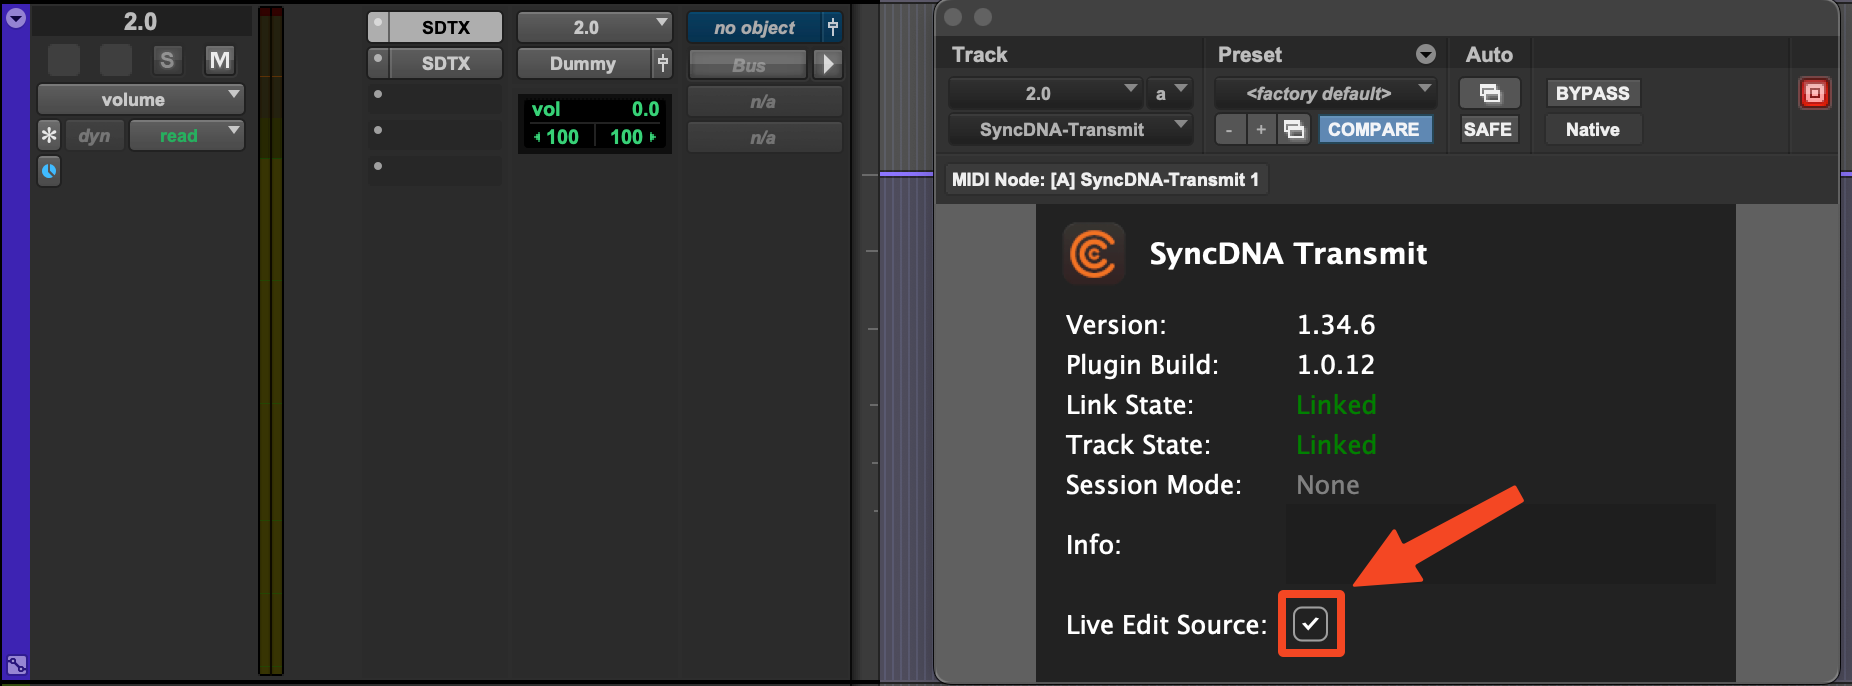
The transmit plugin sends audio from your DAW/NLE session into the SyncDNA session.
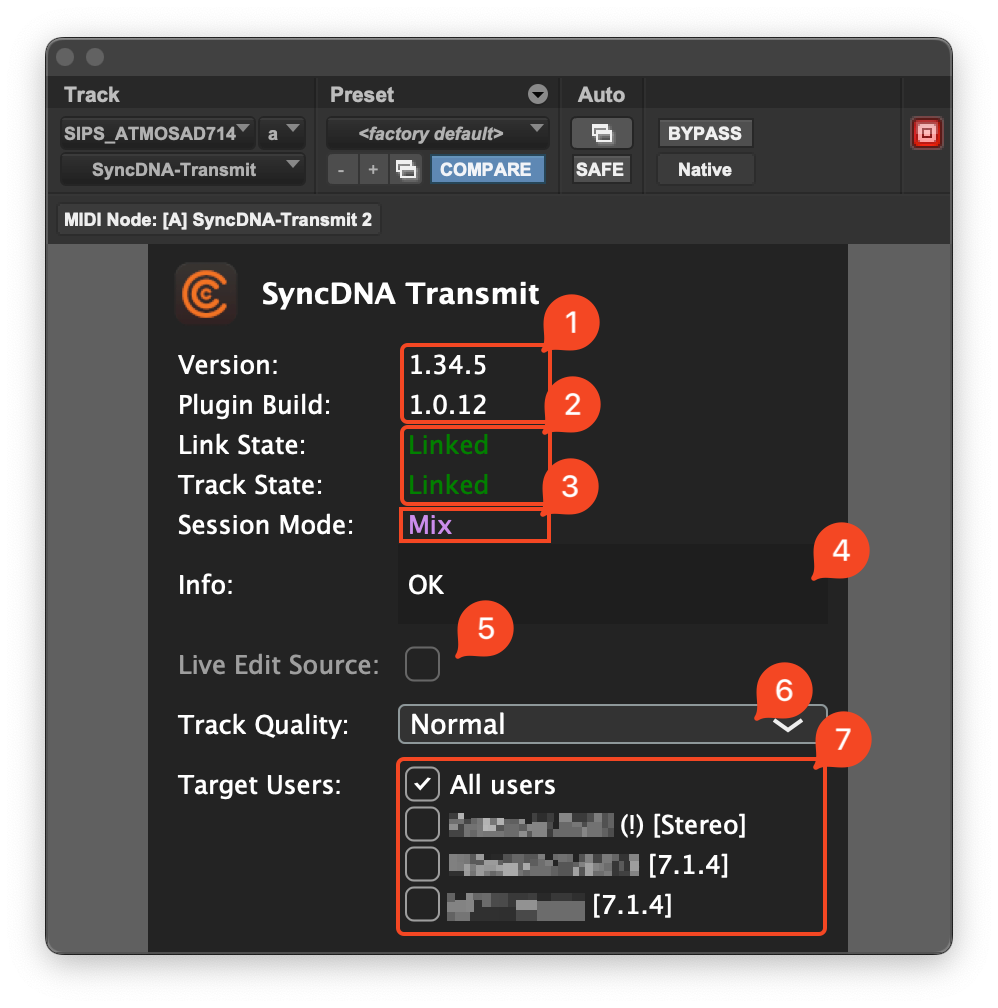
- Version: SyncDNA app and plugin version info.
- Track and session link state: "Linked" when the plugin is successfully connected to a SyncDNA session/track. "Unlinked" otherwise.
- Current SyncDNA session mode.
- Status info or error messages.
- Live Edit: If you want to make this plugin instance your audio source for Live Edit Mode you can enable this. Only mono and stereo tracks can be routed into live edit. A transmit plugin exclusively transmits audio into live edit mode or other modes. That means if you want a track to be routed into Mix Mode and Live Edit Mode at the same time, you have to use two transmit plugins.
- Track quality: Normal (compressed) / High (Lossless)
- Target users: User routing configuration.
- Behind each user name the plugin shows the configured audio output of a user. For example "7.1.4".
- If you see a (!) symbol, the user's output configuration does not match the track's channel layout. Audio will still be routed to that user. But SyncDNA does not create an automatic downmix in case the user has fewer available channels. SyncDNA will just map the track's channels to the user's configured outputs. In the image the first user will just hear the L/R channels of the 7.1.4 track.
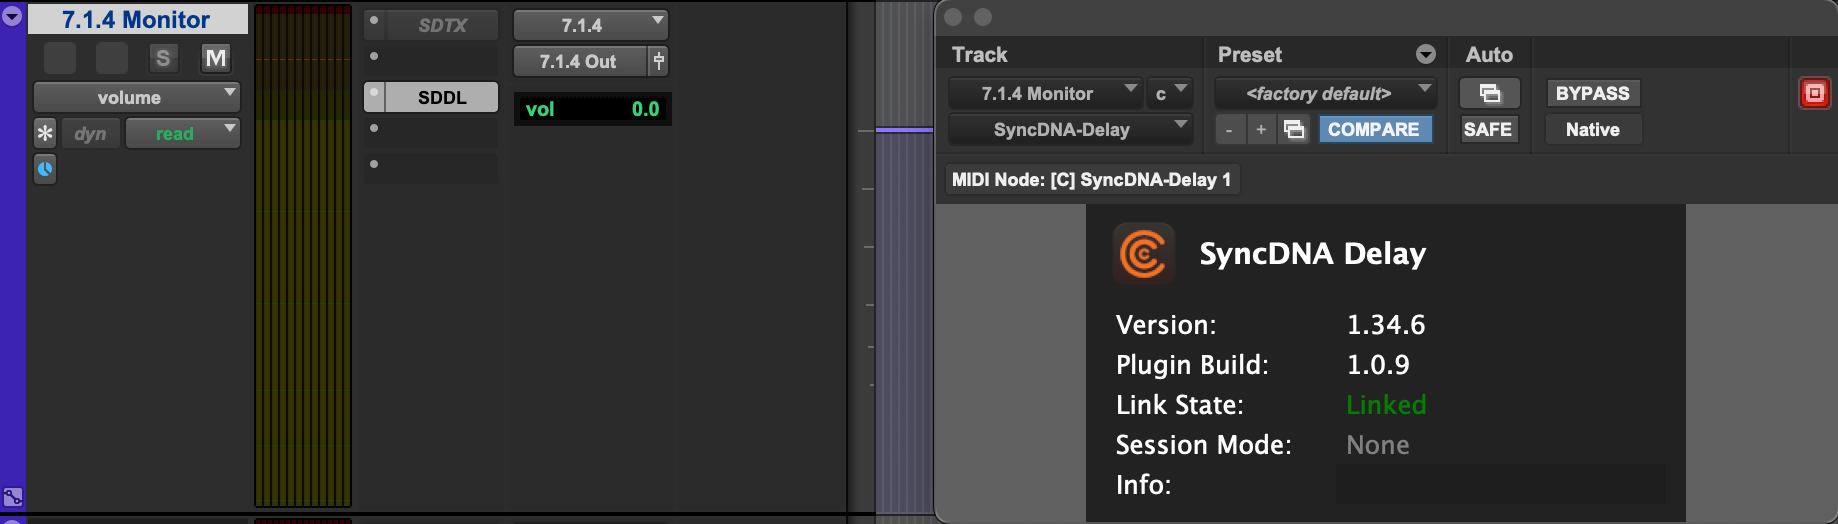
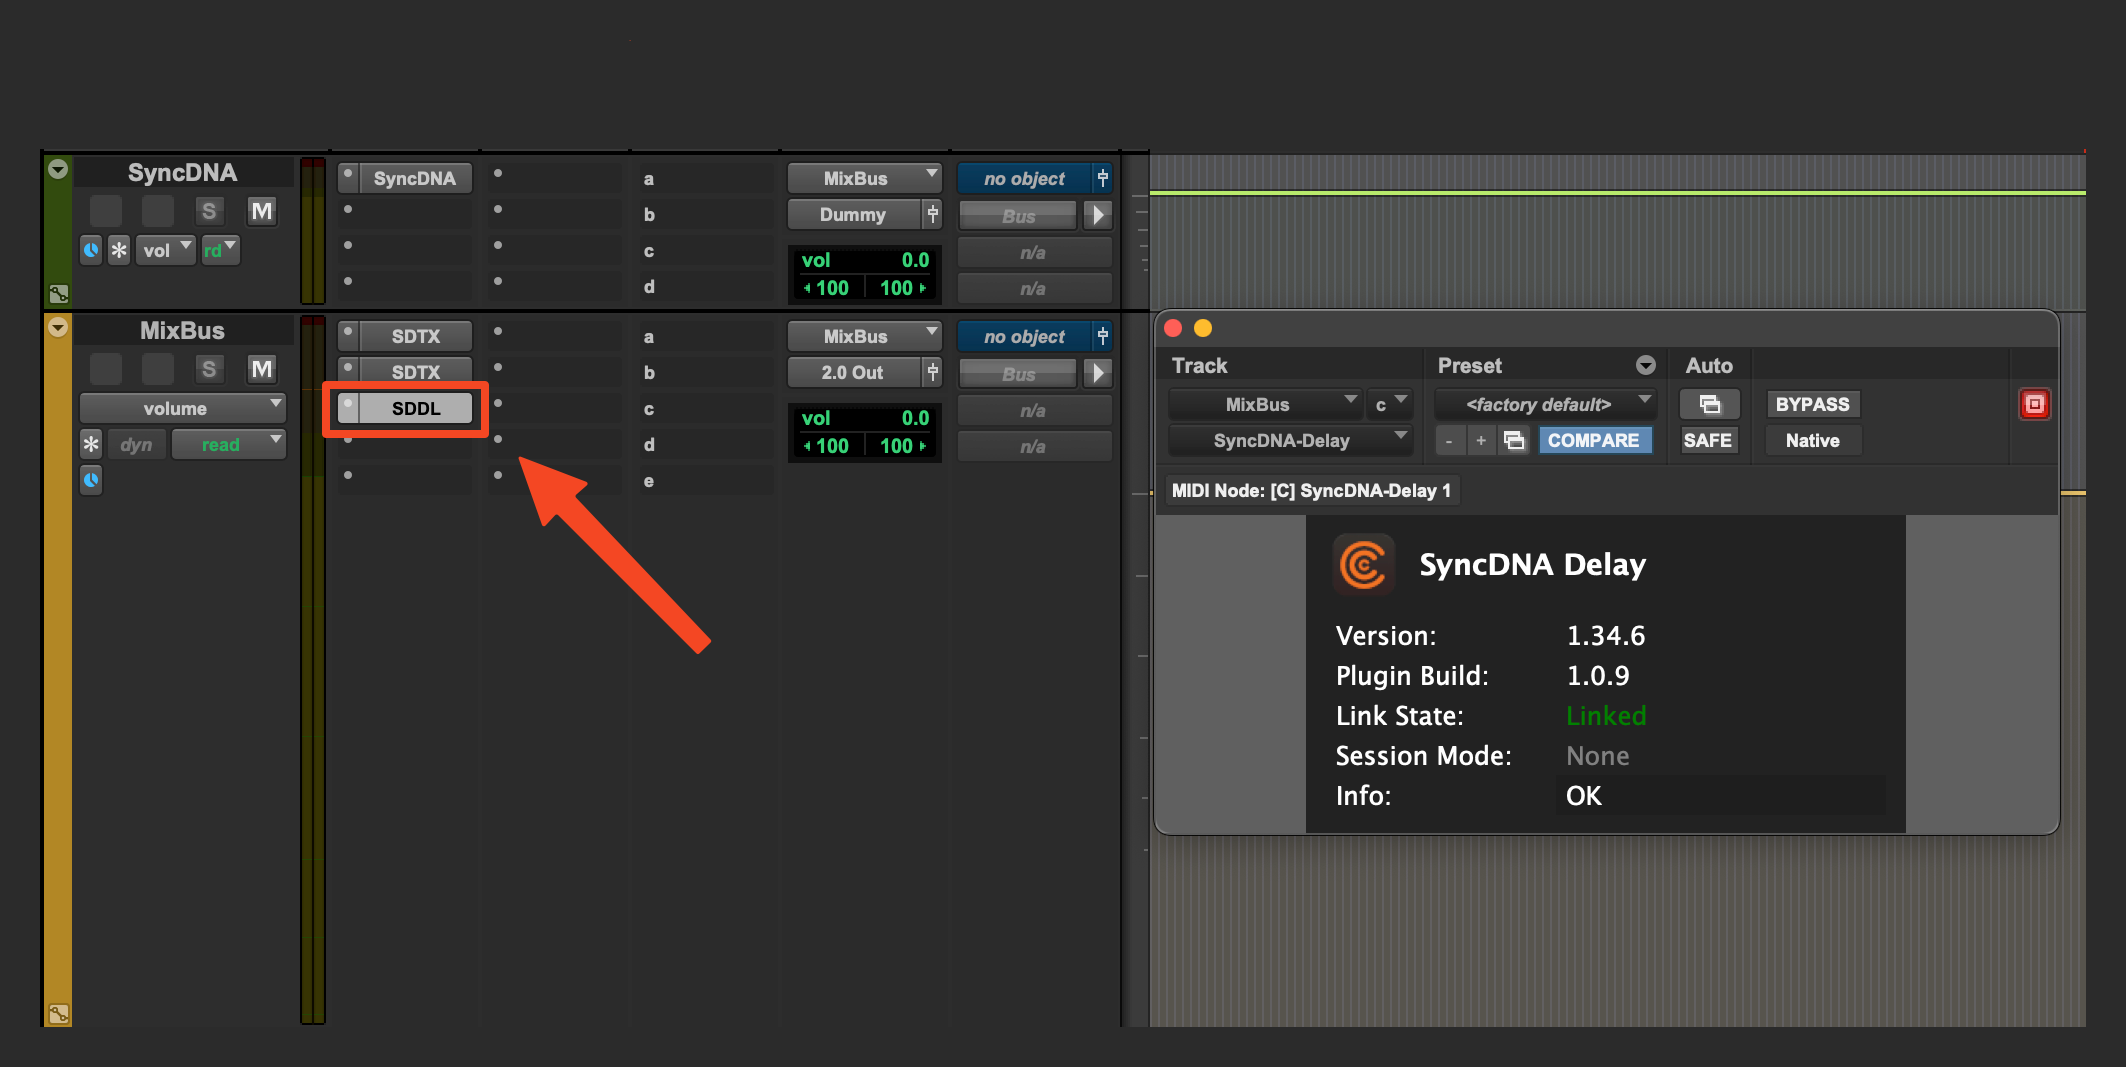
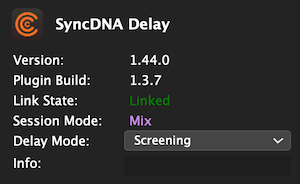
Delay Plugin
The delay plugin can be used to delay local audio tracks or buses in your DAW/NLE when SyncDNA operates in Screening Mode. The plugin does nothing in any other mode.
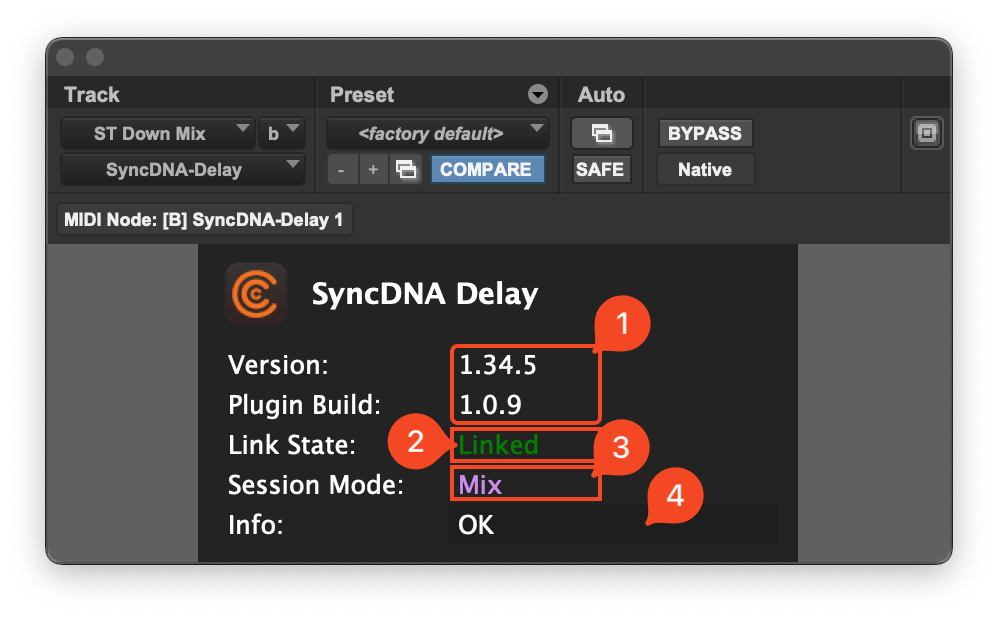
- Version: SyncDNA app and plugin version info.
- Session link state: "Linked" when the plugin is successfully connected to a SyncDNA session/track. "Unlinked" otherwise.
- Current SyncDNA session mode.
- Status info or error messages.
Delay MIDI Plugin
The delay MIDI plugin works like the regular delay plugin but connects to the SyncDNA app over MIDI. This is required for air-gapped setups with no network connection for the renderer machine. You have to setup a MIDI output device in the SyncDNA app.
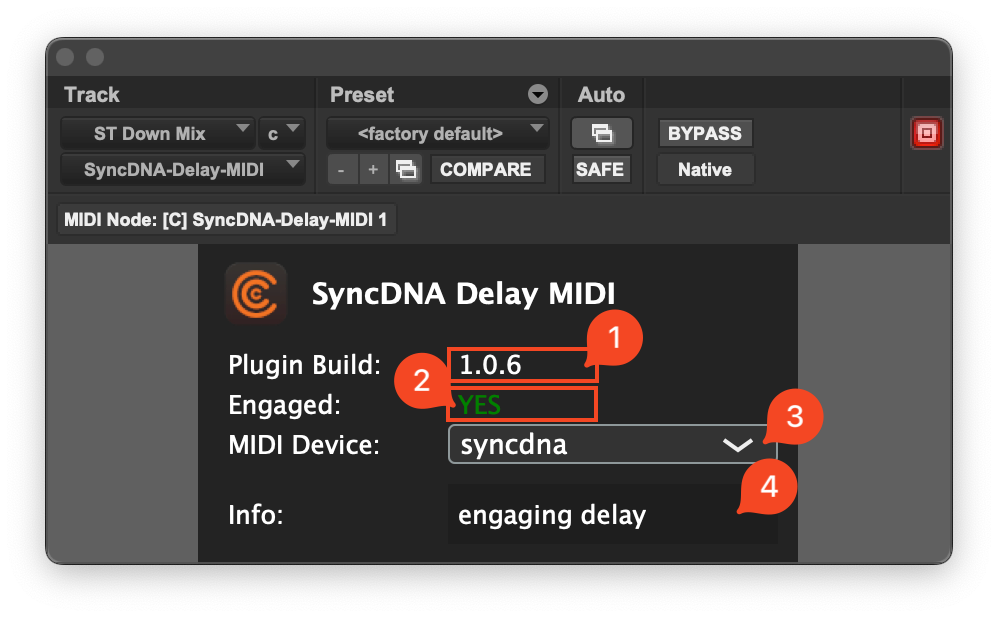
- Version: Plugin version info.
- Engaged: "YES" if the connected SyncDNA app operates in Screening Mode.
- The MIDI input device to use.
- Status info or error messages.
Workflows
- Dolby Atmos Internal Renderer
- Stereo Music Mix
- Blackmagic Decklink Installation
- Understanding Session Modes
- Working with Video
Routing
This page demonstrates how to properly place SyncDNA plugins in your DAW and route audio to the correct participants.
Dolby Atmos Re-Render Routing
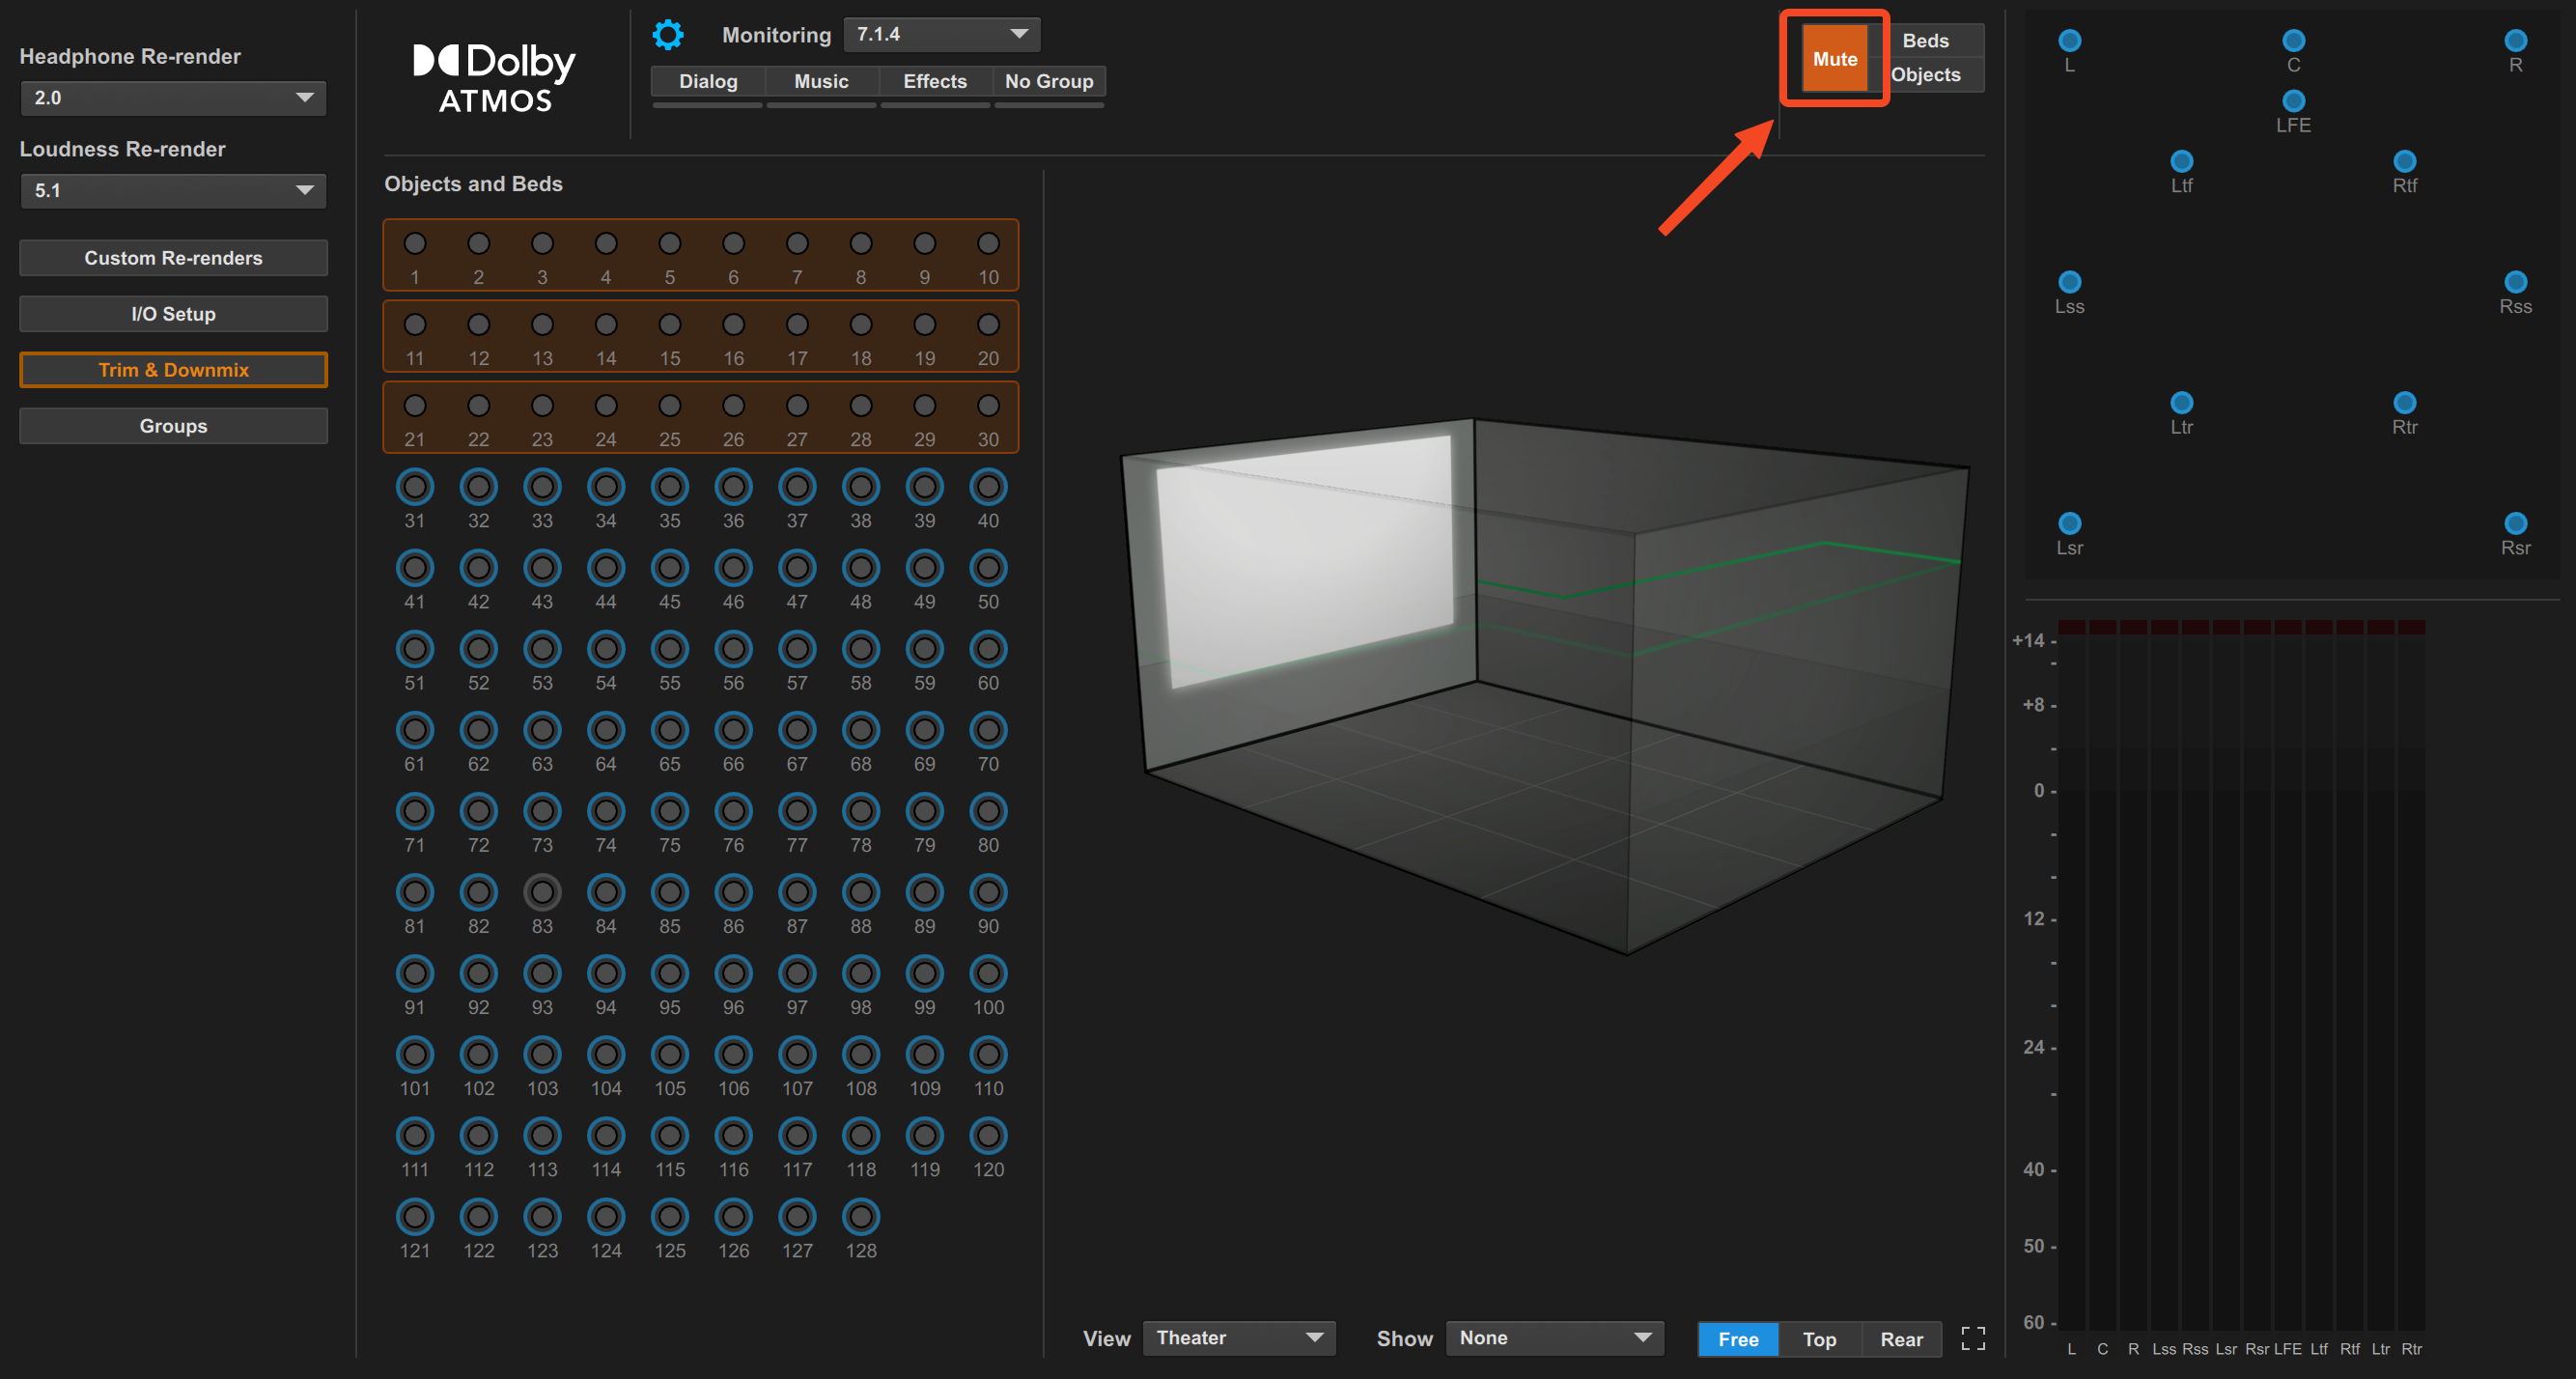
If using the Dolby Atmos Renderer, switch to the Dolby Atmos Internal Renderer.
- Create re-renders in the Renderer of your choosing that you would like to transmit to users in your SyncDNA session.
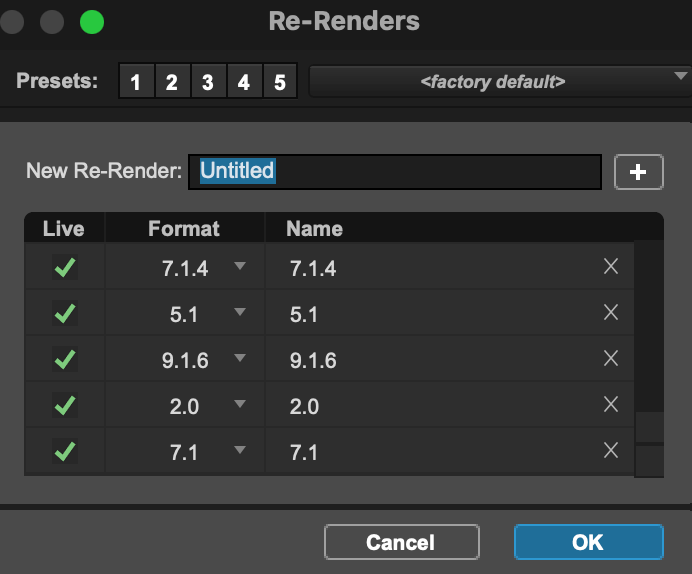
-
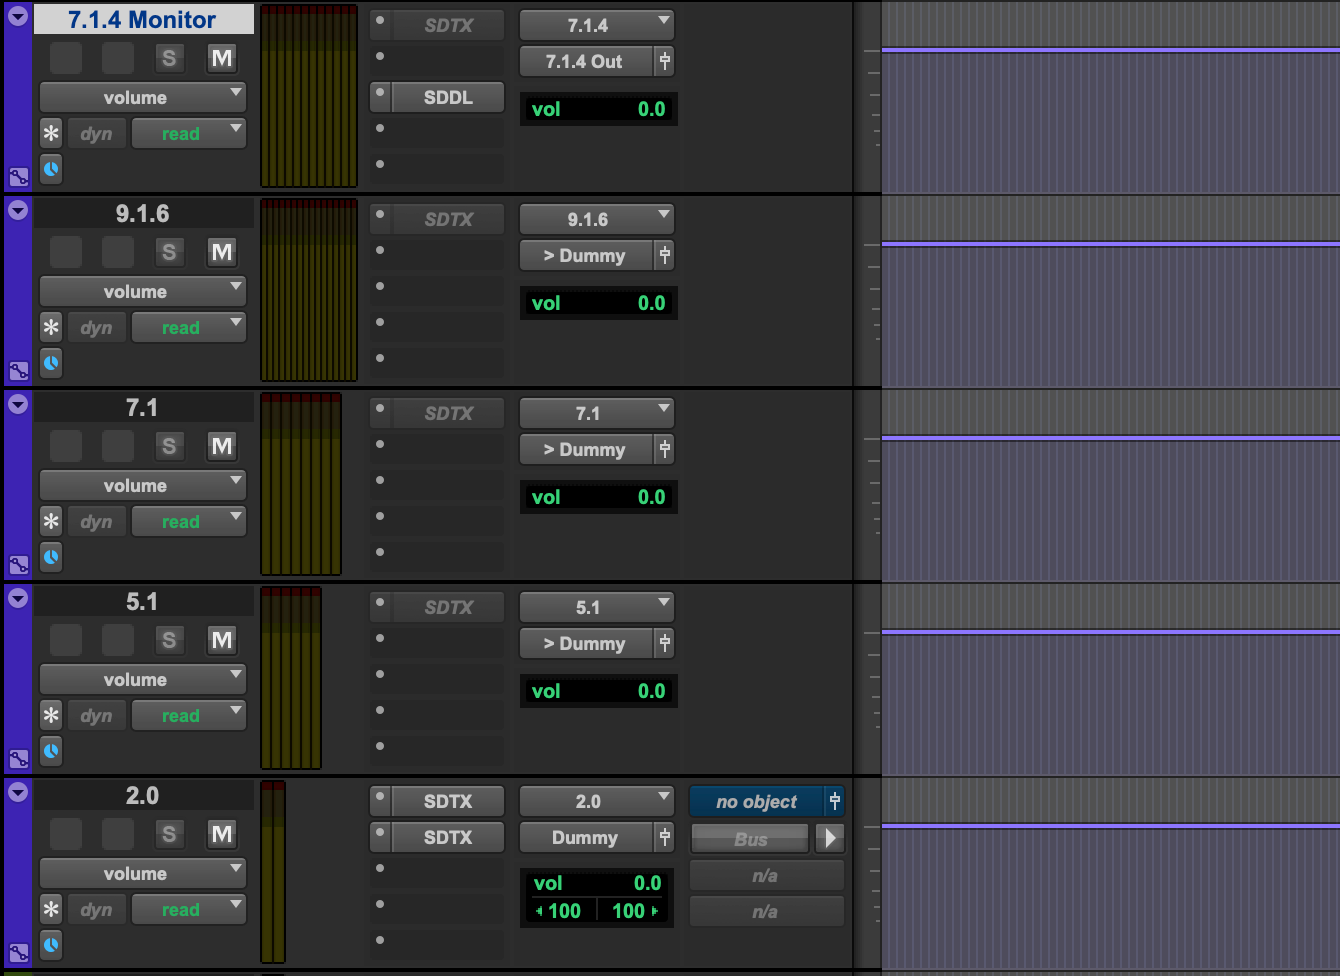
Create a re-render that matches the layout of your room. When using SyncDNA, you'll monitor through a re-render and mute the room output of the renderer.
-
Create AUX's matching the track widths of the re-renders you created. Assign the inputs of these tracks to the re-renders you created. Assign the output of these tracks to dummy outputs or mute them.
-
Assign the Aux that contains the re-render for your local monitoring to the correct output.
-
Mute the renderer Output.
- Make a stereo Aux and a stereo re-render
- Set the input of the stereo Aux to the stereo re-render
- Mute the output of this track and/or buss it to a dummy output
Transmit Plugin
- Place a SyncDNA Transmit plugin on the desired re-render aux's from which you'd like to transmit to users.
- ex. Place a Transmit plugin on your Stereo Aux and a 5.1 Aux re-renders. If you have clients connecting with both stereo and 5.1 configurations you'll select them in the TX Plugins accordingly.
Place an additional SyncDNA Transmit Plugin on the stereo Aux. Engage the Live Edit check box. (This will enable Live Edit Mode)
- Open a Transmit Plugin on ex. the stereo Aux. Select the desired target user to recieve the audio of that Track.
Caution
It is possible to send two formats to one participant. Ensure each participant is only selected in ONE Transmit plugin
Delay Plugin
Place a Delay plugin on the Aux re-render from which you are monitoring your Dolby Atmos Mix. In this example, we are monitoring a 7.1.4 re-render as our room is configured as 7.1.4.
- The delay plugin will only engage the synchronization delay in Screening Mode
Stereo Music Mix
SyncDNA Main Plugin
-
Create a stereo Aux track labeled "SyncDNA":
- Set the input to your Mix Bus
- Set the Output to a Dummy output
-
Add a stereo SyncDNA Main Plugin to the stereo "SyncDNA" Aux track
SyncDNA Transmit Plugin
- Place a stereo SyncDNA Transmit plugin on your stereo Mix Bus Aux and engage Live Edit checkbox.
-
Place a second SyncDNA Transmit plugin on your stereo Mix Bus Aux after the first Transmit Plugin.
-
This plugin will be used to transmit sample-accurate audio to guests.
SyncDNA Delay Plugin
- Place a SyncDNA Delay plugin after the SyncDNA Transmit plugins. This should be the last plugin in your Mix Bus chain.
- The Delay plugin will only engage during Screening Mode
A Pro Tools Template is available for download here: SyncDNA Plugins Stereo Music Template
Blackmagic DeckLink Installation
Download latest Desktop Video driver from Blackmagic Design
- Please note, some users have experienced issues with the latest driver, your system may function better with a driver ranging from v12.5-current.
Minimum version required is v12.5
-
When installing the Desktop Video Driver, ensure all MacOS Privacy and Security settings are accepted. This includes:
-
Login Items
- Blackmagic Design Desktop Video
-
Extensions
- Camera Extensions
- Blackmagic Desktop Video Driver Extension
- Driver Extensions
- Blackmagic Desktop Video Driver Extension
- Camera Extensions
Supported Devices
- Blackmagic UltraStudio 3G Recorder (Note, this device only supports up to 1080p input)
- Blackmagic UltraStudio HD Mini (Note, this device only supports up to 1080p input)
- Blackmagic UltraStudio 4k Mini
- Blackmagic Decklink 4k
- Blackmagic Decklink 4k Extreme 12G
- Blackmagic Decklink 8k Pro G2
Setup
Place an SDI cable connecting the output of your Blackmagic hardware to an SDI input of your Blackmagic hardware.
-
If connecting a 3G Recorder, connect to the 3G Recorder via HDMI or SDI from your video hardware device attached to your DAW.
-
Open the Desktop Video Setup software included with the driver
- Select which input you are using (SDI or HDMI)
-
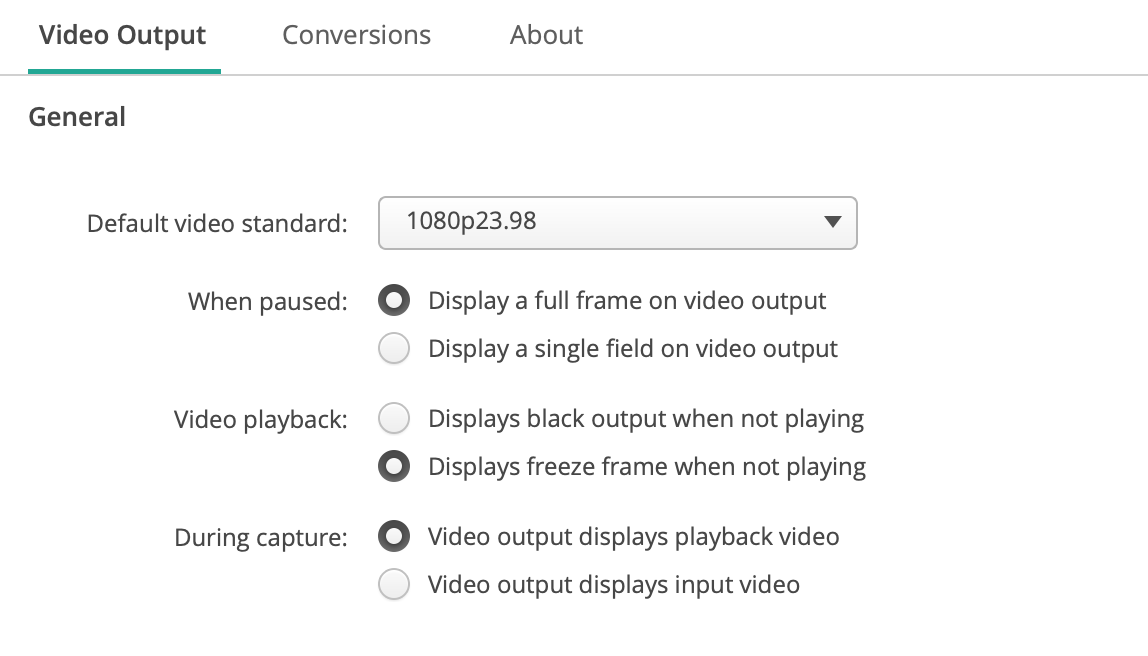
Ensure the following settings are selected in Desktop Video Setup
Setting up your video device in SyncDNA
-
Open SyncDNA and open the App Settings found in the settings gear on the left side of the application.
-
Navigate to the Video Tab
-
Create a profile
-
If connecting a Blackmagic Device that has both playback and capture, ONLY select your device in the input field of the video profile. Select "NONE" in the output field of the video profile as the output is claimed by your DAW.
-
If connecting to a Blackmagic 3G Monitor, only select the device in the input field of the video profile.
Understanding Session Modes in Various Workflows
SyncDNA's Session Modes are designed to circumvent the consequences of latency in everyday remote collaboration.
The SyncDNA Session Modes were designed to be quickly toggled between various modes throughout a session. Using Key Bindings are a good way to quickly toggle session modes during sessions.
Screening Mode (Sample & Frame-accurate)
- If desiring to playback a section of material from the DAW to participants and have all participants synchronized, use Screening Mode.
-
In Screening Mode, the local studio session is delayed by a few seconds upon rolling the DAW transport while media is synchronized to all participants.
- This is done in two parts:
- The SyncDNA Delay Plugin introduces a sample-accurate delay into the DAW monitor output path to delay the audio to match all participants
- The SyncDNA standalone app delays the video (either uploaded or inputed over Blackmagic video hardware) to match all participants
- If viewing picture in Pro Tools, monitor video in the SyncDNA standalone app via the video hardware input which will be shown in the application, or via an imported video file.
- Most users prefer to monitor SyncDNA's video window which can be undocked at the bottom of the application and moved to an extended monitor
- This is done in two parts:
-
Hands must be off faders in Screening Mode as the audio and video are being rendered in the background and will audibly and visually be synced, however a few seconds out sync relative to the DAW
-
Mix Mode (Sample & Frame-accurate)
- If desiring to mix (hands on faders) while maintaing sample and frame-accuracy, switch into Mix Mode
- In Mix Mode, the mixer/engineer can mix in real-time while guest participants are slightly delayed downstream, however guest participants are receiving high resolution audio and video (frame and sample-accurate)
Live Edit Mode (Lossy Stream)
- If desiring to quickly address areas in the DAW timeline without needing to wait the few seconds for synchronization, use Live Edit Mode
- In Live Edit Mode, audio feed is switched to a maximum of stereo with lossy compression and transmission is switched to WebRTC streaming quality. Video is also compressed and streamed over WebRTC
- This mode is not frame and sample-accurate, however, it is very quick and designed for short duration playbacks, spotting, identifying, etc.
Isolate Mode
- If desiring to address notes given in a session or make adjustments without participants receiving audio and video, use Isolate Mode
- Isolate Mode terminates the audio and video transmission from the studio/host to the guest participants and essentially acts as a disconnect allowing the mixer/engineer to work solo without guests reviewing.
- Isolate Mode can pair nicely with Focus Mode allowing the guests to continue their conversation while the mixer/engineer addresses notes privately without the distraction of the video conference.
Working with Video
There are 2 ways to work with video in SyncDNA
1. Importing a video asset
- A video asset can be imported into a SyncDNA session via the session settings window.
With the workstation connected and plugins linked properly
-
Open the session settings found at the bottom of the application while inside a session
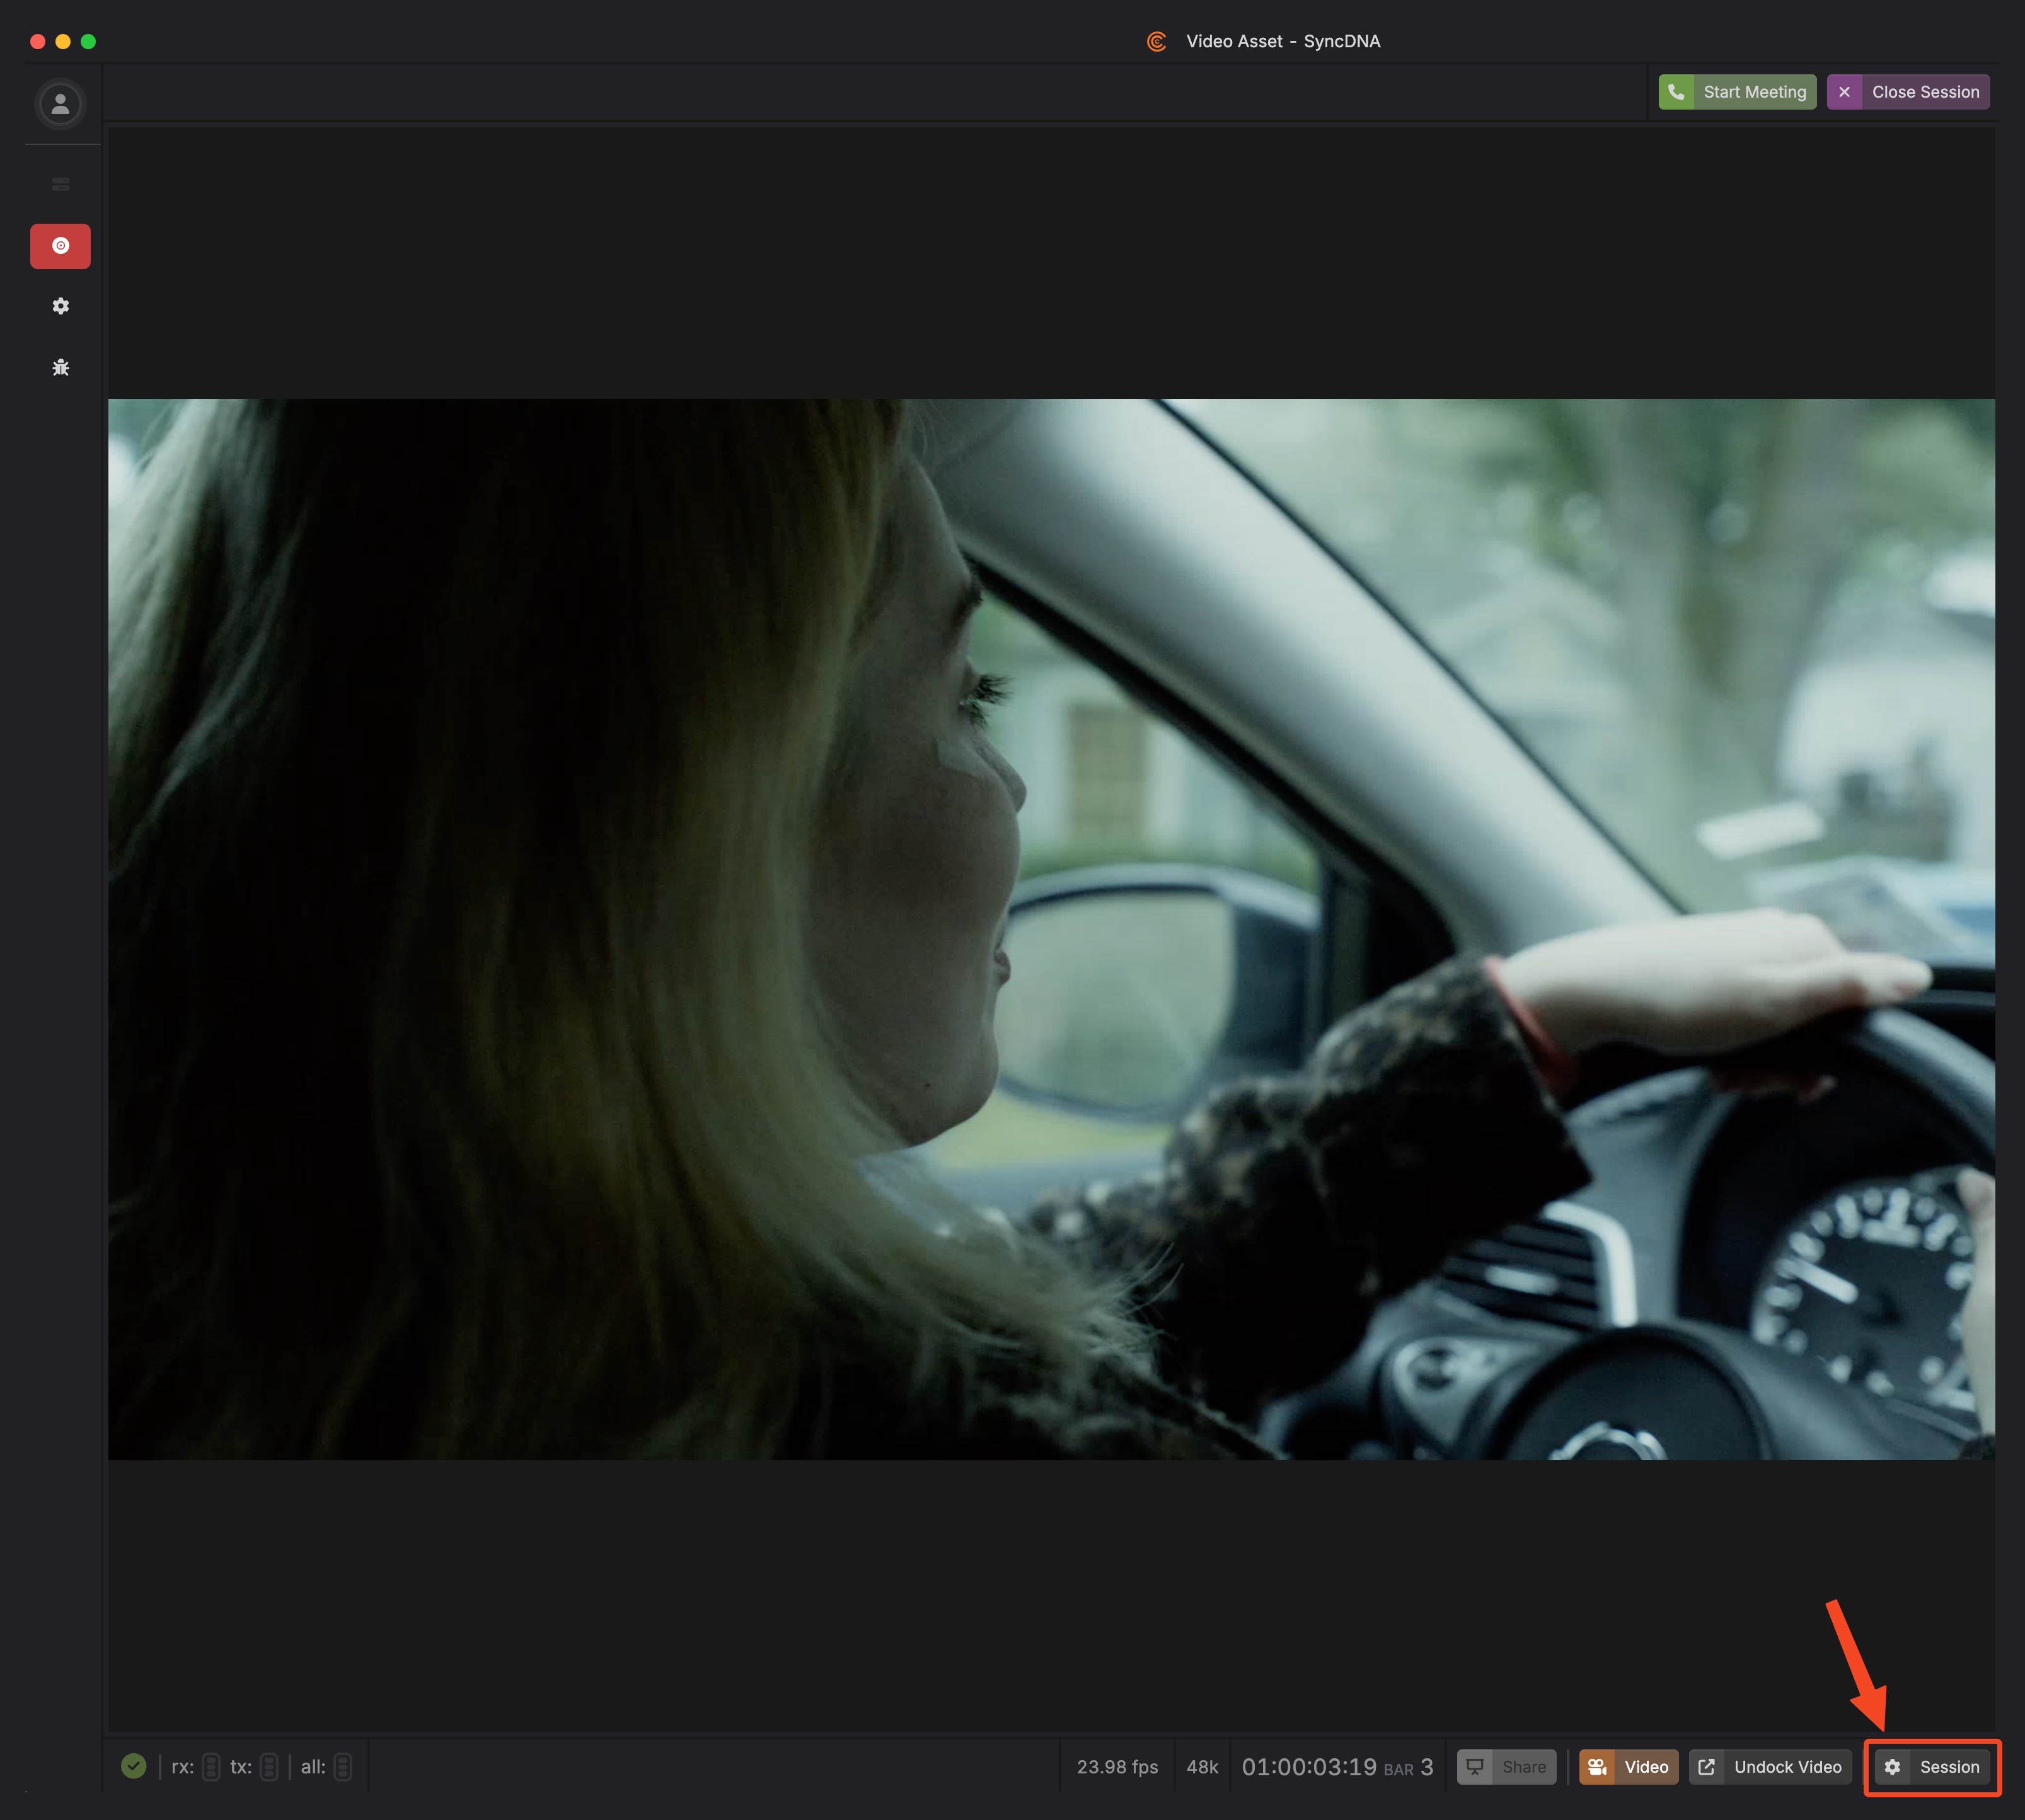
-
- Ensure "File Upload" is selected in the standalone app
-
- Select the video file from the pop up file browser
-
- Enter the timecode start position of the video asset (more than likely the same timecode of the asset in the DAW timeline)
-
- Upload the asset
Calibrating Video Sync with Video Assets
- When using a video asset, calibrate your local monitor delay by utilizing a tool such as Catch n' Sync.
- Import the Catch 'n Sync video into SyncDNA and sync it with the DAW timeline
- Import the Catch 'n Sync video into Pro Tools for the audio beeps that are included in the file
- Capture the offset value between the audible beeps and the visual sync indicators.
- Input the value into the local offset field of the Video Settings
- Run the test again to ensure the measurement was inputted properly. and sync is ~0ms
2. Live Video via Video Hardware.
-
After Setting up Video Hardware, video can be displayed in the application directly from the hardware.
-
There are 3 ways to enable live video
- Enable "Live Input" from the session create and session edit modal.
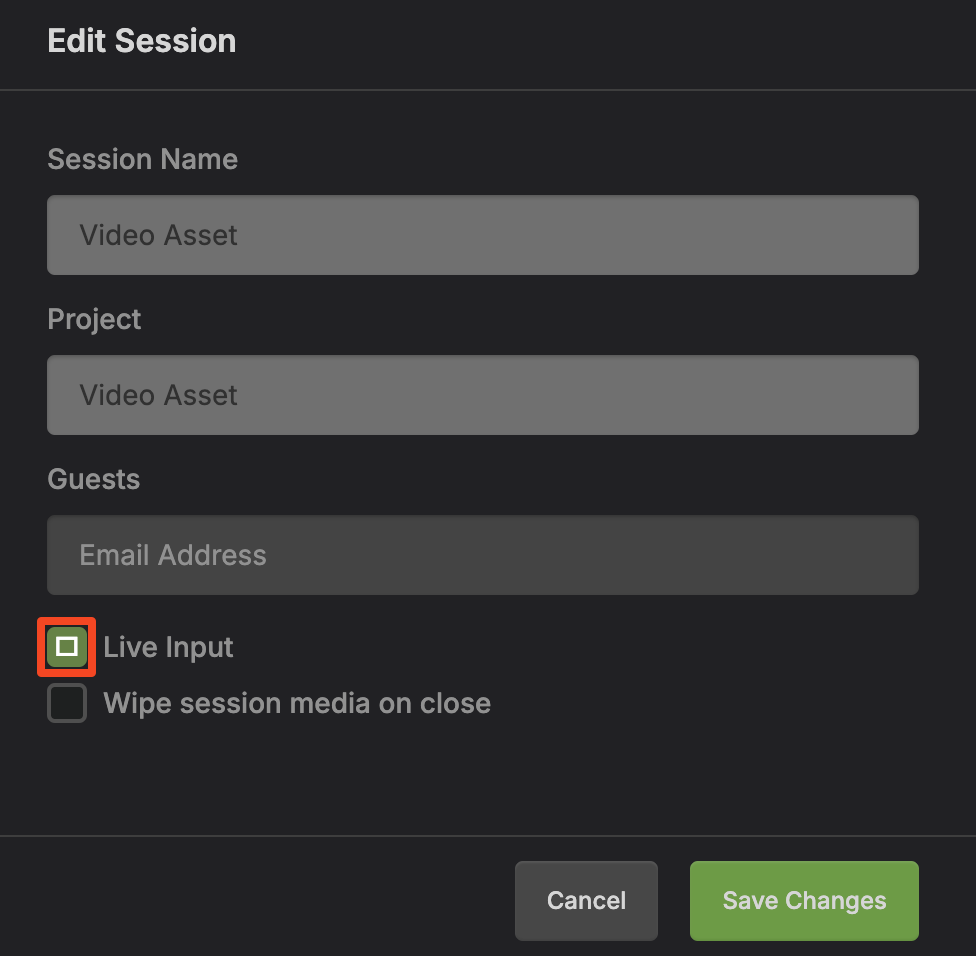
- Enable "Live Input" from the session settings within a session
- Video displayed should match video coming from DAW
Boot Order
- If using a single Blackmagic video hardware device for both playback from the DAW and capture into SyncDNA, the DAW must be opened first with the device successfully initialized. Once the DAW is open, proceed to open the SyncDNA Application.
- If using a separate capture device for SyncDNA such as the Blackmagic 3g Recorder, the boot order does not matter as the DAW only utilizes the playback portion of the driver.
Calibrating Live Input Video
- Ingesting the live video feed over hardware introduces roughly ~120 ms of latency in the feed. This can be offset in 3 ways.
- Adjust the video offset in the DAW.
- For ex. adjust the DAW video playback offset by ~ -120ms so it nulls out the ingestion delay.
- Adjust the session offset in the Video Settings which will correct the video sync for all participants of the session, however locally, it will be ~120ms out of sync.
- If utilizing option 2, take sync measurements in screening mode using Catch n' Sync videos. Input the delay value into the Local offset field in the Video Settings. This will align video properly in screening mode.
Track Record: Remote Recording with Pro Tools
Signal Flow Overview
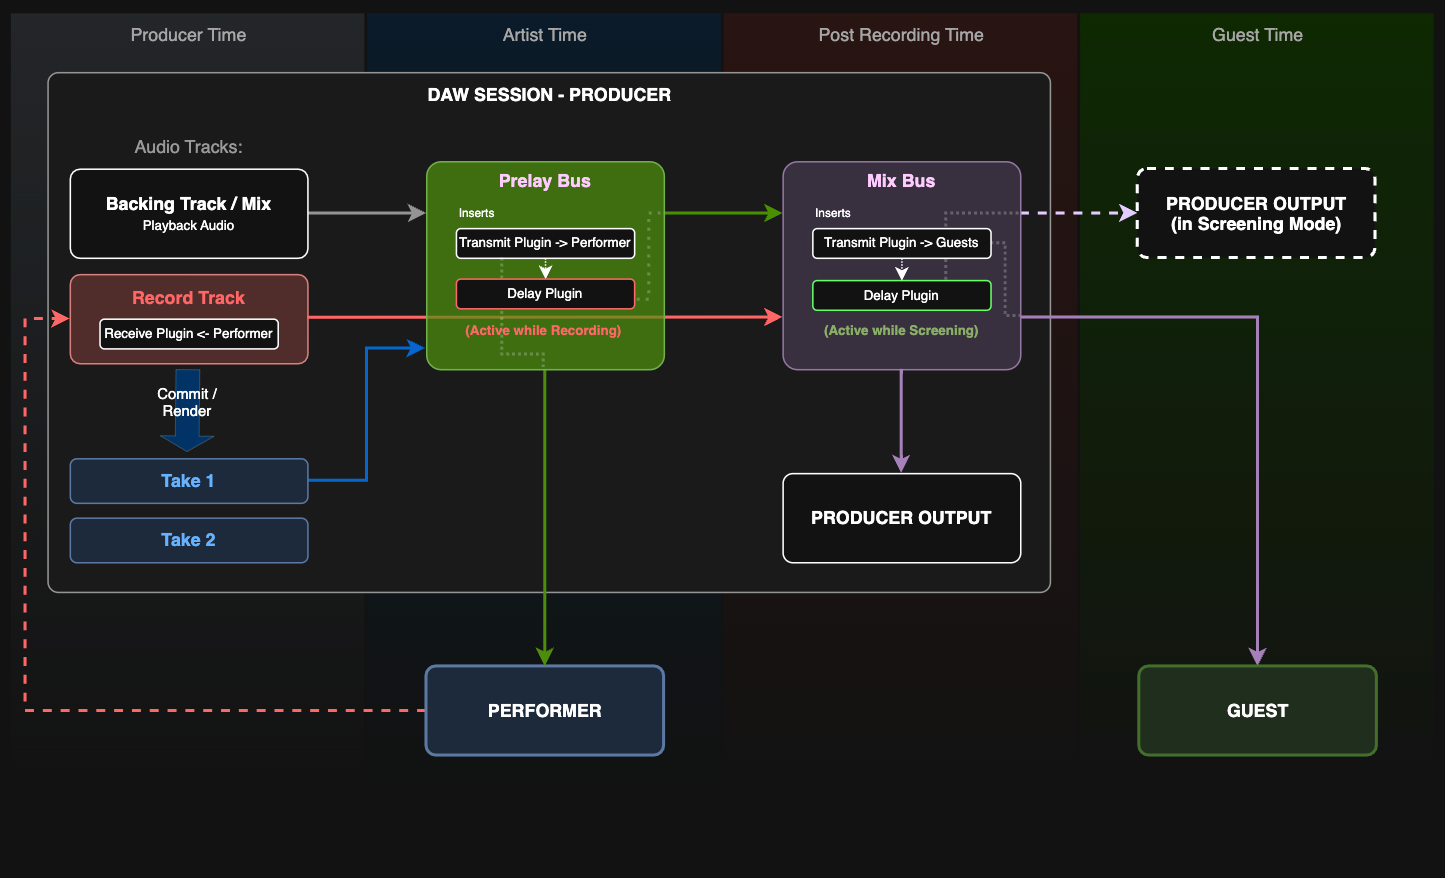
This diagram shows the complete signal flow for remote recording with Pro Tools and SyncDNA across different time domains:
- Backing Track/Mix sends prelay audio to the Prelay Bus
- Record Track receives performer audio via SyncDNA-Receive plugin and routes to the Mix Bus
- Prelay Bus (green)
- sends to performers via Transmit plugin, does local and guest recording delay compensation via Delay plugin
- sends to the Mix Bus
- Mix Bus (purple)
- sends to guests via Transmit plugin, moves local audio into the guest domain via Delay plugin when SyncDNA runs in Screening Mode
- sends to the local monitoring output
- Producer Output local monitoring output
- Committed takes (Take 1, Take 2) are rendered from the record track
Initial Setup
- Launch SyncDNA app and log in
- Create and open a session, invite the performer and the guests you want to work with
- Launch Pro Tools
- Create and open a session in Pro Tools
Session Setup
-
Open the I/O Setup (menu: Setup > I/O...)
- Under the Bus tab:
- Create a mono bus called "No Input"
- Create a stereo bus called "Mix"
- Create a stereo bus called "Prelay"

- Under the Bus tab:
-
Create a new instrument track for SyncDNA and add a "SyncDNA" plugin


-
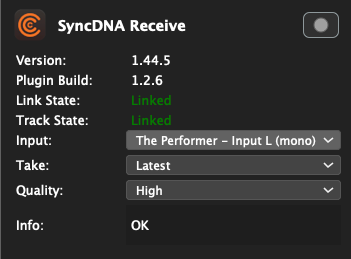
Create a new audio track for the performer input and add a "SyncDNA-Receive" plugin
- Choose the performer input channel
- Set the "No Input" bus as input for the track
- Set the "Mix" bus as output for the track

-
Route everything you want the performer to hear while recording to the "Prelay" bus (backing tracks, mix elements, etc.)

-
Create a stereo aux "Prelay" track
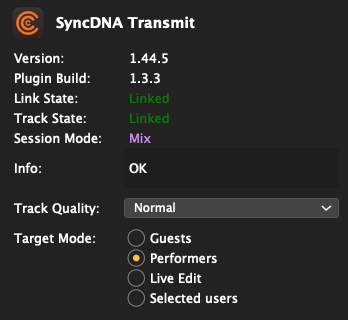
- Add a "SyncDNA-Transmit" plugin and select "Performers" as Target Mode
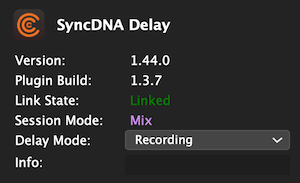
- Add a "SyncDNA-Delay" plugin and select "Recording" as Delay Mode
- Set the "Prelay" bus as input
- Set the "Mix" bus as output

-
Create a stereo aux "Mix" track
- Add a "SyncDNA-Transmit" plugin and select the "Guests" as Target Mode

- Add a "SyncDNA-Delay" plugin and select "Screening" as Delay Mode
- Set the "Mix" bus as input

Recording
- Record arm the performer track
- Start recording in the transport
- Stop the transport when done
You will hear the performer's audio immediately but no waveform data will be visible yet.
-
Commit the performer track
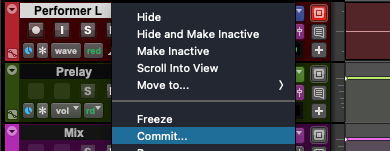
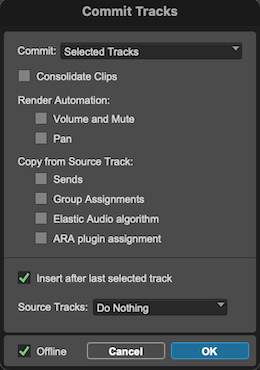
-
Pro Tools will receive the audio from SyncDNA and add it to a new track
-
If you want the performer to hear the recorded audio during the next take, you must change the output of the commited track to the "Prelay" bus

-
Mute the performer input track for review/mixing to prevent playback overlap with the committed track
-
Unmute the performer input track and repeat those steps for another take
Track Record: Remote ADR with Non-Lethal
The audio recording portion of this workflow is as described in the Track Record: Remote Recording with Pro Tools document. This document will focus on the differences, namely:
- Setting up live video input in our SyncDNA session, fed by the Pro Tools video engine through Blackmagic hardware
- Using Non-Lethal's Cue Pro application to cue our voice artist with cue beeps and visual wipes
Live Video Input
In this workflow we'll use Blackmagic hardware to capture live video. The Blackmagic Decklink Installation page describes the supported Blackmagic devices, and how to install their drivers.
To capture live video so it can be viewed by voice artists and other guests in the SyncDNA session, configure the Pro Tools Video Engine to output to a Blackmagic Monitor 3G or similar output device. Connect the SDI output from the monitor device to the SDI input on a Blackmagic Recorder 3G or similar capture device.
Configure a Video Input device in the SyncDNA application as described in App Settings: Video.
Create and launch your SyncDNA session. To enable Live Video input, select the checkbox when creating the session as described in Basic Usage, or enable it from within a session using the Session Settings.
Pro Tools Session Setup
As described in Track Record: Remote Recording with Pro Tools, the voice artist will need to set up their audio interface for capture following the same session setup procedures outlined in that document.
Ensure you have Non-Lethal Cue Pro downloaded and installed from https://non-lethal-applications.com/cue-pro. After installation, restart Pro Tools so it can detect the Cue Pro Connect plugin.
In Pro Tools, add the Cue Pro Connect plugin to a track. Place it below the SyncDNA main plugin. Ensure the track output is routed to the bus that feeds the voice artist's SyncDNA Transmit plugin.
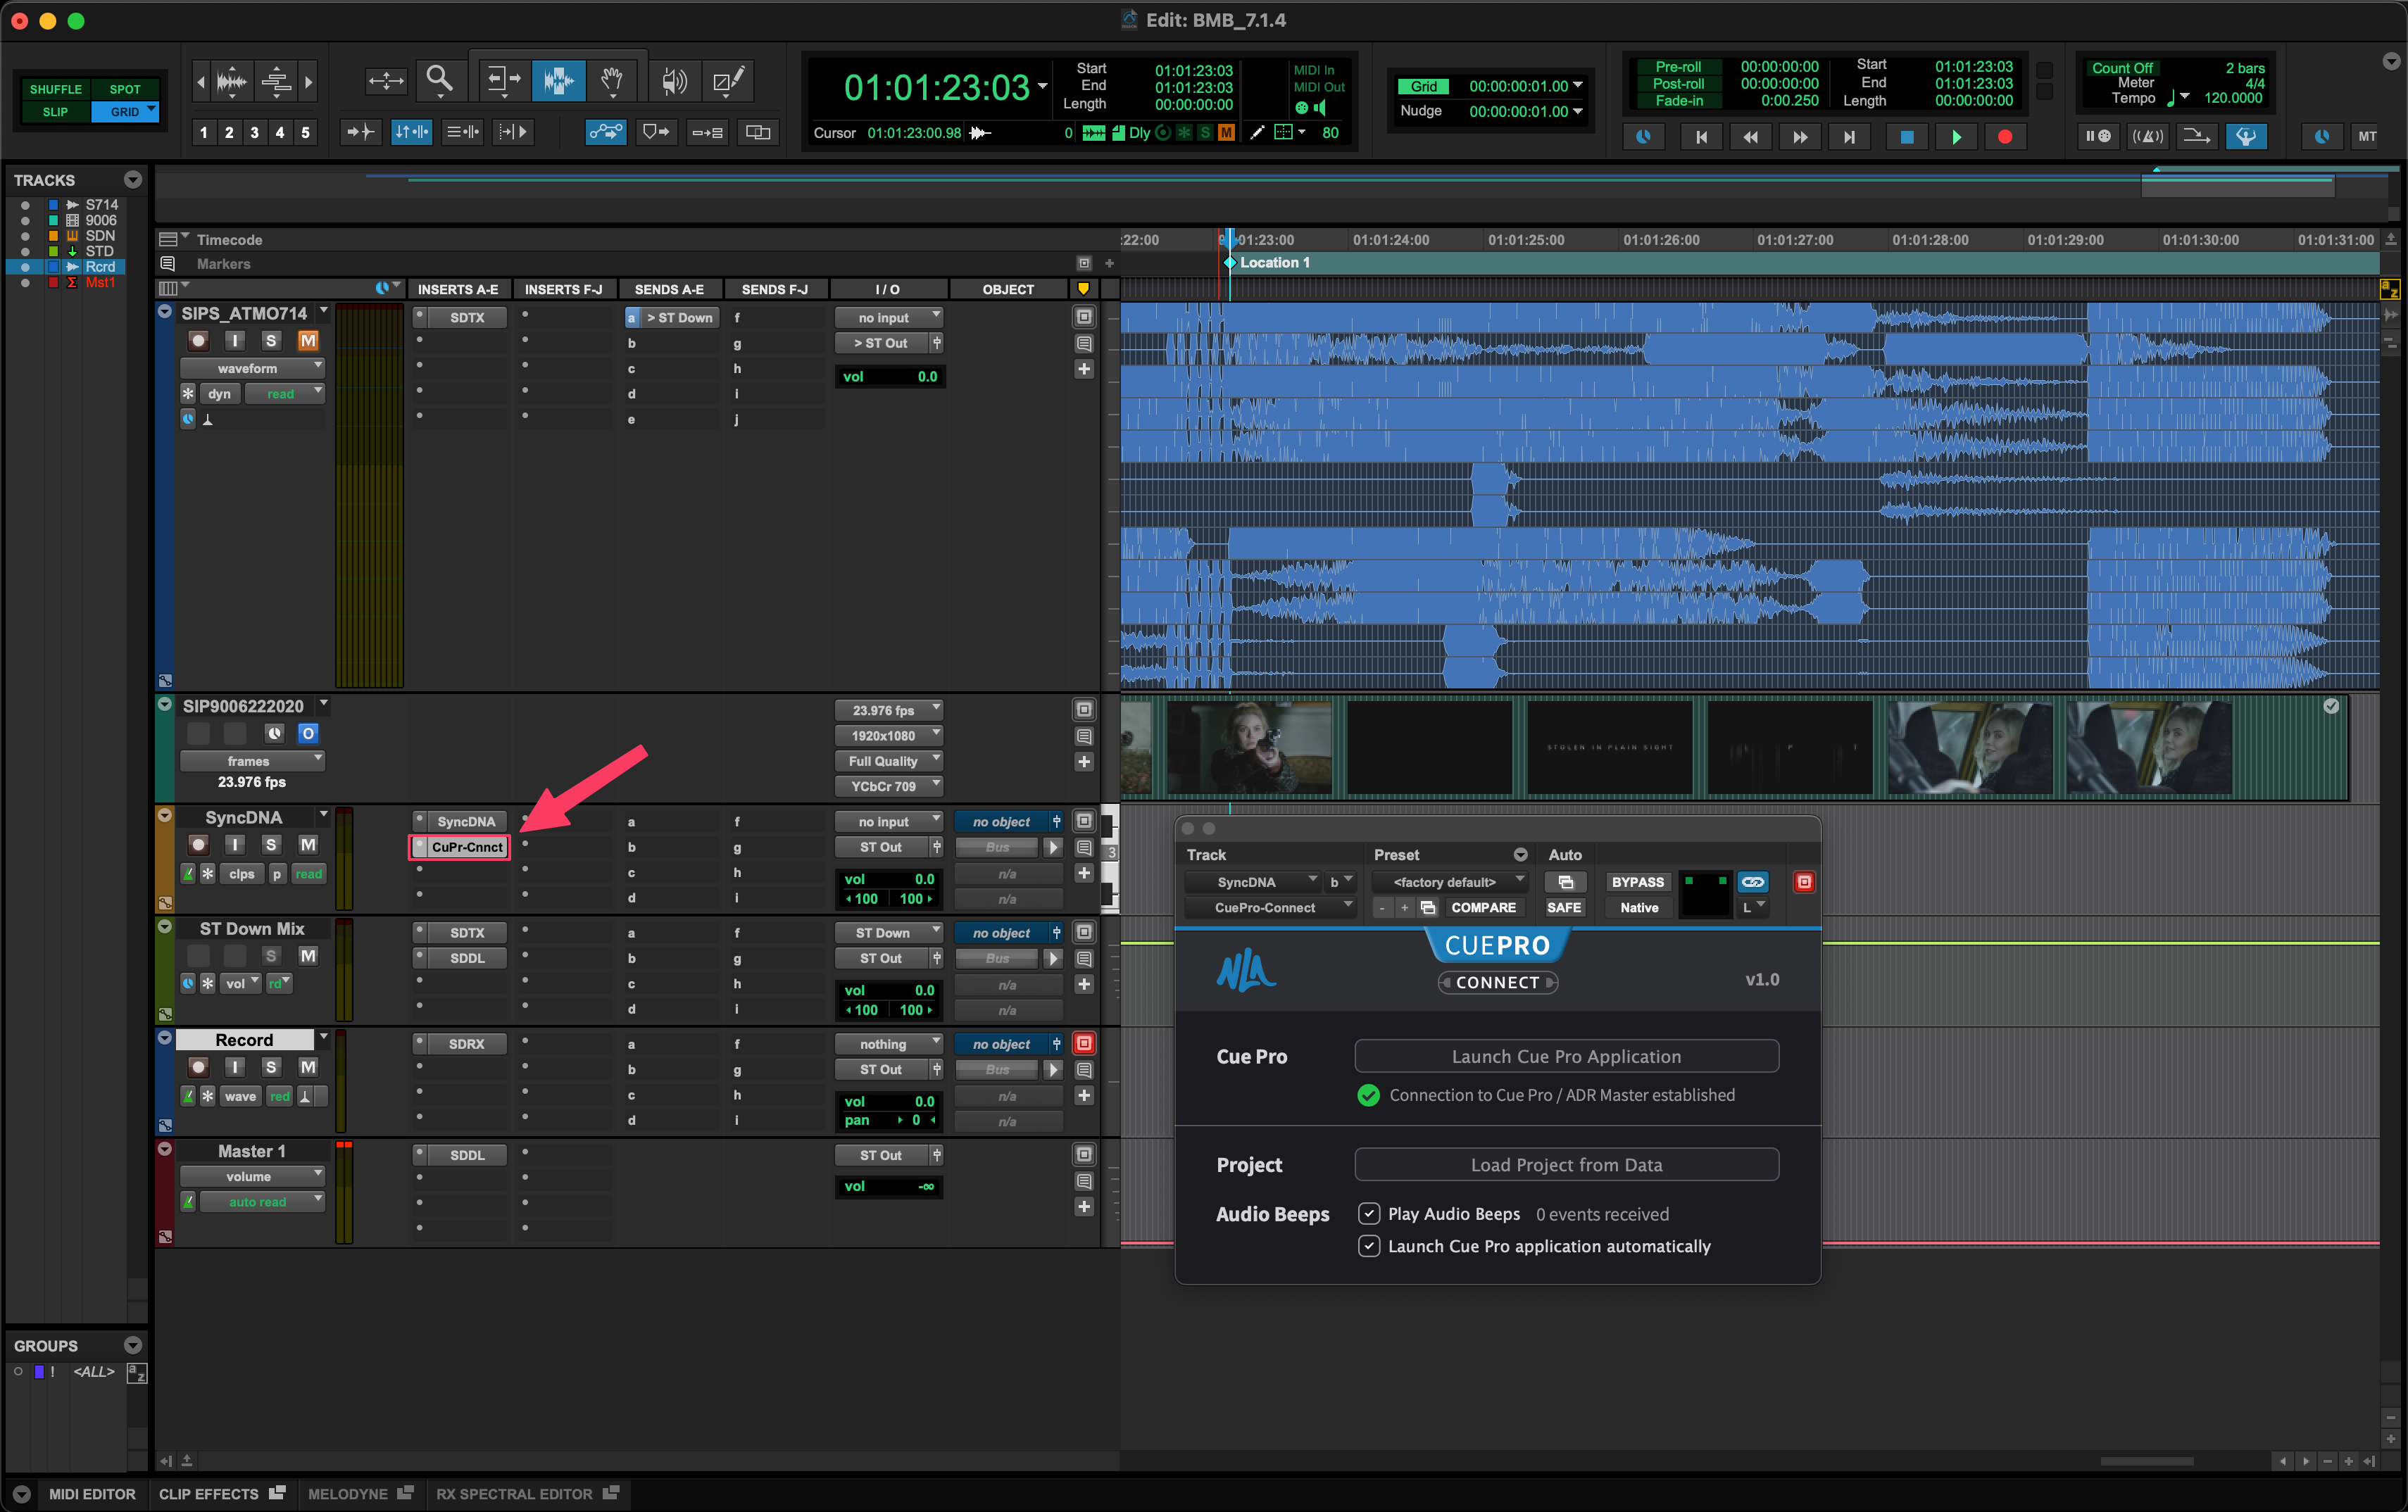
Launch the Cue Pro application and drop a cue where you plan to record. Notice that Cue Pro's timeline follows Pro Tools, and vice versa. Use this synchronization to navigate to the desired location and create a cue.
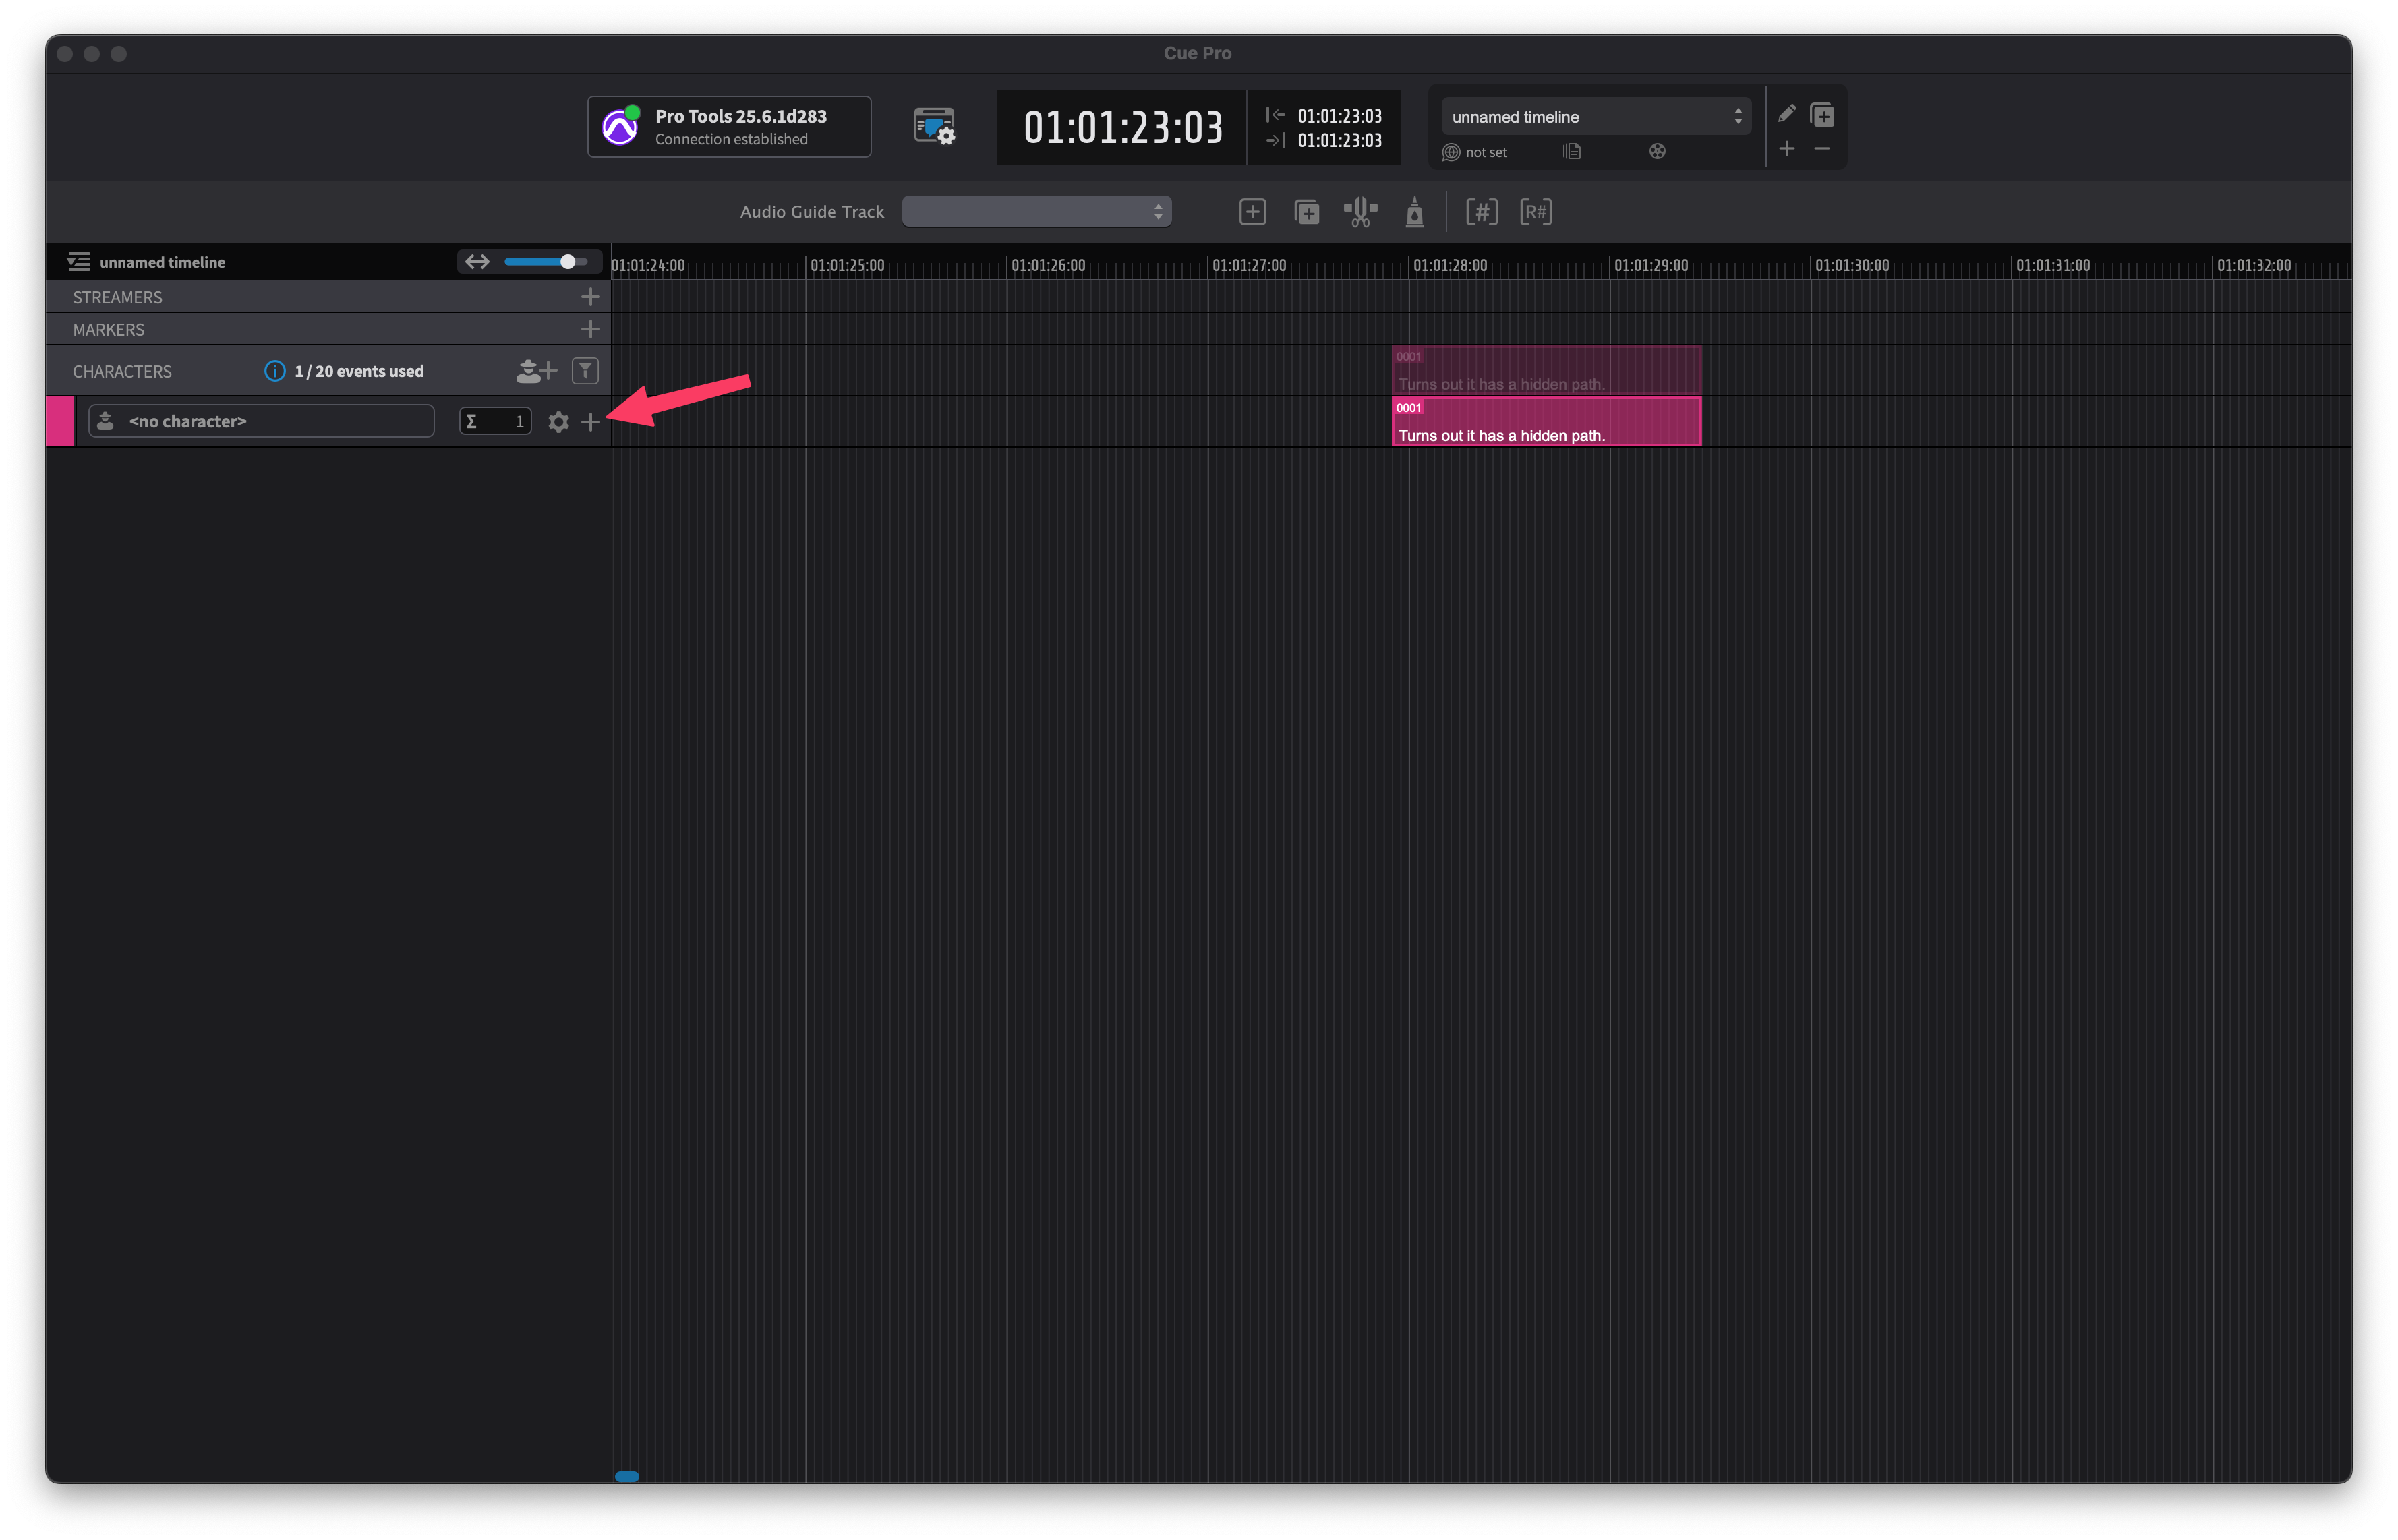
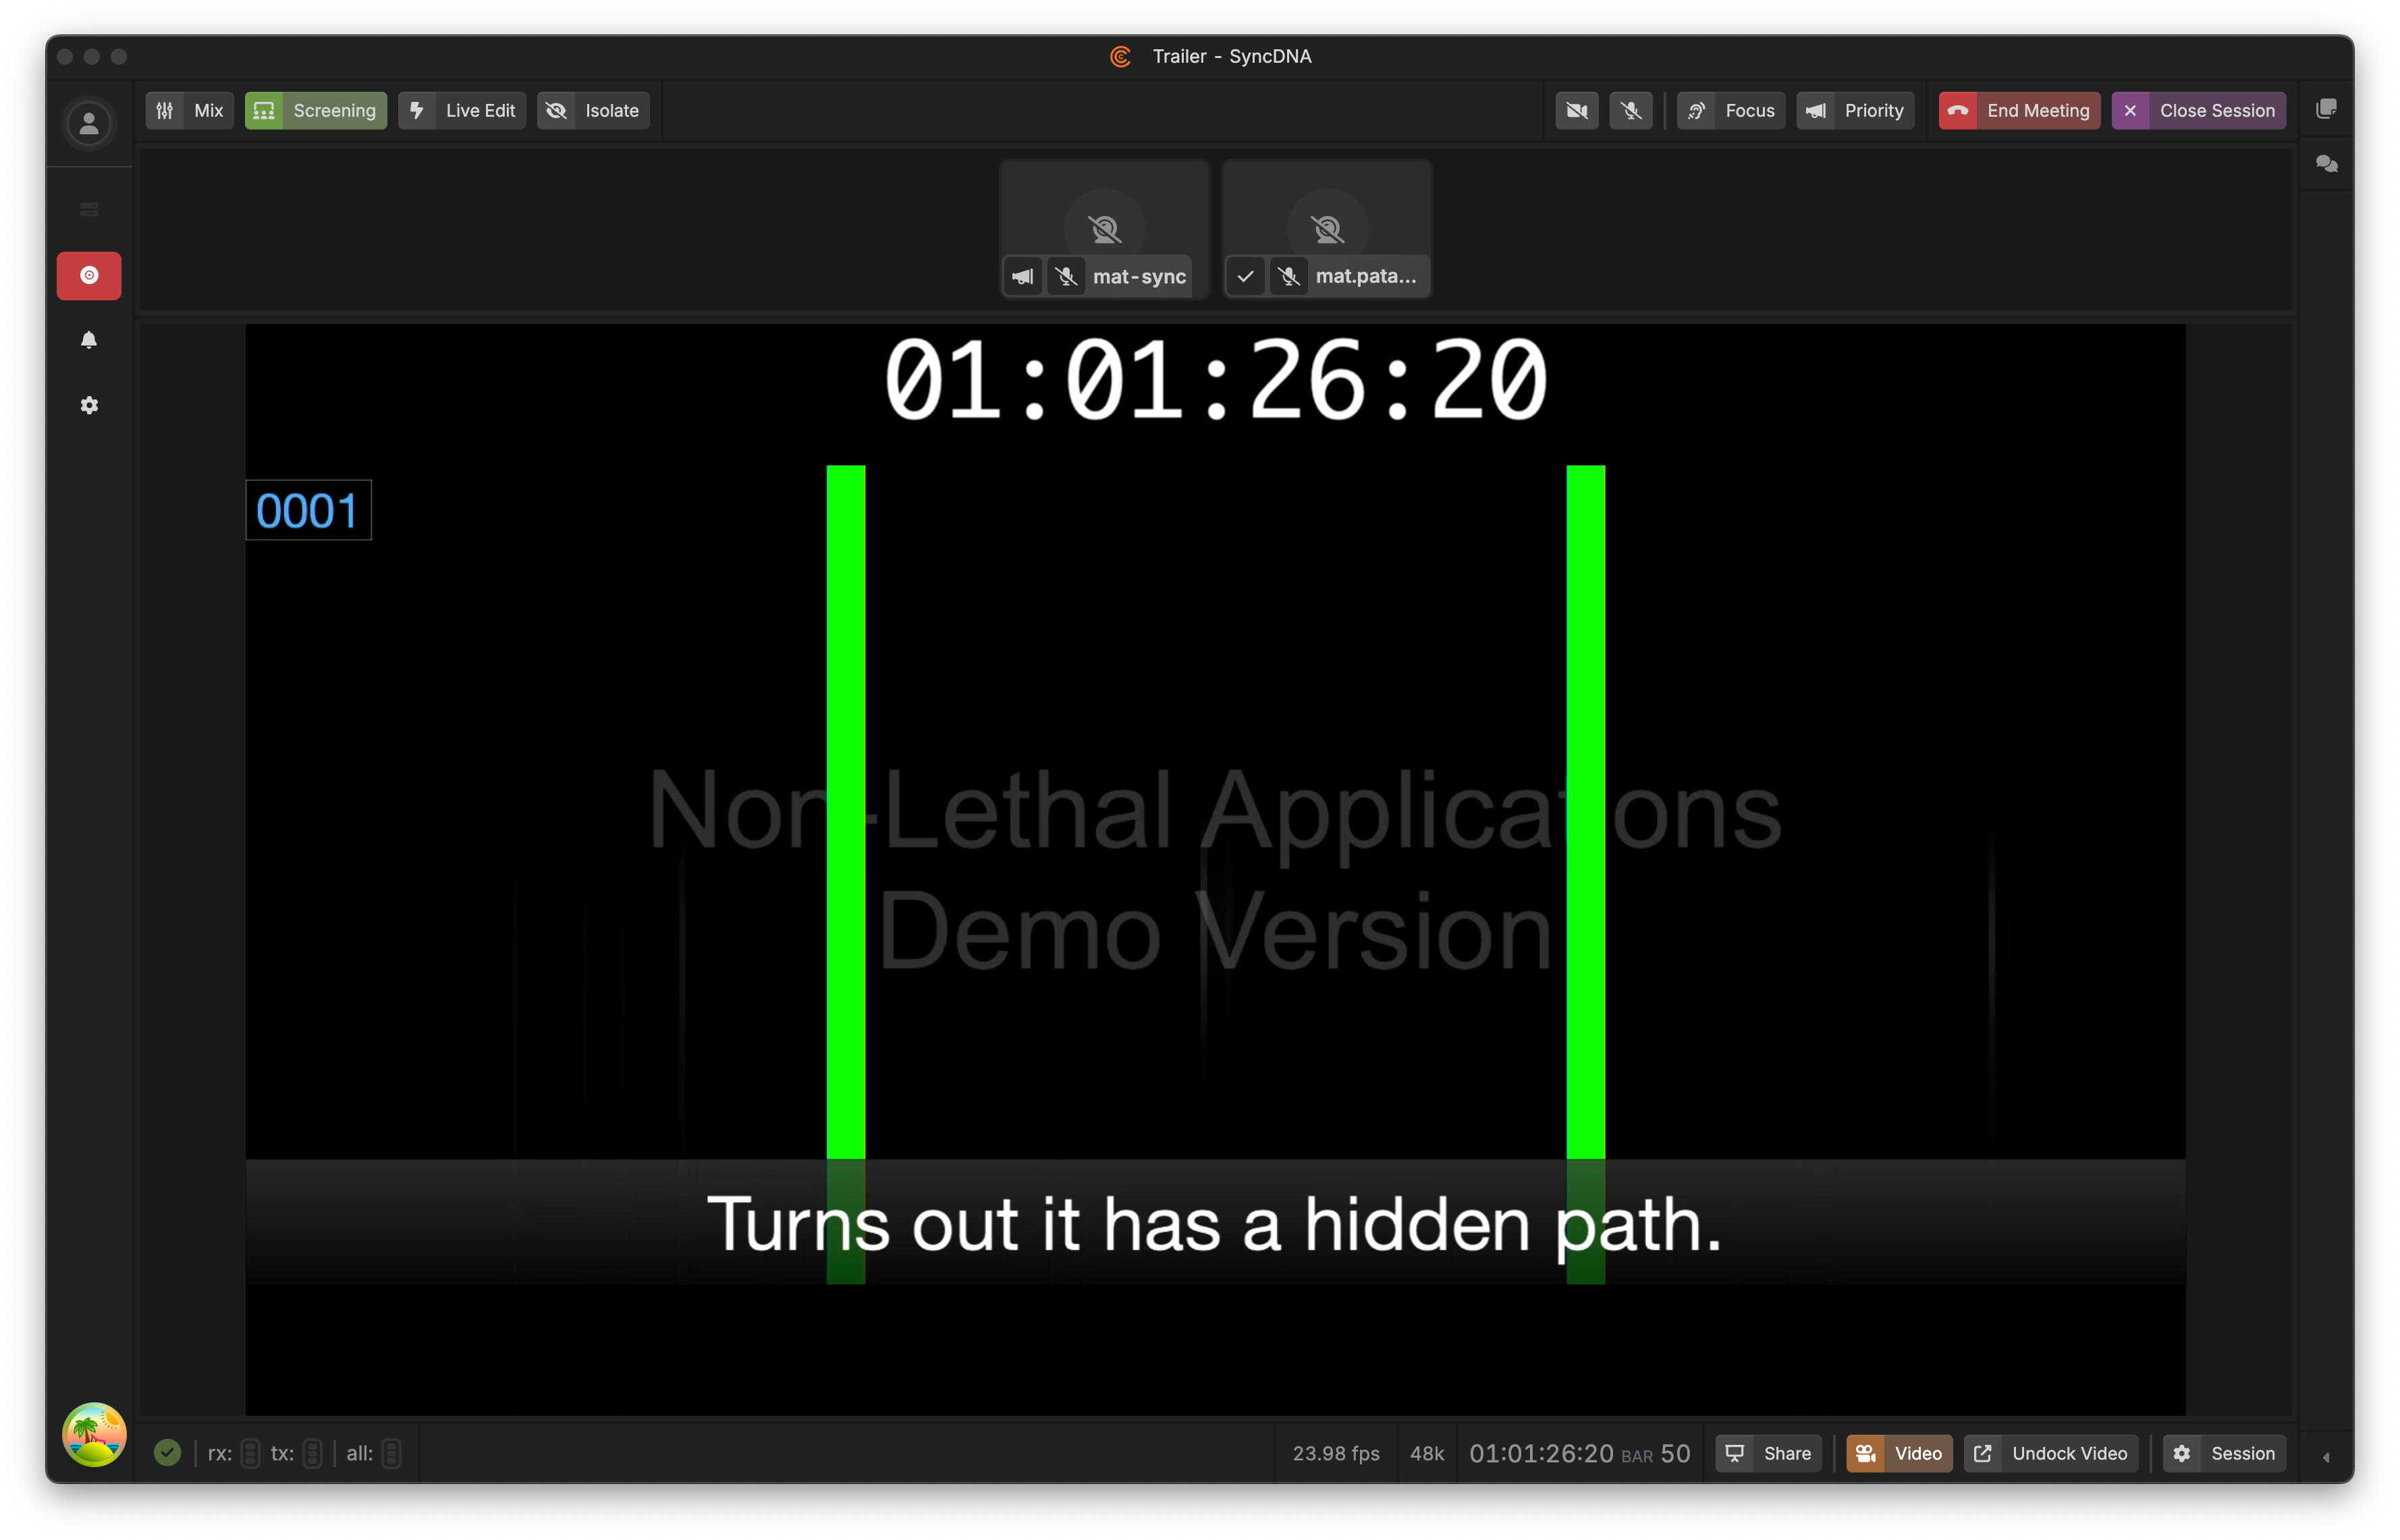
Notice that Cue Pro's video overlays, including timecode, cue text, and cue wipe are captured through SyncDNA Live Video Input and transmitted to the voice artist.
You can now continue the workflow by performing audio capture via Track Record as described in Track Record: Remote Recording with Pro Tools.
Bug Reporting
Found a bug? Let us know so we can fix it! 🐛
📝 How to Report a Bug
In-App Reporting (Recommended)
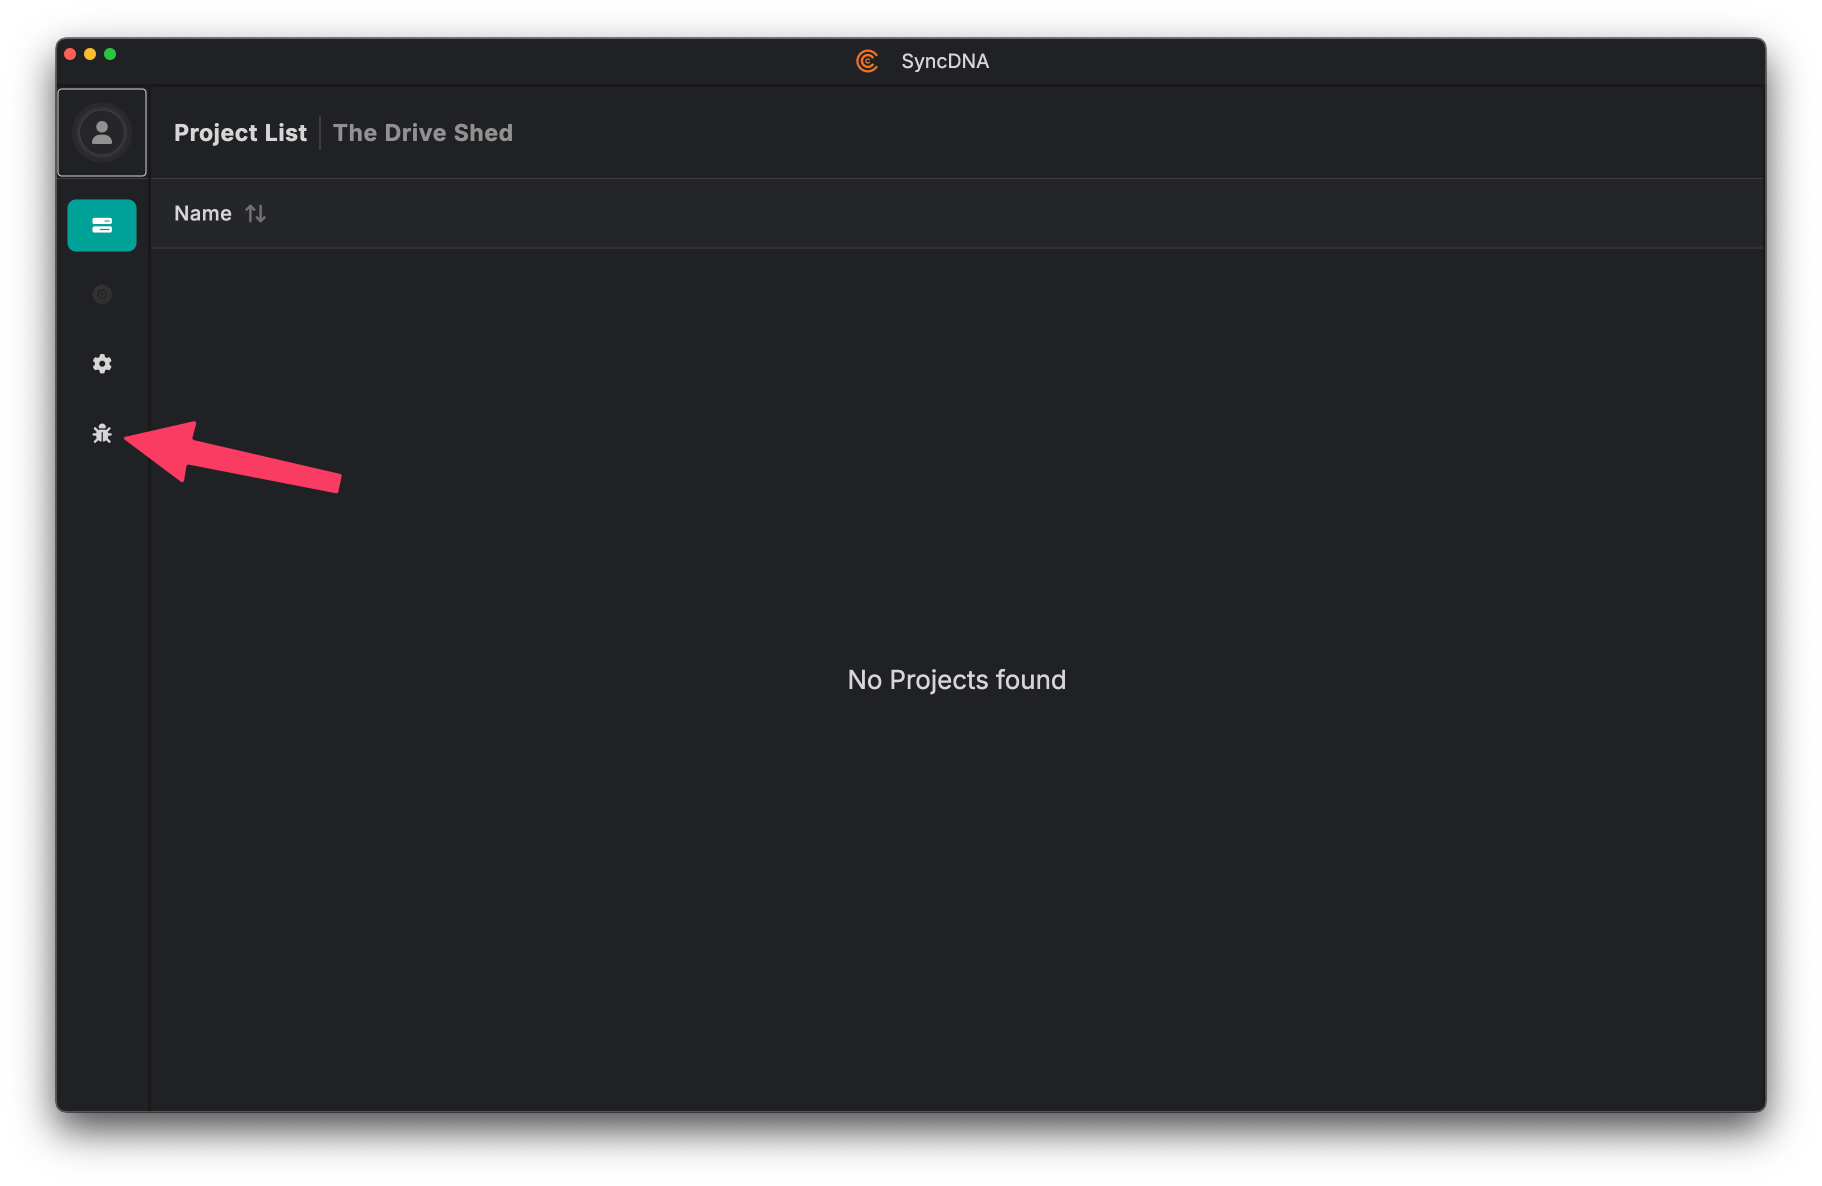
- Click the bug icon in the left sidebar
- Fill out the feedback form:
- Name (required)
- Email (optional but helpful for follow-up)
- Description (required) - Tell us what happened and what you expected
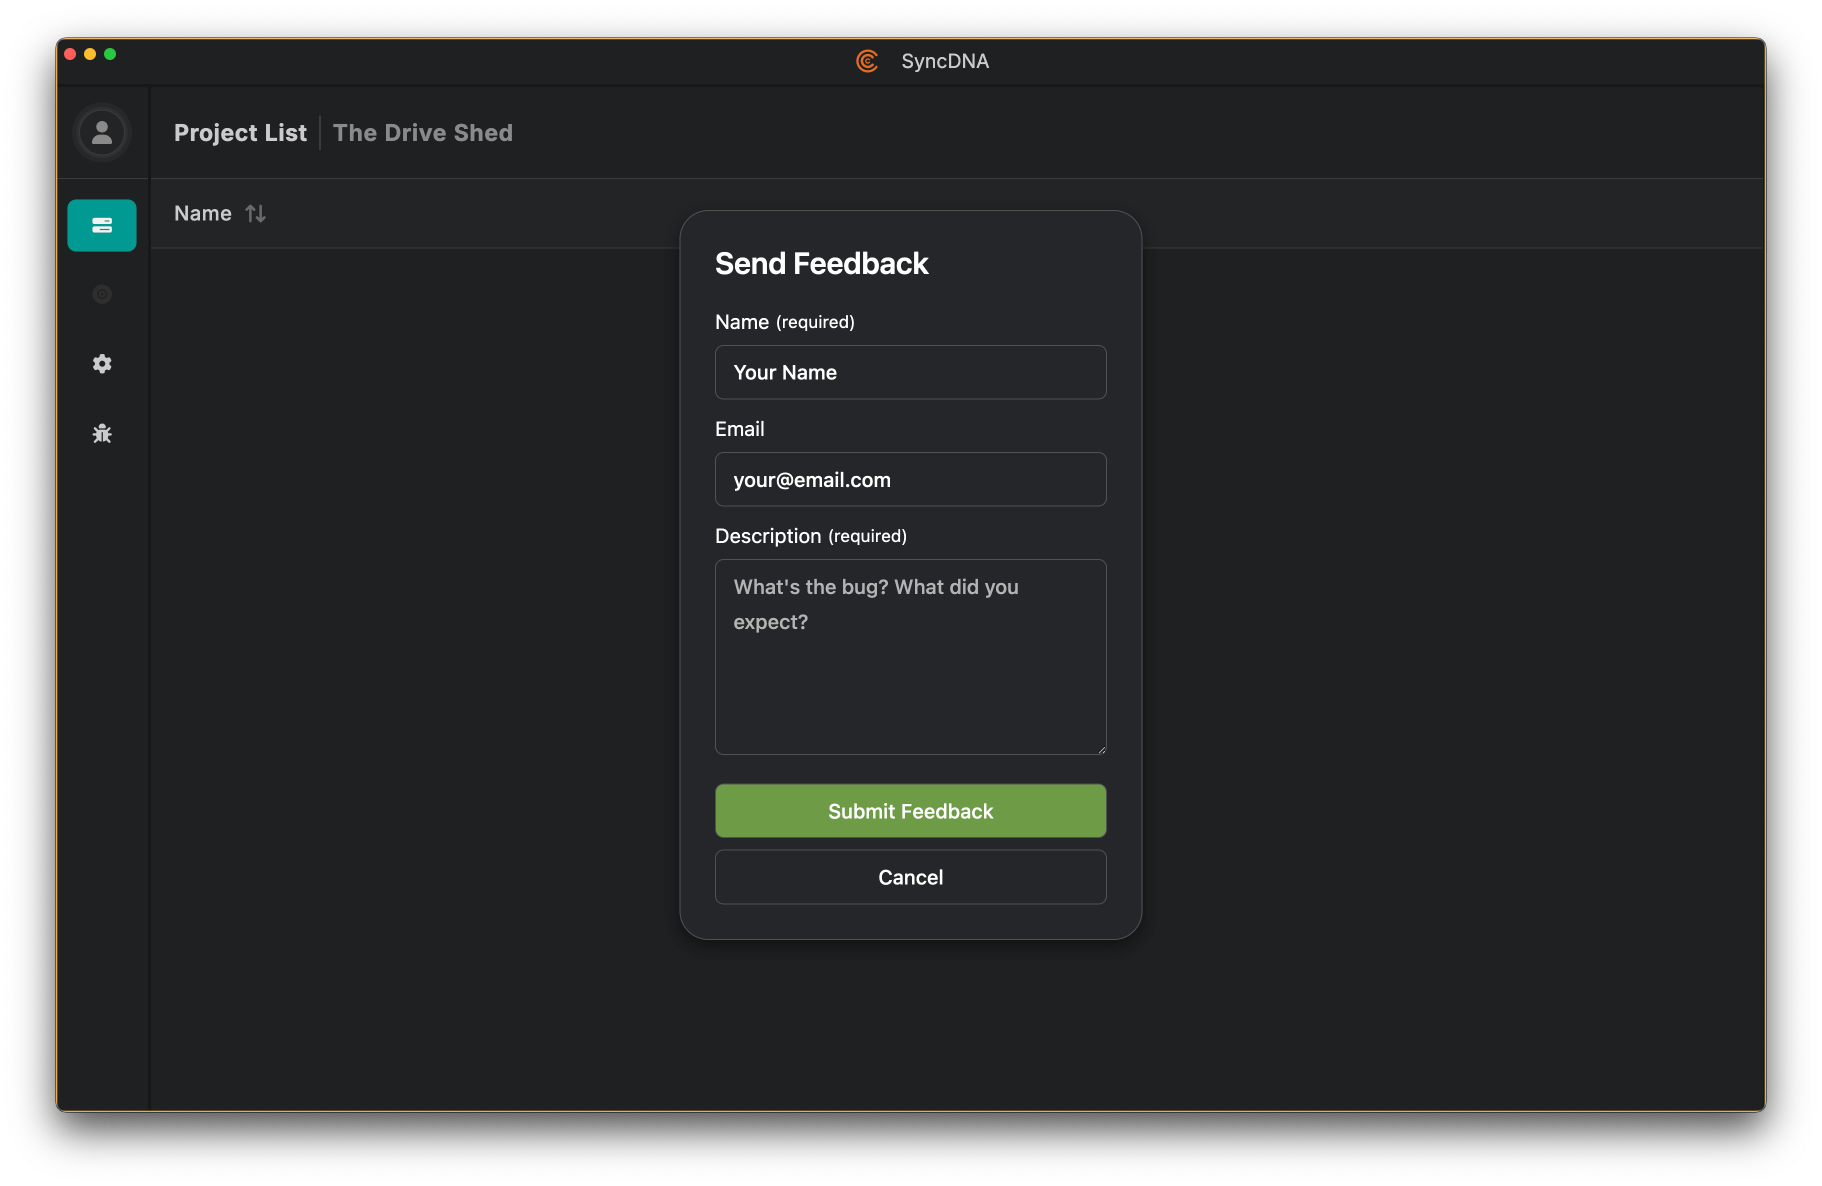
- Click Submit Feedback
💡 What to Include
Write a clear, descriptive summary of the issue:
✅ Good: "Audio drops out briefly after 30 minutes in session"
❌ Bad: "Audio problem"
For the best results, please include:
- What you were doing when the bug occurred
- What you expected to happen
- What actually happened
- Any error messages you saw
📎 Note: When you submit through the app, log files from your current session are automatically included to help us diagnose the issue.
🔍 Enabling Tracing for Better Diagnostics
If you're experiencing a reproducible issue, enabling tracing can help us gather more detailed information:
Step 1: Click the settings icon (⚙️) in the left sidebar

Step 2: Go to the Advanced tab and check Enable Tracing
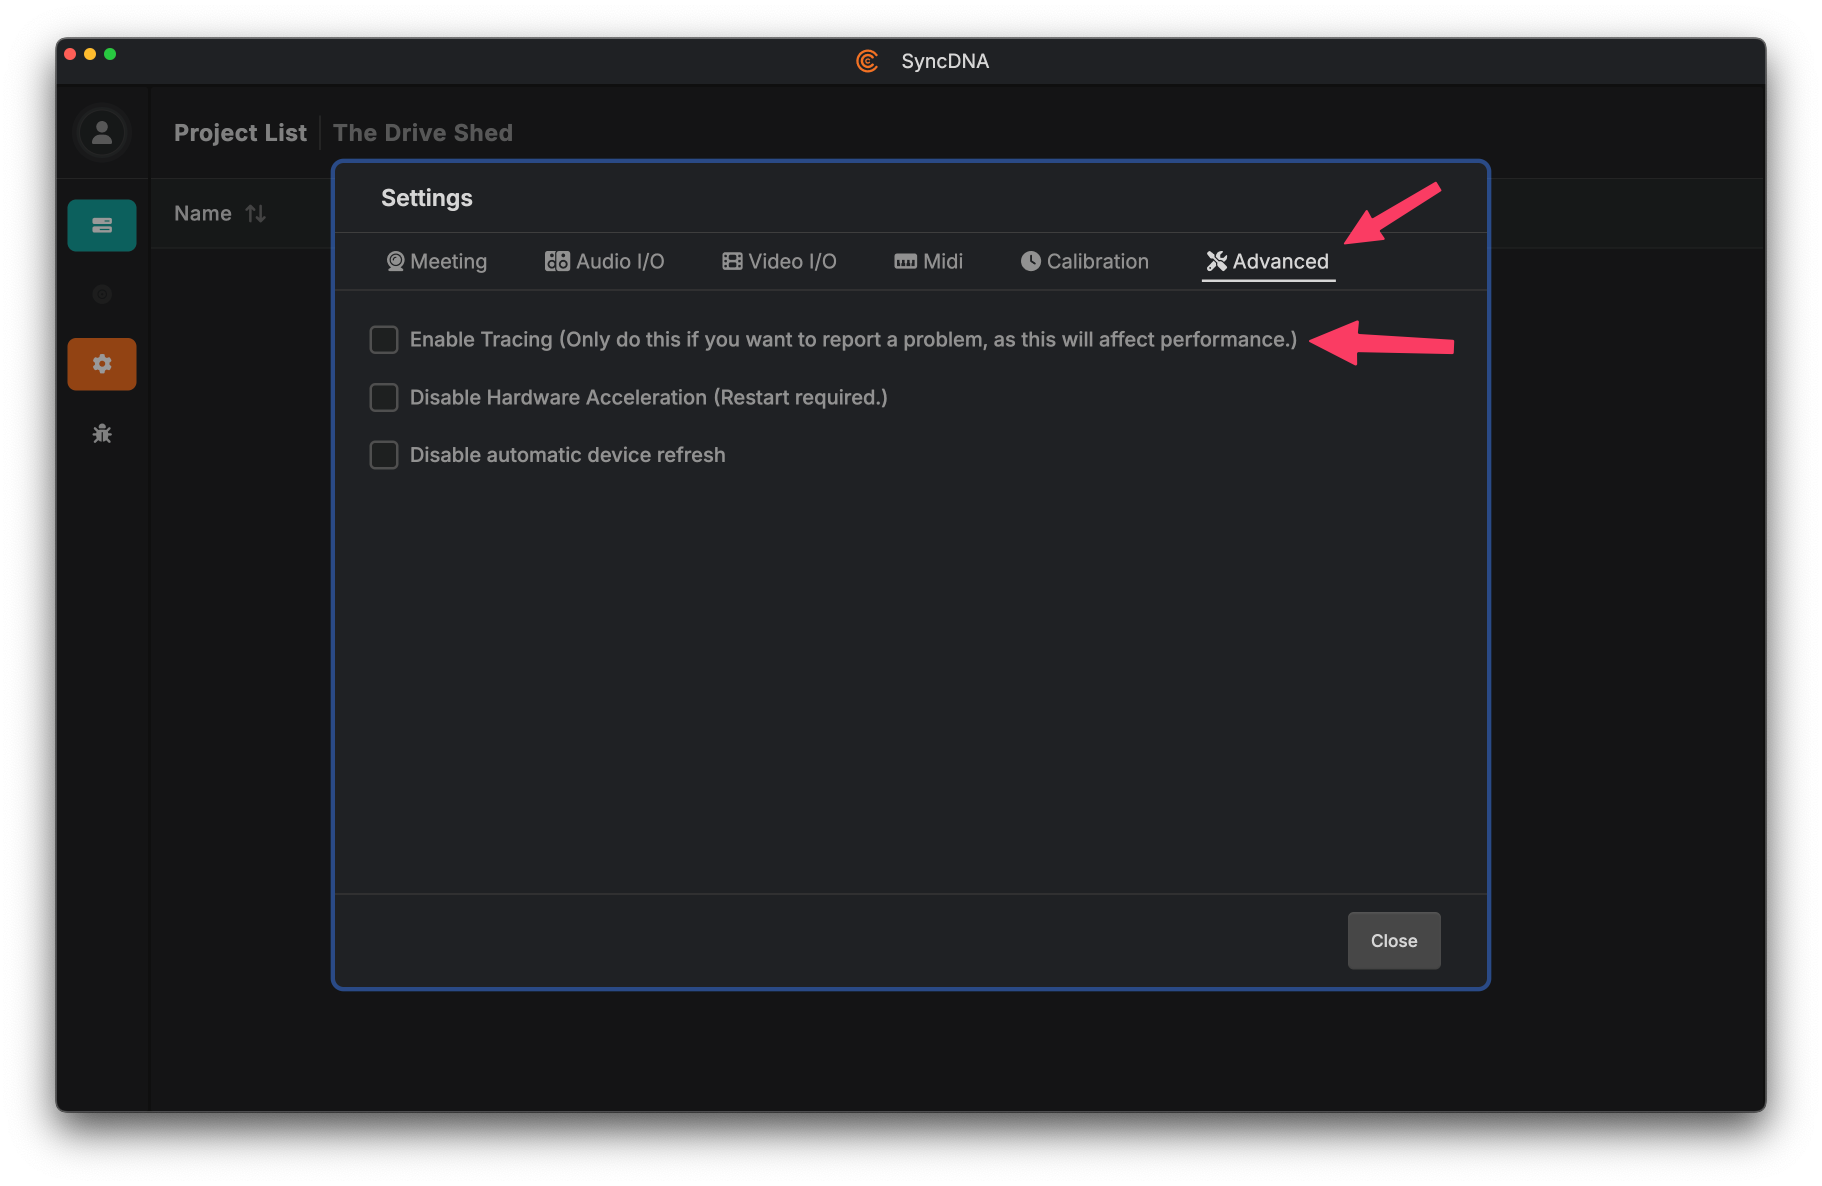
⚠️ Important: Only enable tracing when needed to report a problem, as it will affect performance. Remember to disable it after submitting your bug report.
Alternative Methods
You can also email bug reports to: support@syncdna.com
✅ What Happens Next?
- You'll receive an acknowledgment of your report
- Our team will investigate and try to reproduce the issue
- We'll include fixes in future updates
Thank you for helping improve SyncDNA! We truly appreciate it! 💙